Why Proper Gutter Downpipe Installation Protects Your Home
Gutter downpipe installation is the process of attaching vertical pipes (also known as downspouts) to your gutters so rainwater drains safely away from your home’s foundation. Here’s a quick overview of how it’s done:
- Plan your layout – place one downpipe every 20-50 feet of gutter run
- Cut a hole in the gutter at the lowest point and attach a drop outlet
- Connect elbows to offset the pipe from the wall (the “swan neck”)
- Run the vertical pipe down the wall and secure with brackets every 5-6 feet
- Terminate at ground level – direct water at least 5 feet from your foundation
- Test the system with a garden hose before calling it done
Without a working downpipe system, even a light rainfall can spell trouble. Water spilling over or pooling at your foundation can cause erosion, basement leaks, wood rot, and cracked concrete – repairs that can run anywhere from $2,000 to $15,000 according to industry estimates.
Wisconsin’s climate makes this especially real. Heavy spring rains, summer storms, and freeze-thaw cycles put serious pressure on any gutter system. A poorly installed downpipe isn’t just an eyesore – it’s an invitation to expensive structural damage.
The good news? With the right tools, materials, and a clear plan, gutter downpipe installation is a manageable DIY project – typically 1-2 hours per downpipe for a beginner.
I’m Matt Smith, owner of Smith Roofing & Exteriors, and I’ve spent years helping Wisconsin homeowners get their gutter downpipe installation right the first time. In this guide, I’ll walk you through everything I’ve learned – from sizing and spacing to watertight connections and ground termination.

Glossary for gutter downpipe installation:
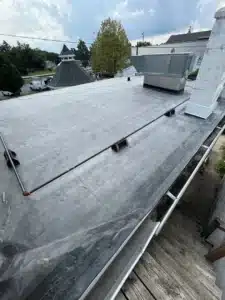
Essential Tools and Materials for Gutter Downpipe Installation
Before you climb that ladder, you need the right gear. In our experience working across Southeastern WI, having the correct tools makes the difference between a leaky mess and a professional-grade finish.
The Tool Checklist:
- Hacksaw or Miter Saw: To cut the downpipe sections to length.
- Hole Saw (usually 2-3 inches): For cutting the outlet hole in the gutter trough.
- Rivet Gun and Pop Rivets: These provide a more permanent, smoother connection than screws alone.
- Cordless Drill: For pilot holes and driving fasteners.
- Crimper Tool: To shrink the end of a pipe so it fits into the next section.
- Tape Measure and Level: Essential for calculating slope and vertical alignment.
- Silicone Sealant: Specifically high-quality gutter sealant to ensure watertight joints.
Choosing Your Materials: Aluminum vs. Vinyl Most homeowners in Fort Atkinson and Lake Mills choose between aluminum and vinyl. Aluminum is our top recommendation for Wisconsin weather because it handles temperature extremes without becoming brittle. Vinyl is budget-friendly and won’t rust, but it can crack during our harsh winters.

| Feature | Aluminum Downpipes | Vinyl Downpipes |
|---|---|---|
| Durability | High (20-30 years) | Moderate (10-15 years) |
| Cost | $2.75 – $5.00 per ft | $1.50 – $3.00 per ft |
| Weather Resistance | Excellent in cold/heat | Can become brittle in deep freeze |
| Maintenance | Low (needs paint check) | Low (no painting needed) |
Step 1: Preparing for Gutter Downpipe Installation
Preparation is where most DIY projects succeed or fail. Start by inspecting your fascia boards. If you find any soft spots or rot, you must repair them before proceeding. Installing heavy gutters and downpipes on rotten wood is a recipe for a mid-storm collapse.
Next, plan your layout. You want your downpipes located at the lowest points of your gutter run. Gutters should slope approximately 1/2 inch for every 10 feet of run toward the downspout. If you have a run longer than 40 feet, it is best practice to pitch the gutter down from the middle to a downpipe at each end.
Don’t forget the Everything You Need to Know About Drip Edge and Gutter Installation to ensure water is actually making it into your gutters and not behind them. Finally, always buy about 10% more material than you measured to account for cutting errors.
Selecting the Right Downpipe Size
Size matters when it comes to volume. A standard residential downpipe is 2×3 inches, but for larger roofs or homes in high-rainfall areas like Jefferson County, upgrading to 3×4 inches is a smart move.
The “Rule of Thumb”: Allow 1 square inch of downpipe cross-section for every 100 square feet of roof area. If you have a 1,000-square-foot roof section draining into one pipe, a standard 2×3 inch pipe (6 sq inches) is usually sufficient, but a 3×4 inch pipe (12 sq inches) provides a safety margin against clogs and torrential downpours.
Step-by-Step Guide to Professional Results
Now, let’s get into the nitty-gritty of the gutter downpipe installation.
Marking and Cutting the Outlet
Locate the lowest point of your gutter. Trace the shape of your drop outlet onto the bottom of the gutter. Using your hole saw or a pair of heavy-duty tin snips, cut the hole. Pro Tip: Cut about 1/16 inch outside your line to ensure the outlet fits easily without forcing it, which can deform the gutter.
Attaching the Drop Outlet
Apply a generous bead of silicone sealant around the flange of the drop outlet. Insert it into the hole and secure it with pop rivets or short stainless steel screws. Seal the heads of the fasteners inside the gutter to prevent leaks.
The Golden Rule of Crimping
When connecting sections, the crimped end must always point downward. This ensures that water flows inside the next pipe section rather than leaking out of the joint. If you have to cut a pipe and lose the factory crimp, use your crimping tool to create a new one.
Advanced Techniques in Gutter Downpipe Installation
Navigating the “Swan Neck” Most homes have an eave overhang, meaning the gutter sits away from the wall. You’ll need to create a “swan neck” or offset. This involves using two elbows and a short piece of downpipe to bring the run from the gutter back to the house wall.
The 5mm Expansion Gap Materials expand and contract. When fitting downpipe sections into each other, push them together fully, then retract the pipe about 5mm (approx. 1/4 inch) before securing it to the wall bracket. This small gap prevents the system from buckling or pulling apart during Wisconsin’s extreme temperature shifts.
Connecting to Ground Systems and Catchment
How you finish the job at the bottom is just as important as the top. You have several options:
- Splash Blocks: The simplest method. These concrete or plastic trays sit under the elbow and spread water away.
- Underground PVC: For a cleaner look, connect your downpipe to a solid PVC pipe (Schedule 40 is best) that carries water to a “daylight” exit or a pop-up emitter in the yard.
- Rain Barrels: An eco-friendly choice for gardeners in Elkhorn or Burlington. Use a diverter to collect water for your plants. Check out our guide on Elkhorn Gutters Installation for more localized tips on drainage integration.
Strategic Spacing and Sizing for Maximum Efficiency
Efficiency is all about placement. If your downpipes are too far apart, your gutters will overflow during heavy storms, regardless of how clean they are.
Spacing Rules:
- Install a downpipe every 20 to 50 feet along the gutter run.
- For steep roofs, space them closer (every 20-30 feet) because water moves faster.
- Ensure the gutter has a consistent slope of at least 1/16 inch per foot toward the outlet.
Sizing Your System for Heavy Rainfall
In areas like Walworth or Delavan, we often see “micro-burst” storms. If your home has complex roof valleys that dump a lot of water into one spot, consider “oversizing” that specific downpipe. A 3-inch round or 3×4 inch rectangular pipe can handle significantly more volume and is less likely to clog with small debris.
Terminating at Ground Level
The “5-Foot Rule” is non-negotiable. Downpipes should terminate at least 5 feet away from the foundation if the ground slopes away from the house. If you are connecting to an underground catchment system, that system should discharge at least 10 feet away. This prevents the water you just collected from seeping right back into your basement or crawlspace.
Troubleshooting Common Issues and Safety Precautions
Even with a perfect gutter downpipe installation, things can go wrong if you ignore the details.
Common Pitfalls:
- Galvanic Corrosion: Never mix metals. If you have aluminum gutters, use aluminum downpipes and stainless steel fasteners. Using steel screws in aluminum can cause a chemical reaction that leads to rapid rusting.
- Improper Bracket Spacing: Downpipe clips or brackets should be spaced approximately 5 to 6 feet apart. In high-wind areas like Edgerton, we recommend a bracket every 4 feet for extra stability.
- Skipping the Sealant: Every joint where the outlet meets the gutter must be sealed. Don’t rely on a “tight fit” to keep water out.
Preventing Leaks and Structural Damage
Always apply sealant to the inside of the gutter. If you apply it only to the outside, water pressure will eventually push it away. Also, ensure your rivets are placed on the sides of the downpipe, not the front or back, to keep the visible face looking clean and professional. For more on when it’s time to stop repairing and start replacing, see Understanding When Gutter Replacement Becomes Necessary.
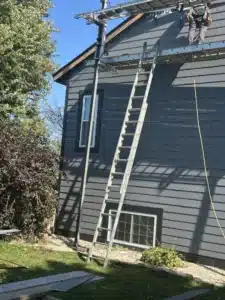
Safety Protocols for Working at Heights
Safety is our number one priority at Smith Roofing & Exteriors. If you’re doing this yourself:
- Ladder Stability: Use a ladder standoff to avoid crushing your gutters. Always maintain three points of contact.
- PPE: Wear gloves (cut-resistant are best) as the edges of cut aluminum are razor-sharp. Wear safety glasses when drilling or using a hole saw.
- Weather Check: Never work on a ladder during high winds or when rain is imminent.
Frequently Asked Questions about Gutter Downpipe Installation
How far should a downpipe extend from the foundation?
At a minimum, 5 feet. If your yard has poor drainage or clay-heavy soil (common in some parts of Jefferson County), 10 feet is much safer. Using a Burlington Gutters Installation specialist can help you determine the best drainage route for your specific landscape.
How many downpipes do I need for my roof size?
The general rule is one downpipe for every 30 to 40 linear feet of gutter. However, if your roof is very steep or you live in a high-rainfall area, you should plan for one every 20 feet to prevent overflow.
Can I connect my downpipe directly to an underground drain?
Yes, but with a caveat. Do not connect it directly to your foundation’s “footing drains” (the pipes that protect your basement). This can overload the system and cause a flooded basement. Instead, connect to a dedicated storm-water line that leads to a dry well, soakaway, or the street (where local codes allow).
Conclusion
Mastering gutter downpipe installation is one of the best things you can do to protect the structural integrity of your home. By following these steps—calculating your roof area, ensuring a proper slope, and directing water far away from your foundation—you can save yourself thousands of dollars in future repairs.
However, we know that spending your weekend on a 20-foot ladder isn’t everyone’s idea of a good time. If you’re in Fort Atkinson, Lake Mills, Lake Geneva, or anywhere in Southeastern WI, we’re here to help. At Smith Roofing & Exteriors, our local team uses superior materials and proven techniques to ensure your home stays dry, no matter what the Wisconsin weather throws at it.
Whether you need a full system replacement or just a professional to check your work, don’t hesitate to reach out. Explore our Gutters Category for more professional tips, or give us a call for a transparent, no-obligation quote. Let’s make sure your DIY skills—and your home—stay high and dry!