Why Attic Fan Installation Can Save You Money This Summer
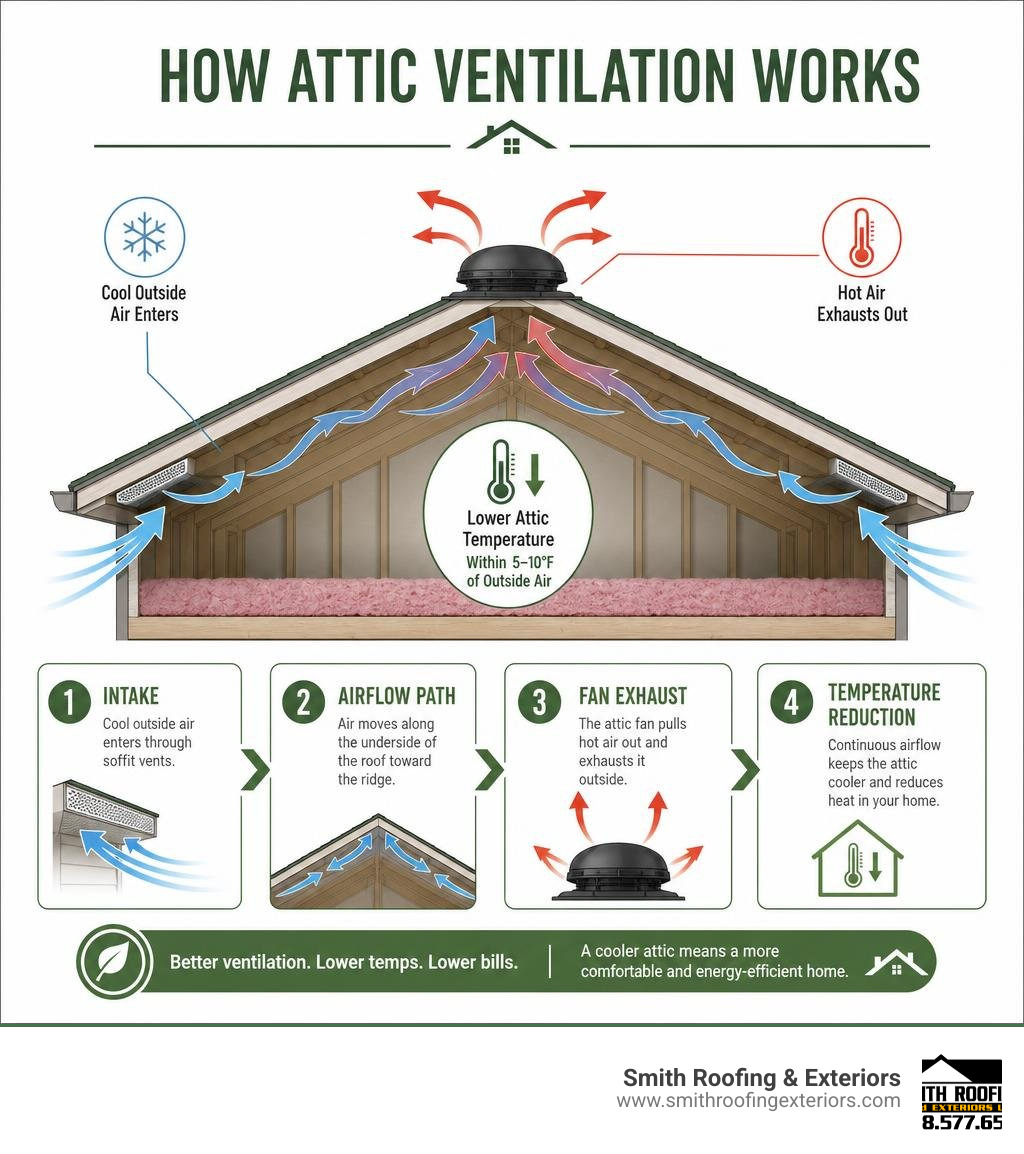
Attic fan installation is one of the most cost-effective home improvements you can make before summer hits. Without proper ventilation, attic temperatures can soar to 150–160°F — and all that heat radiates straight down into your living space, forcing your AC to work harder and driving up your energy bills.
Here’s a quick overview of how to install an attic fan:
- Choose your fan type — roof-mounted, gable-mounted, or solar-powered
- Size the fan — multiply your attic’s square footage by 0.7 to get the minimum CFM needed
- Gather tools and safety gear — reciprocating saw, safety harness, roofing cement, and a voltage tester
- Cut the opening — position it near the ridge, between rafters, away from existing vents
- Mount and seal the fan — slide flashing under shingles and caulk all edges
- Wire the fan — connect to a thermostat and shut off power at the breaker first
- Test the installation — verify airflow and check for leaks
A properly installed attic fan can bring attic temperatures to within 5–10°F of the outside air and potentially cut your cooling costs by up to 30%. In Wisconsin, where summer heat and humidity can be relentless, that’s real money back in your pocket.
I’m Matt Smith, owner of Smith Roofing & Exteriors, and I’ve worked on roofs across Southeast Wisconsin long enough to know that attic fan installation is one of the most overlooked ways to protect both your comfort and your roof. In this guide, I’ll walk you through everything you need to know — from picking the right fan to making a weather-tight seal that lasts.
Attic fan installation word roundup:
Understanding Attic Ventilation and Fan Types
When we talk about attic ventilation, we are talking about the respiratory system of your home. A house needs to breathe. If your attic is choked off, heat builds up like a heavy blanket over your ceiling. This heat transfer doesn’t just make your upstairs bedrooms feel like a sauna; it actively degrades your building materials.
Proper attic ventilation benefits your home in four major ways:
- Roof Longevity: Extreme heat can literally bake your asphalt shingles from the inside out, reducing their lifespan by 25% to 40%.
- Mold Prevention: In the winter, warm air from your living space rises into the cold attic, condenses on the underside of your roof deck, and creates a breeding ground for mold.
- AC Performance: By removing the reservoir of superheated air right above your ceiling, you reduce your air conditioner’s workload and extend its operating life.
- Ice Dam Prevention: Uniform attic temperatures prevent the freeze-thaw cycles that cause destructive ice dams along your eaves during cold Wisconsin winters.
To get the full picture of how ventilation keeps your home healthy, check out The Complete Guide to Roof Ventilation. If you are wondering how active fans compare to passive vents, we dive deep into those options in our review of To Vent or Not to Vent: Top Energy Efficient Roof Vents Reviewed.
Attic Fans vs. Whole-House Fans
A common point of confusion for homeowners is the difference between an attic fan (often called a power attic ventilator) and a whole-house fan. While they both deal with airflow, they have completely different jobs, installation processes, and power profiles.
An attic fan is designed solely to ventilate your attic space. It pulls cool air in through your soffit or intake vents and pushes hot, stale air out through the roof or gable. It has no direct connection to your living space and operates automatically via a thermostat.
A whole-house fan, on the other hand, is installed in the ceiling between your living space and your attic. It is designed to cool your entire home by drawing cool evening air through open windows, pulling it up through the house, and exhausting it out through your attic vents. Whole-house fans require massive CFM (Cubic Feet per Minute) capacities and significantly more attic exhaust area to prevent pressurizing the attic.
| Feature | Attic Fan | Whole-House Fan |
|---|---|---|
| Primary Goal | Cool and dry the attic space | Cool the living space |
| Air Source | Drawn from outside through intake vents | Drawn from living space through open windows |
| CFM Capacity | Typically 800 to 1,600 CFM | Typically 1,500 to 7,000 CFM |
| Power Consumption | Low (around 100–300 watts) | Moderate (about 33% of a 2.5-ton AC unit) |
| Noise Levels | Very quiet (isolated by attic insulation) | Can be loud (direct opening to living space) |
| Typical Cost | $75 – $400 (unit only) | $200 – $1,600 (unit only) |
Solar-Powered vs. Electric Attic Fan Installation
If you’ve decided on an attic fan, your next choice is how to power it. The two main contenders are traditional electric-powered fans and modern solar-powered fans.
Electric attic fans are hardwired into your home’s electrical system. They are incredibly reliable and provide consistent, high-volume airflow regardless of whether it is sunny, cloudy, or midnight. Most electric models include an adjustable thermostat and humidistat, meaning they only run when the attic reaches a specific temperature (usually set between 90°F and 95°F) or moisture level. The downside? They require electrical wiring, which can complicate a DIY installation, and they add $5 to $15 to your monthly electricity bill.
Solar attic fans utilize an integrated solar panel to power a DC motor. Because they generate their own power, they cost absolutely nothing to operate. In 2026, solar attic fans remain highly popular because they qualify for the 30% Residential Clean Energy Credit under IRS Section 25D, which can shave a chunk of change off your total project cost.
Furthermore, solar fans require zero electrical wiring, making them a dream for DIYers. The main drawbacks are their dependency on direct sunlight—their output can drop by 50% or more if shaded—and their generally lower CFM output compared to heavy-duty electric models.
For a detailed look at the financial and operational trade-offs of these systems, take a look at How to Install an Attic Fan 2026: Complete DIY Guide.
Sizing Your Fan and Preparing for Attic Fan Installation
Before you head to the home improvement store or order your materials online, you must calculate exactly how much ventilation your attic requires. Installing a fan that is too small won’t move enough air to cool the space, while installing a fan that is too powerful without adequate intake vents can create dangerous negative pressure.
If you have a finished attic or a unique structural layout, you’ll want to read Don’t Let Your Attic Suffocate: A Guide to Finished Attic Ventilation to ensure you don’t trap moisture in hidden knee walls or rafter bays.
Calculating the Correct CFM and Vent Area
Sizing an attic fan is straightforward. The industry standard formula is based on your attic’s total square footage:
Required CFM = Attic Square Footage × 0.7
For example, if your attic footprint is 1,500 square feet:
- 1,500 × 0.7 = 1,050 CFM
- You would need a fan rated for at least 1,050 CFM. If you have a dark roof or a steep roof pitch, it is wise to add 10% to 20% to this target to account for extra heat load.
However, a fan can only exhaust air if there is enough fresh air coming in to replace it. This is where intake ventilation (such as soffit or eave vents) comes into play. If you don’t have enough intake vents, the fan will struggle, run hot, and potentially pull conditioned air out of your home through light fixtures and ceiling cracks.
Follow these critical ventilation sizing rules:
- The 1:300 Rule: You need at least 1 square foot of net free area (NFA) of ventilation for every 300 square feet of attic floor space.
- Fan Intake Ratio: For every 300 CFM of fan capacity, you need at least 1 square foot of net free intake vent area.
- Balanced Airflow: Your intake ventilation area should always equal or exceed your exhaust ventilation area.
If your attic fan is rated for 1,200 CFM, you will need at least 4 square feet of net free intake area (1,200 / 300 = 4) distributed across your soffit or eave vents.
Essential Tools, Materials, and Safety Gear
Working on a roof and inside a hot attic presents real hazards. Having the right tools and safety gear ready will keep your project running smoothly and safely.

Essential Tools:
- Reciprocating saw or jigsaw (a jigsaw is often easier for cutting precise circular holes)
- Cordless drill with driver bits and a spade bit
- Utility knife with fresh blades
- Roofing hammer or pry bar (flat bar)
- Caulking gun
- Voltage tester (non-contact)
- Tape measure and pencil
- Chalk line or circle template
Required Materials:
- The attic fan unit (with thermostat/humidistat if electric)
- High-grade roofing-grade sealant (do not use standard interior/exterior silicone; it fails under intense UV and thermal cycling)
- 1-1/4 inch galvanized roofing nails or self-tapping roofing screws
- 14/2 NM electrical cable (for electric models) and wire connectors
- Junction box and cable clamps
Critical Safety Precautions:
- Fall Protection: If your roof pitch is 4/12 or greater, wear a properly anchored safety harness.
- Heat Safety: Attic temperatures climb rapidly. Work early in the morning, stay hydrated, and take breaks out of the attic every 20 minutes.
- Footing: Inside the attic, walk only on the structural ceiling joists. One misstep on the drywall ceiling below, and you will end up in your living room. Use a sturdy piece of plywood laid across the joists as a temporary work platform.
- PPE: Wear safety glasses, protective gloves, and a high-quality dust mask or respirator to protect yourself from fiberglass insulation fibers.
Cost Analysis: DIY vs. Professional Installation
Is attic fan installation a project you should tackle yourself, or should you call in the pros? Let’s look at the numbers.
If you choose the DIY route, your costs will consist almost entirely of materials. A quality electric or solar attic fan will run you anywhere from $100 to $400, and miscellaneous supplies (sealant, wiring, fasteners) will add another $50 to $100. Your total out-of-pocket cost will likely land between $150 and $500, along with about 4 to 6 hours of your time.
If you opt for professional installation, the price typically ranges from $400 to $1,500. This variation depends on several factors:
- Roof Complexity: Steep pitches, tile roofs, or metal roofs require specialized safety setups and sealing techniques, which increase labor costs.
- Electrical Access: If an electrician has to run a brand-new circuit from your main panel to the attic, it will cost more than tapping into an existing junction box.
- First-Time vs. Replacement: Installing a replacement fan is much faster than cutting a brand-new hole through your shingles and decking.
While DIY saves money upfront, professional installation brings peace of mind, structural warranties, and guaranteed leak protection. Regular professional check-ups can also prolong your roof’s lifespan. To understand how professional oversight saves you money in the long run, take a look at How Roof Maintenance Can Help Extend the Life of Your Roof and explore the 5 Benefits of Professional Roof Maintenance.
Step-by-Step Attic Fan Installation Guide
Now that you have your fan sized, your tools gathered, and your safety gear on, it’s time to start the installation. We will cover both roof-mounted and gable-mounted options.
Before cutting any holes, read the manufacturer’s manual thoroughly. If you are retrofitting an existing passive vent, you can save yourself some cutting, but most installs require a fresh penetration. For a basic overview of active ventilation setups, you can also consult the How to Install an Attic Ventilator Fan | True Value Hardware guide.
How to Install a Roof-Mounted Attic Fan
A roof-mounted fan is highly efficient because it sits at the highest point of the roof, where hot air naturally collects.

Step 1: Choose the Location
Locate a spot on the back or side of your roof (ideally south- or west-facing for solar models) that is centered between two rafters. It should be high up near the ridge line (usually about 2 to 3 feet down) but no closer than 10 feet to any existing passive vents or ridge vents to prevent “short-circuiting” the airflow.
Step 2: Mark and Drill a Pilot Hole
From inside the attic, measure between your rafters to find the center point of your chosen location. Drive a long screw or nail up through the roof deck and shingles at this center point. This will serve as your locator locator on the outside.
Step 3: Cut the Opening on the Roof
Go up onto the roof (wearing your safety harness). Locate your pilot screw. Using the template provided by the manufacturer (often a 15-inch to 19-inch circle), draw a circle on the shingles using the screw as the center. Use a utility knife to cut away the shingles within this circle. Next, use a jigsaw or reciprocating saw to cut through the exposed plywood roof deck. Set your saw blade depth so you only cut through the decking, not the rafters beneath.
Step 4: Prep the Shingles
To slide the fan’s flashing under the shingles on the upslope side, you must release the shingles. Use a flat pry bar to carefully break the sealant seals on the shingles directly above and to the sides of the hole. Remove any roofing nails within 5 to 6 inches of the top half of the cut hole. Cut two small, horizontal 4-inch slits in the shingles at the 3 o’clock and 9 o’clock positions to allow the flashing to slide upward smoothly.
Step 5: Test Fit and Apply Sealant
Test-slide the fan flashing under the loose upper shingles. The bottom half of the flashing must sit on top of the lower shingles to shed water properly. Once you confirm a good fit, slide it out and apply a thick, continuous bead of high-grade roofing cement to the underside of the flashing.
Step 6: Secure and Seal
Slide the flashing back into place under the upper shingles. Secure the flashing to the roof deck using galvanized roofing nails or self-tapping screws through the pre-drilled holes in the flashing. Finally, apply a generous layer of roofing cement over all exposed screw heads and along the edge where the shingles meet the flashing. For further technical specifications on securing solar-powered units, refer to the Installation Guide.
How to Install a Gable-Mounted Attic Fan
If you prefer not to cut a hole in your roof, a gable-mounted fan is an excellent alternative. It mounts inside the attic behind an existing gable vent on the side wall of your home.
Step 1: Prep the Opening
If you already have a functional gable vent, you can mount the fan directly behind it. If the vent is too small, you may need to enlarge the opening or frame out a new square opening in the gable wall using 2×4 lumber.
Step 2: Build a Mounting Frame
If your existing framing doesn’t match the fan’s mounting brackets, construct a simple wooden frame around the vent opening using 2x4s. Screw this frame securely to the wall studs.
Step 3: Mount the Fan Unit
Position the fan against the framing so that the fan blades face the vent (it should blow air out of the attic). Secure the fan’s mounting shroud to your wooden frame using wood screws. Ensure there are no large gaps around the edges of the shroud; if there are, seal them with plywood panels or heavy-duty weatherstripping to prevent the fan from simply recycling the attic air.
Step 4: Install Louvers (If Applicable)
If you are installing a new gable vent with automatic shutters or louvers, mount the shutter assembly on the exterior wall. These shutters will remain closed when the fan is off to keep out rain and pests, and swing open automatically when the fan turns on.
Safe Electrical Wiring for Your Attic Fan Installation
If you chose an electric attic fan, you must connect it to a power source. Working with electricity requires absolute caution. If you are not comfortable handling electrical wiring, always hire a licensed electrician to complete this step.
If you choose to do it yourself, follow these safety steps:
- Shut Off the Power: Locate the circuit breaker in your main electrical panel and turn it off. Use a non-contact voltage tester in the attic to verify that the wires you plan to connect to are completely dead.
- Mount the Controller: Most electric attic fans come with an adjustable thermostat/humidistat control box. Mount this box to a nearby rafter where it is easy to access and adjust.
- Run the Cable: Run a length of 14/2 NM cable from a nearby junction box (or a dedicated circuit) to the fan’s thermostat controller. Use cable clamps to secure the wire to the framing.
- Make the Connections: Inside the controller box, connect the black (hot) wire from the power source to the thermostat switch, and then to the fan motor. Connect the white (neutral) wires together, and connect the bare copper (ground) wires to the green grounding screw.
- Close and Test: Secure the cover on the junction and controller boxes. Turn the breaker back on. Temporarily turn the thermostat dial down below the current attic temperature to test if the fan kicks on. Once verified, set the thermostat to your desired operating temperature (usually 90–95°F).
For professional assistance or complex wiring configurations, you can learn more about certified residential electrical services via Attic Fan Installation, Replacement, & Repair.
Frequently Asked Questions about Attic Ventilation
Can an attic fan cause negative pressure in the home?
Yes, if your attic does not have enough intake ventilation (like soffit or eave vents), a powerful attic fan will create a vacuum. To satisfy its need for air, the fan will pull conditioned, cool air from your living space up through recessed lights, attic hatches, and wall cavities.
This is known as negative pressure. Not only does this waste your air conditioning, but it can also cause “backdrafting,” where dangerous combustion gases from gas water heaters or furnaces are pulled back into your home instead of venting safely up the chimney. Always ensure you have at least 1 square foot of intake ventilation for every 300 CFM of fan power.
How do I prevent roof leaks after installing a roof-mounted fan?
The secret to a leak-free roof installation lies in how you handle the shingles and flashing.
- Always slide the upper half of the fan’s metal flashing underneath the shingles above the hole.
- The bottom half of the flashing must sit on top of the shingles below the hole. This creates a natural shingle-lap system that sheds water down the roof.
- Never rely on standard silicone sealant. Use a generous amount of high-grade roofing cement under the flashing and over all exposed nail heads.
How much can I save on my cooling bills with an attic fan?
A properly sized and installed attic fan can reduce your attic’s peak summer temperature by up to 50°F. By lowering the temperature of the air sitting directly above your ceilings, you minimize heat transfer into your living space. This can reduce your air conditioner’s runtime and save you up to 15% to 30% on your monthly cooling bills.
Conclusion
Tackling an attic fan installation is a highly rewarding project that keeps your home comfortable, lowers your energy bills, and protects your roof from extreme heat and moisture damage. Whether you choose a solar-powered model to save on electrical work or a heavy-duty electric gable fan, ensuring proper intake ventilation and a weather-tight seal is key to long-term success.
At Smith Roofing & Exteriors, we love helping homeowners in Fort Atkinson, WI, and throughout Southeastern Wisconsin (including Jefferson, Lake Mills, Burlington, and Lake Geneva) maximize their homes’ efficiency. If you are uncomfortable working on a steep roof, worried about cutting through your shingles, or just want to make sure your ventilation system is perfectly balanced, we are here to help.
To learn more about how your roof impacts your home’s thermal performance, read about The Role of Roofing in Energy Efficiency, or reach out to our local team today for a professional consultation!