What Every Homeowner Should Know About a Gutter Parts Diagram
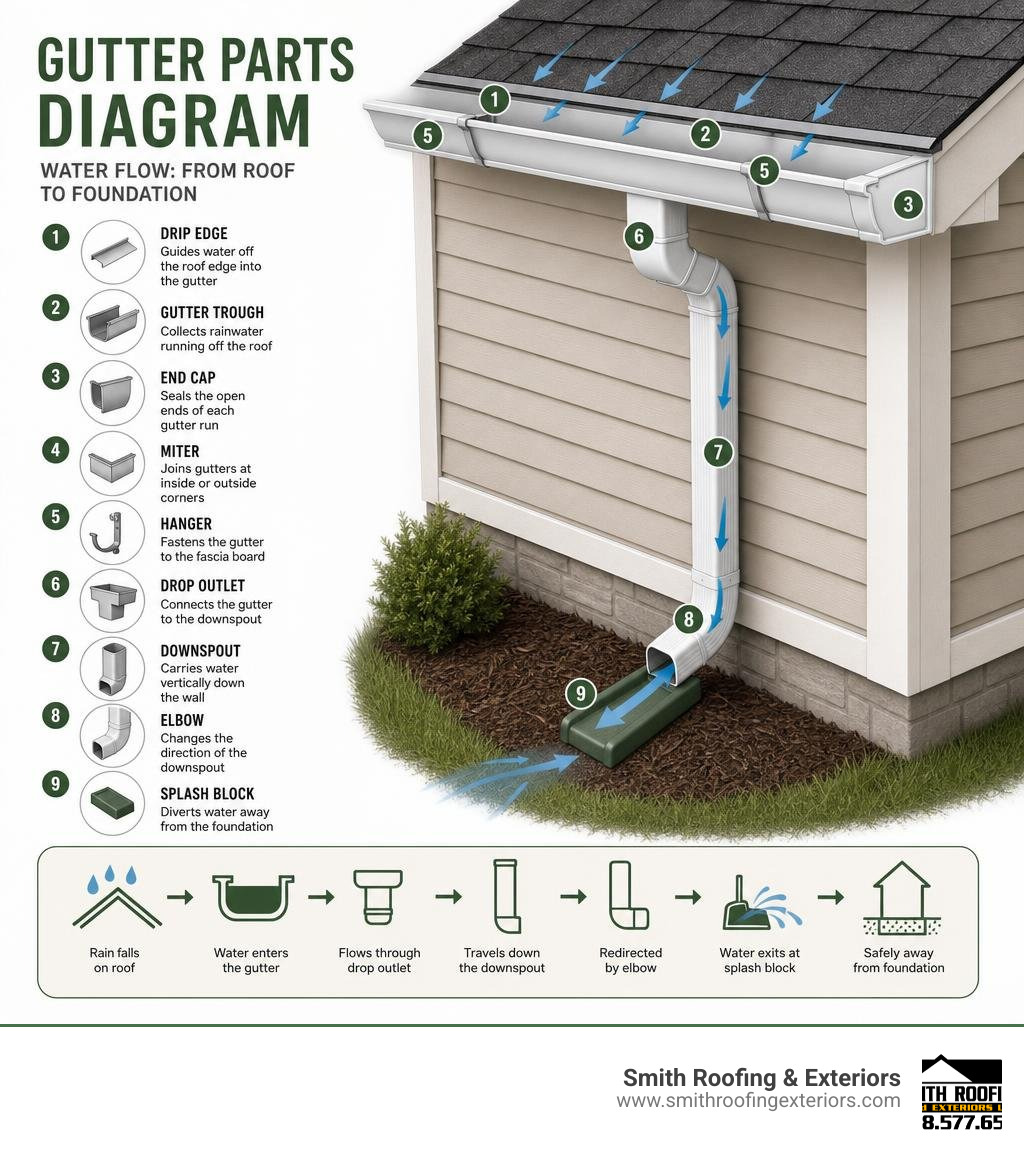
A gutter parts diagram is the fastest way to understand how your home’s drainage system works — and why each piece matters. Here’s a quick overview of the main components:
| Part | What It Does |
|---|---|
| Gutter trough | Collects rainwater running off the roof |
| End cap | Seals the open ends of each gutter run |
| Drop outlet | Connects the gutter to the downspout |
| Downspout | Carries water vertically down the wall |
| Elbow | Changes the direction of the downspout |
| Miter | Joins gutters at inside or outside corners |
| Hanger | Fastens the gutter to the fascia board |
| Drip edge | Guides water off the roof edge into the gutter |
| Splash block | Diverts water away from the foundation |
You pull into your driveway after a Wisconsin storm and water is pouring over the edge of your gutters. Is it a clog? A broken hanger? A failed seal at a corner joint? Knowing your gutter anatomy means you can spot the problem fast — and talk to a contractor without guessing.
A gutter system looks simple from the ground. But it’s made up of a dozen or more parts that have to work together. When one fails, the rest of the system can’t do its job. And in rural Wisconsin, where heavy rain, ice, and snow put real stress on exteriors, that matters.
I’m Matt Smith, owner of Smith Roofing & Exteriors, and I’ve spent years helping Wisconsin homeowners diagnose, repair, and replace gutter systems — so I know exactly which parts in a gutter parts diagram cause the most trouble and why. Let’s walk through all of them so you know exactly what you’re looking at.
Understanding Your Home’s Drainage with a Gutter Parts Diagram
When most people think of gutters, they picture a single metal channel running along the edge of their roof. In reality, a residential gutter system is a precision-engineered drainage network. If even one small component fails, the entire system can back up, threatening your home’s structural integrity.
To help visualize how these components connect, we often refer homeowners to a comprehensive Rain Gutter Parts (Gutter Diagram Infographic). This visual guide traces the path of water from the moment it hits your shingles to the second it safely discharges away from your foundation.
Without this synchronized flow, rainwater runs directly off the roof, undermining foundations, flooding basements, and damaging siding, windows, and doors. Let’s break down the system into its two primary networks: the horizontal collection components and the vertical discharge path.
Main Horizontal Collection Components in the Gutter Parts Diagram
The horizontal line of your gutter system is your home’s first line of defense against heavy downpours. It sits directly beneath your roofline to capture and channel runoff.
- The Gutter Trough: This is the open channel that collects rainwater. In Southeastern Wisconsin, these are typically crafted from seamless aluminum, which we install on-site to minimize joints and prevent leaks.
- End Caps: These flat, shaped metal pieces seal the open ends of each gutter run. Without a secure end cap, water would simply pour out the sides of the channel. They are common areas for leaks, making regular spring inspections essential.
- Drip Edge: This is one of the most critical yet frequently overlooked components of any roof-to-gutter integration. The drip edge is a L-shaped metal flashing installed along the edge of your roof deck. For a complete look at how this works, check out our guide on Everything You Need to Know About Drip Edge and Gutter Installation. The drip edge must extend at least 1.5 inches over the back wall of the gutter trough. This prevents water from wicking backward behind the gutter and rotting your wood fascia board.
- Fascia Board: While technically part of your home’s framing and not the gutter system itself, the fascia board is the wooden trim board where your gutter hangers are mounted. If your drip edge is missing or installed incorrectly, water will rot this board within five years, causing your gutters to sag and pull away.
Downspout and Drainage Components in the Gutter Parts Diagram
Once the horizontal troughs collect the water, the vertical discharge path takes over to safely move that water away from your home. To understand the terminology of these connections, you can read our breakdown on Guttering – What Goes Where – Jargon Explained.
- Drop Outlets (or Running Outlets): This is the funnel-shaped piece of hardware built into the bottom of the gutter trough. It serves as the critical transition point where horizontal water flow converts into vertical discharge.
- Downspouts: These are the vertical pipes that carry water down the side of your home.
- Elbows: These curved pipe sections attach to the downspouts to navigate around architectural features like trim, brick ledges, and foundations.
- Splash Blocks: Placed at the very bottom of the downspout, these plastic or concrete blocks receive the high-velocity discharge and spread it out, preventing soil erosion and directing water at least three feet away from your foundation.
Gutter Profiles: K-Style vs. Half-Round vs. Box Gutters
Not all gutters are shaped the same. The “profile” refers to the cross-sectional shape of the gutter trough. Choosing the right profile depends on your home’s architectural style, local weather patterns, and drainage needs.
| Gutter Profile | Shape Description | Best Used For | Key Advantage |
|---|---|---|---|
| K-Style | Resembles crown molding with flat back and decorative front | Modern & standard residential homes | High water capacity; structurally rigid |
| Half-Round | Semicircular, open U-shape | Historic, rustic, or European-style homes | Smooth water flow; fewer clogs; easy to clean |
| Box Gutters | Deep, rectangular box shape | Commercial buildings & modern architectural designs | Maximum water volume capacity |
K-Style Gutters
K-style gutters dominate American residential neighborhoods, including communities like Lake Mills and Jefferson, WI. Their decorative front profile mimics crown molding, blending seamlessly with standard home trims. Because they have a flat back, they flush mount directly to the fascia board.
From a performance standpoint, K-style gutters hold significantly more water than half-round gutters of the same width. For areas prone to heavy storms, upgrading from a 5-inch K-style gutter to a 6-inch K-style gutter provides 67% more capacity, making it highly effective at handling torrential downpours without overflowing.
Half-Round Gutters
Half-round gutters feature a smooth, semicircular trough. Because they lack sharp internal corners, water flows with minimal resistance, and debris is far less likely to get trapped inside. They are highly favored for historic home restorations in places like Lake Geneva and Delavan, WI, especially when crafted from elegant materials like copper.
However, half-round gutters require specialty external brackets to cradle the curved bottom, and they have a slightly lower water capacity than K-style profiles.
Box Gutters
Box gutters are wide, deep, and rectangular. They are generally reserved for commercial buildings or ultra-modern homes with massive roof surfaces. Because of their industrial capacity, they can handle immense volumes of water, but they require professional design to ensure proper pitch and drainage.
Downspout Systems: Elbows, Outlets, and Support Clips
The downspout system is responsible for high-speed water transport. If this vertical pathway is restricted, your entire horizontal gutter line will fill up and overflow.

Sizing Your Downspouts for Wisconsin Weather
Most standard residential installations use 2×3 inch downspouts. However, in Southeastern Wisconsin, where sudden summer storms and rapid spring snowmelt are common, upgrading to 3×4 inch downspouts provides 78% more drainage capacity. This simple upgrade dramatically reduces the risk of water backing up into your eave lines.
When water is restricted or downspouts are undersized, the consequences can be devastating. To learn more about the risks to your home’s lower levels, read how Overflowing Gutters Can Ruin Your Basement and Foundation.
Navigating Angles: A-Style vs. B-Style Elbows
Because walls aren’t perfectly flat and foundations often flare out, downspouts can rarely run in a straight line from roof to ground. This is where elbows come in. You will typically need three elbows for a standard downspout run: two at the top to transition from the eave to the wall, and one at the bottom to transition water away from the foundation.
- A-Style Elbows: These elbows transition water front-to-back. If you are looking at the front of the elbow and it curves toward or away from you, it is an A-style.
- B-Style Elbows: These elbows transition water side-to-side. If you look at the elbow and it curves to the left or right, it is a B-style.
Support Clips and Straps
Downspouts must be securely fastened to your home’s siding or brickwork to prevent wind damage and vibration. We use matching aluminum downspout straps, securing them with self-tapping screws. Best practices dictate strapping downspouts at least every six feet to keep the vertical lines perfectly rigid.
Corners, Miters, and Leak Prevention Hardware
The corners of a gutter system are its most vulnerable points. Because gutters must turn corners to wrap around your roofline, they require specialized joints called miters.
Strip Miters vs. Box Miters
When joining two gutter runs at a 90-degree corner, installers choose between two main hardware options:
- Strip Miters: These are narrow strips of metal applied over a custom-cut, mitered joint. They are economical and require on-site fitting.
- Box Miters: These are pre-fabricated, premium corner pieces. They offer a much cleaner, professional appearance and provide superior, smooth water flow through the corner. Because they are manufactured in a factory, they are more structurally sound than on-site cuts.
The Role of Professional Sealant
No matter which miter you choose, water will find a way out if the joint is not sealed correctly. We seal all four seams of our miters using high-grade, professional EPDM gutter sealant. If you want to know more about how to keep your system watertight without relying on messy, temporary fixes, read our guide: Don’t Let Gutter Leaks Ruin Your Home – No Mastic Required.
Thermal Expansion and Contraction
In Wisconsin, our local climate experiences extreme temperature swings—from sub-zero winters in Elkhorn to humid summers in Burlington. Metal gutters expand and contract as the temperature changes. Professional installation accounts for this thermal movement, ensuring that joints are sealed with flexible EPDM sealants rather than rigid solder or cheap caulk, preventing the seams from splitting over time.
Gutter Hangers, Mounting Hardware, and Protection Systems
How your gutters are attached to your home determines how much weight they can handle. A standard gutter trough filled with water, wet leaves, or heavy winter ice is incredibly heavy.
Hidden Hangers vs. Spike-and-Ferrule Systems
Historically, installers used a “spike-and-ferrule” system, which is essentially a large metal nail driven through the front of the gutter, through a sleeve, and into the wood fascia. While cheap, spikes fail quickly. As wood expands and contracts with freeze-thaw cycles, the spikes work loose. A spike-and-ferrule system typically fails within 5 to 10 years.
Today, professional installers use hidden hangers with screws. These heavy-duty brackets clip inside the gutter trough, making them completely invisible from the ground. They are fastened directly into the fascia board using 1.5-inch self-tapping screws (or 2-inch screws for wrapped fascia).
- Load Capacity: Quality hidden hangers can support 50 pounds per linear foot when properly installed.
- Lifespan: Hidden hangers easily last 25 years, matching the lifespan of high-quality aluminum gutters.
Hanger Spacing for Heavy Snow Loads
While standard installations space hangers every 24 inches, our local climate demands extra reinforcement. In areas prone to heavy snow and ice accumulation, we recommend spacing hidden hangers every 16 inches on center. This tighter spacing prevents the gutters from sagging or bending under the weight of winter ice dams.
Gutter Protection: Micro-Mesh vs. Other Systems
To minimize maintenance and prevent dangerous clogs, many homeowners opt for gutter guards. However, not all protection systems are created equal.
- Micro-Mesh Gutter Guards: These are the gold standard. Made with a fine stainless steel mesh, they block 90% of all debris, including tiny pine needles and shingle grit, while letting heavy rain pass through. They cost about $22 to $24 per linear foot installed and last up to 20 years. For a deep dive into these systems, see A Comprehensive Guide to Gutter Guards.
- Reverse Curve Guards: These work on water surface tension, directing water into a slot while letting leaves fall over the edge. They cost $21 to $23 per foot but can fail during light, slow rains where water does not curve properly, or during torrential downpours where water shoots right over the edge.
- Foam and Brush Inserts: While cheap, these are not recommended by professionals. Foam inserts quickly trap organic matter, grow mold within two years, and must be replaced frequently.
To compare all your filtration options, read The Ultimate Guide to Rain Gutter Screens and Leaf Filters.
Frequently Asked Questions About Gutter Components
What is the difference between A-style and B-style elbows?
A-style elbows change the direction of your downspout front-to-back (relative to the wall), while B-style elbows change the direction side-to-side. A standard downspout configuration typically utilizes two A-style elbows at the top to navigate the roof eave overhang and bring the pipe flush against the wall, and one B-style or A-style elbow at the bottom to direct water away from the foundation.
How many gutter hangers do I need for my home?
As a rule of thumb, you need one hanger every 24 inches for standard installations. However, for homes in Southeastern Wisconsin, we highly recommend spacing hangers every 16 inches to handle heavy snow and ice.
For example, if you have a 40-foot run of gutter:
- At 24-inch spacing, you will need 21 hangers.
- At 16-inch spacing (recommended), you will need 31 hangers.
When should I repair vs. replace my gutter parts?
If your gutters are made of aluminum, they should last 20 to 30 years with proper care. If you are experiencing minor leaks at a single miter joint or have a loose downspout clip, a simple repair is usually highly effective. You can read more about how localized fixes can save your home in our guide on How Gutter Repair Can Help Protect Your Roof and Foundation.
However, if your system is sagging across multiple runs, has extensive rust, or consists of old vinyl that has cracked from winter freezes, it is time for a full upgrade. To help you make the right call, check out our resource on Understanding When Gutter Replacement Becomes Necessary.
Conclusion
Understanding your gutter parts diagram is the first step toward protecting your home from water damage. From the drip edge at your roofline to the splash blocks at your foundation, every component plays a vital role in keeping your home dry and structurally sound.
At Smith Roofing & Exteriors, we are proud to be the trusted local exterior experts serving Fort Atkinson, WI, and surrounding communities, including Lake Mills, Jefferson, Burlington, Delavan, Elkhorn, Lake Geneva, Walworth, and Edgerton. Our experienced local team uses superior materials, offers transparent pricing, and provides 24/7 emergency services to keep your home protected through every Wisconsin season.
Ready to upgrade your home’s drainage system with a premium, seamless gutter installation? Schedule your professional gutter replacement today and let our family take care of yours!