How to Install Hardie Board and Batten Siding
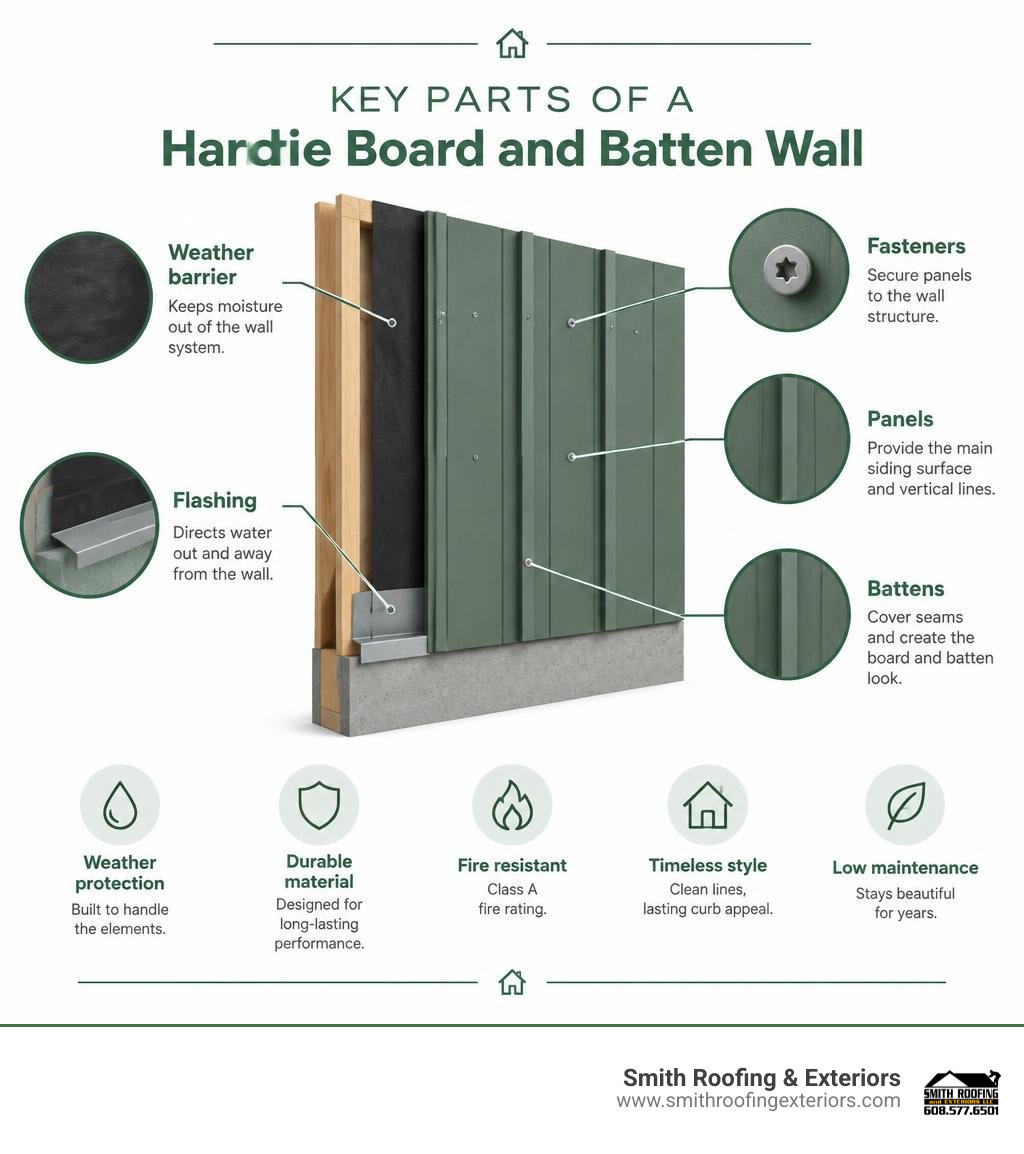
Start with a flat wall, a water-resistive barrier, and flashing that directs water out. Lay out the Hardie® Panel vertical siding so its seams line up, fasten it using the instructions for your wall, then cover the vertical seams with batten strips. Keep the required gaps above the ground, roofs, decks, and horizontal flashing. Do not caulk over flashing that needs to drain.
The crisp lines come from careful layout, but the details behind the panels matter just as much, especially through Wisconsin’s wet and freezing seasons. This guide walks through the prep, cutting safety, fastening, and finishing steps that protect the wall as well as its appearance.
I’m Matt Smith, owner of Smith Roofing & Exteriors, where I help homeowners understand their exterior remodeling options. I’ll break down board and batten hardie board installation so you can ask better questions and know what to look for on your project.
Board and batten siding provides timeless rustic charm while delivering sharp, clean architectural symmetry. Unlike traditional wood siding that swells, rots, and attracts wood-boring insects, James Hardie® fiber cement panels are dimensionally dead and carry a Class A fire rating. When planning a project across Southeastern Wisconsin—from Fort Atkinson to Lake Geneva—understanding the core specs of your siding materials ensures lasting performance.
| Feature | Hardie® Panel Vertical Siding | Traditional Wood Siding | Vinyl Vertical Siding |
|---|---|---|---|
| Material Base | Portland cement, sand, cellulose fibers | Natural timber (Cedar, Pine) | Extruded PVC |
| Fire Rating | Class A (Non-combustible) | Combustible (Class C) | Melts under high heat |
| Dimensional Stability | Stable (No expansion/contraction issues) | High swelling & shrinking | High thermal expansion |
| Pest Resistance | Immune to woodpeckers & termites | Vulnerable to rot & pests | Immune to pests |
| Batten Profile Shadow | Full 3/4-inch to 1-inch authentic depth | Full shadow line | Shallow, hollow shadow |
Step-by-Step Board and Batten Hardie Board Installation Guide

Achieving a clean vertical aesthetic requires systematic execution from framing inspection to the final coat of paint. For a comprehensive overview of general substrate prep and framing, explore our detailed panel siding installation guide before diving into the specific board-and-batten steps below.
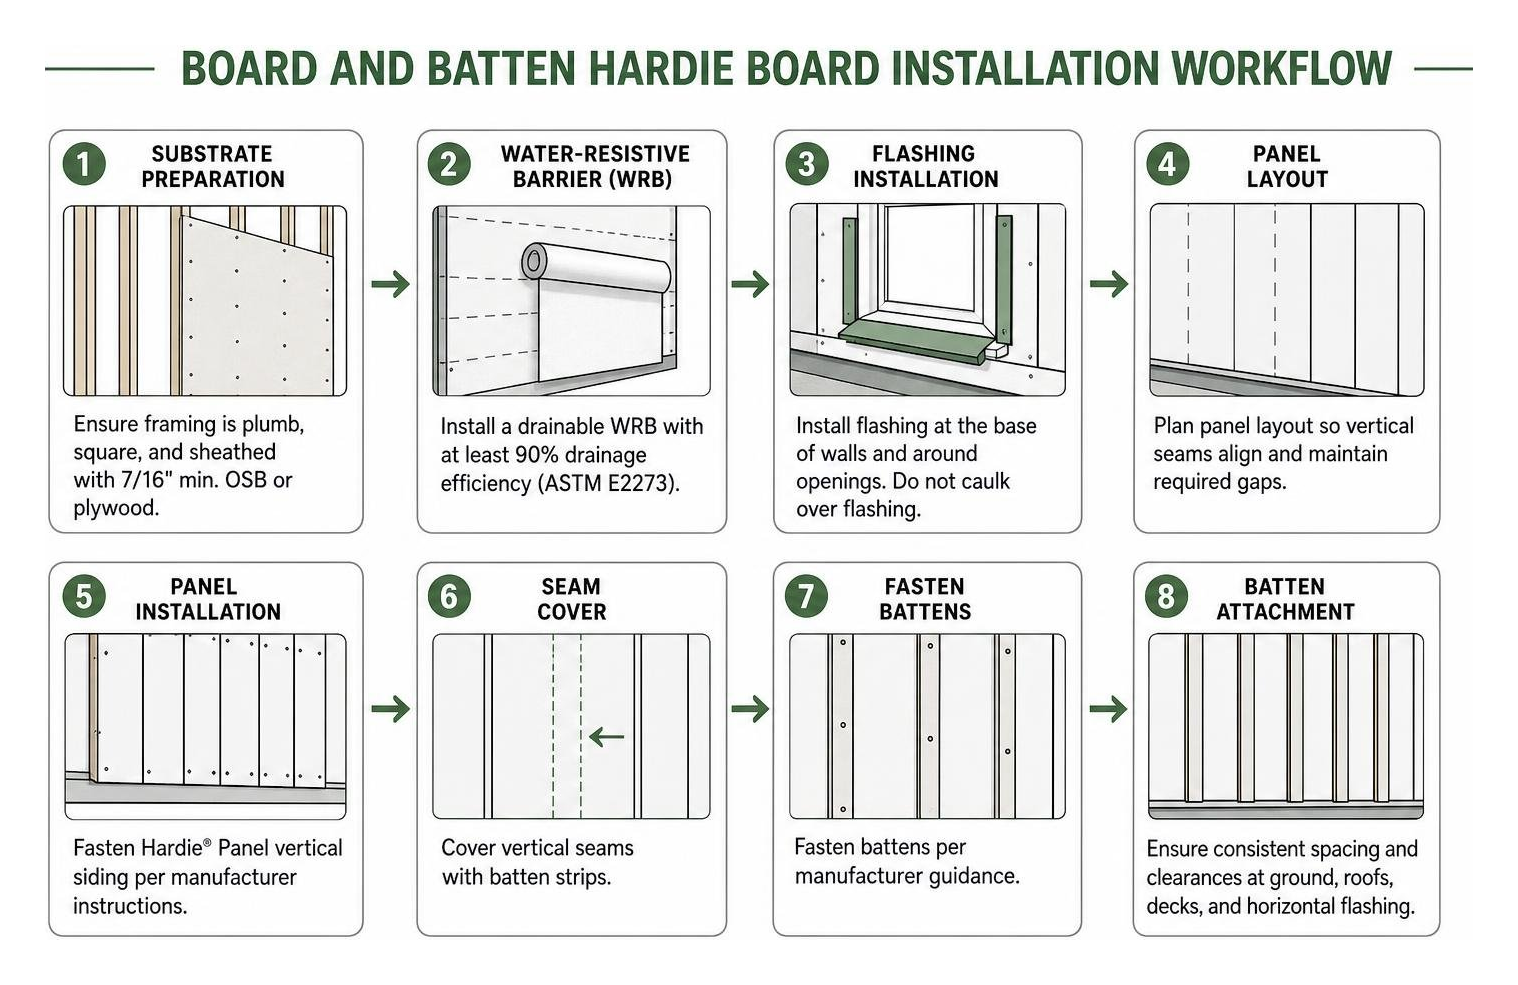
Pre-Installation Wall Prep, WRB, and Safety Protocol for Board and Batten Hardie Board Installation
Long-term siding durability begins with substrate integrity. Ensure the wall framing is plumb and square, with minimum 7/16-inch OSB or plywood sheathing fastened to braced wood or 20-gauge to 16-gauge steel studs spaced no more than 24 inches on center. Plane down any irregular framing studs so panels sit entirely flat without bowing.
Install a code-compliant water-resistive barrier (WRB). In freeze-thaw climates like Walworth County and Jefferson County, building science best practice recommends a drainable housewrap with at least 90% drainage efficiency tested under ASTM E2273.
Before lifting panels, follow strict safety and jobsite handling practices:
- Storage: Keep HardiePanel units stored flat on a level surface, elevated off the ground, and fully covered with waterproof tarps to prevent saturation before installation.
- Handling: Panels weigh approximately 2.3 pounds per square foot (a 4×10 sheet weighs around 90 lbs). Always use a two-person carry along the edges to prevent panel cracking.
- OSHA Silica Dust Compliance: Cutting fiber cement releases respirable crystalline silica. Always cut outdoors using a dust-collecting circular saw fitted with a polycrystalline-diamond blade (such as a HardieBlade®) connected to a HEPA vacuum. If dust collection systems cannot reduce airborne dust below OSHA permissible limits, wear a NIOSH-approved N95 or N100 respirator. Never dry-sweep silica dust; mist debris with water before cleanup.
For detailed commercial and multi-family code requirements, refer directly to the manufacturer’s Hardie® Architectural Panels Installation Instructions.
Panel Layout, Proper Clearances, and Critical Flashing Details
Layout begins with measuring the wall width to ensure balanced spacing. The minimum standard panel design size is 12 inches by 16 inches. Panels must align evenly along horizontal transitions; staggered or brick patterns are strictly prohibited by code.
Moisture management requires precise clearances around your home envelope:
- Ground Clearances: Maintain a minimum 6-inch gap between the bottom edge of panels and bare soil, and a 1- to 2-inch clearance above hard surfaces like driveways, patios, or concrete walkways.
- Roof and Deck Transitions: Leave a minimum 2-inch clearance where siding meets sloped roofs or decking boards.
- Kickout Flashing: Where a roof eave meets a vertical sidewall, install a 105-degree kickout flashing integrated into step flashing to direct water into the gutter rather than behind the siding.
- Horizontal Z-Flashing: At horizontal joints between stacked panels, install metal Z-flashing over housewrap. Maintain a minimum 1/4-inch drainage gap between the bottom edge of the upper panel and the top horizontal leg of the flashing. Never caulk this gap—it must remain open to let moisture escape freely.
For a deeper look into window pan flashing and apron integration, check out our guide on managing critical flashing and window details.
Fastening and Siding Steps for Board and Batten Hardie Board Installation
Panels require careful fastening to withstand heavy wind loads while preserving weather tightness. When budgeting for premium materials and specialized hardware, review our guide to understanding 2026 panel siding costs.
Follow these fastening rules:
- Fastener Selection: Use minimum 6d corrosion-resistant galvanized nails or 16-gauge stainless steel finish nails (1-1/2 inch minimum length). Stainless steel fasteners are highly recommended in moisture-heavy environments to prevent rust streaks.
- Edge Distance & Spacing: Drive fasteners precisely 3/8-inch from all panel edges and keep them at least 2 inches away from corners. Space nails 6 to 12 inches on center along the perimeter edges and 12 to 24 inches along intermediate studs.
- Pneumatic Calibration: Keep your nail gun perpendicular (90 degrees) to the wall. Calibrate air pressure so fasteners drive flush with the panel face. If a nail remains slightly proud, tap it flush with a smooth-faced hammer—never overdrive nails into the fiber cement core.
Batten Strip Placement, Joint Treatment, and Multi-Story Transitions
Once the panels are secured, the vertical seams must be treated before attaching HardieTrim® batten boards. For additional technical specifications on trim attachment, review the official HardieTrim Batten Installation Guide.
- Seam Treatment: Bring panel vertical edges into moderate contact or leave a 1/8-inch gap. Seal the joint with an elastomeric joint sealant meeting ASTM C920 (Grade NS, Class 25 or higher). Proper joint prep is crucial for preventing problematic board seams.
- Batten Placement: Center HardieTrim battens (available in 4/4 or 5/4 thickness) directly over the seams. Battens must overlap the vertical panel joint by at least 3/4-inch on each side. While 12-inch or 24-inch spacing is sometimes chosen, 16-inch on-center spacing represents roughly 80% of residential installations because it allows battens to nail directly through the sheathing into wall studs.
- Batten Fastening: Fasten battens using 2-inch minimum 16-gauge finish nails or siding nails spaced no more than 16 inches apart vertically, placed at least 3/4-inch from batten edges and 1 inch from ends.
- Multi-Story Transitions: When cladding walls taller than 12 feet, do not bridge the floor band joists with a single continuous sheet. Wood framing shrinks naturally across the floor joists over time. Install a horizontal control joint with metal Z-flashing or an architectural belly band at each floor line to accommodate natural settling.
Pro Maintenance, Finishing, and Common Mistakes to Avoid
Fiber cement provides exceptional longevity, but ongoing performance relies on periodic maintenance:
- Annual Soft Washing: Clean panels once a year using a low-pressure garden hose and a soft brush with mild soap. Avoid pressure washers over 1,500 psi, which can erode factory finishes.
- Sealant Inspection: Check elastomeric caulking around windows, doors, and corner trim every 3 to 5 years, recaulking any separated joints promptly.
ColorPlus Touch-Ups, Caulking Standards, and Repainting Timelines
If you selected pre-finished James Hardie siding with ColorPlus® Technology, minor surface nicks or scratches should be addressed using the matching factory touch-up applicator. Use touch-up paint sparingly on small spots—never paint large panel fields with a touch-up pen, as it will weather differently from the factory bake.
For factory-primed siding, all exposed surfaces and cut edges must be painted within 180 days of installation using high-quality 100% exterior acrylic latex paint applied above 50°F. When caulking field joints, use paintable sealants meeting ASTM C834 latex standards or ASTM C920 elastomeric specifications.
Critical Installation Errors That Void Warranties
To protect your 30-year non-prorated product warranty and avoid costly siding failures, avoid these common mistakes:
- Overdriving Nails: Sinking fasteners beneath the panel surface fractures the structural core.
- Unsealed Cut Edges: Every field cut exposes the inner composite material; all raw edges must be primed or sealed before hanging.
- Caulking Drainage Gaps: Sealing over the bottom edge of Z-flashing traps moisture inside the wall assembly.
- Insufficient Grade Clearances: Installing panels in contact with soil or masonry invites continuous moisture wicking and edge degradation.
When severe storms or impact damage happen, review our advice on addressing damaged or cracked siding panels to execute professional repairs.
Whether you are remodeling an older farmhouse near Burlington, Edgerton, or Elkhorn, our experienced team at Smith Roofing & Exteriors is here to assist. We provide homeowners across Southeastern Wisconsin with transparent pricing, superior materials, and certified installation practices designed to deliver crisp, beautiful exterior lines for decades. Contact us today to discuss your next siding project!