Repair Rotted Shed Siding Before the Damage Spreads
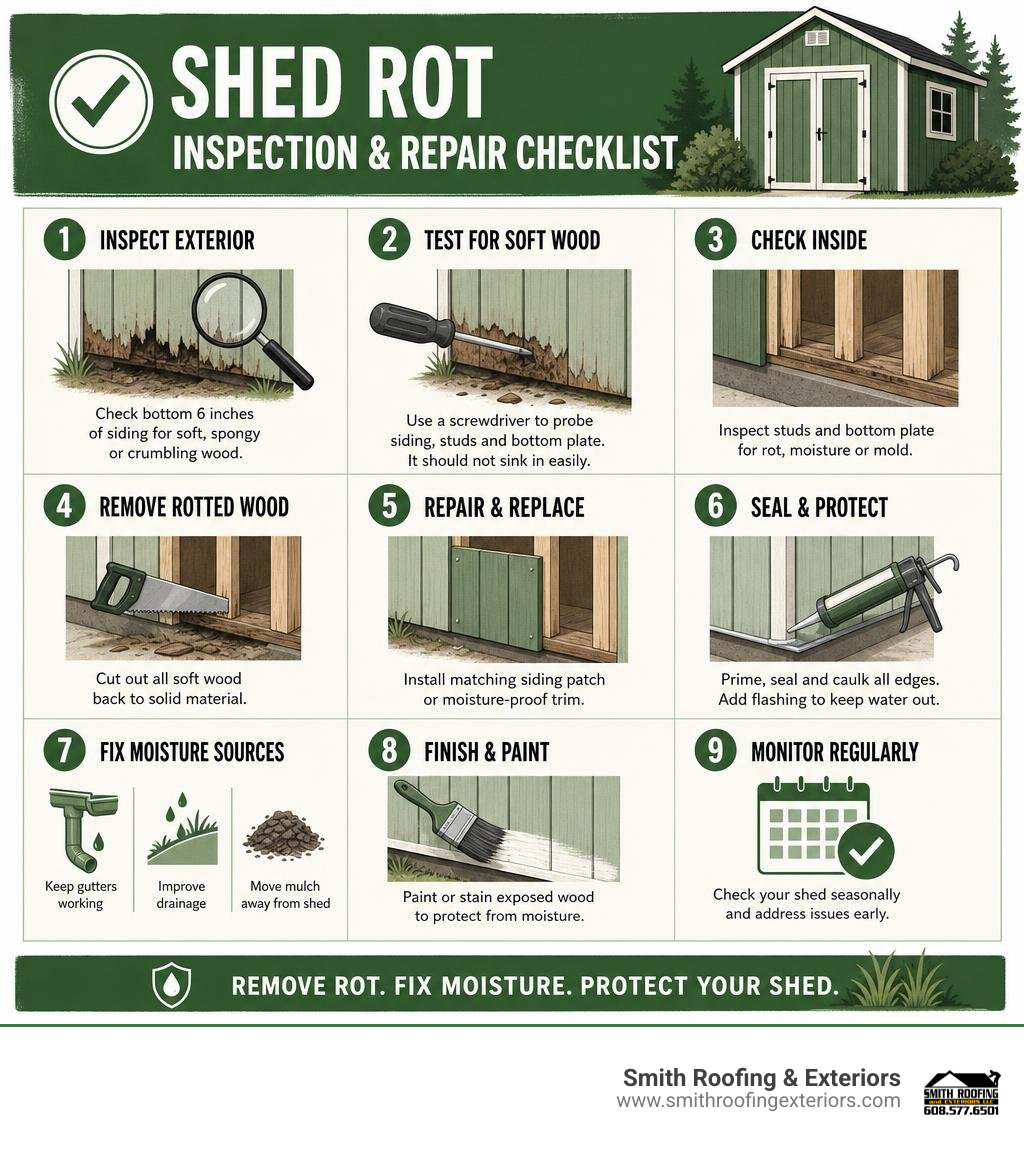
Repairing rotted shed siding is usually worth it when the damage is limited to the outer panel or lower few inches of the wall. Cut out all soft wood back to solid material, inspect the studs and bottom plate behind it, install a matching T1-11 patch or moisture-proof PVC trim, then prime, seal, and flash the repair so water cannot get behind it.
Most shed siding failures start near the bottom six inches. Rain splashback, melting snow, wet mulch, poor drainage, and siding that sits too close to soil can wick moisture into exposed wood edges. If you catch it early, a DIY repair often costs about $50 to $200 in materials, rather than the much higher cost of replacing the shed or paying for major structural work.
The key is not to cover up rot. Remove it, fix the moisture source, and check the framing before installing new siding. A screwdriver that easily sinks into studs or the sill plate is a warning that the problem may be structural, not just cosmetic.
I’m Matt Smith, owner of Smith Roofing & Exteriors, and I help Wisconsin property owners understand practical maintenance and repair choices before small weather-related problems become expensive ones. In this guide, I’ll walk you through repairing rotted shed siding in a way that protects the repair from future moisture.
Key terms for repairing rotted shed siding:
Assessing the Damage: Surface Rot vs. Structural Decay
Before grabbing a saw, you need to understand how deep the fungal decay travels. Wood rot behaves like an iceberg: what looks like a minor, discolored bubble on the exterior surface often conceals widespread rot chewing through the wall framing underneath.
The Screwdriver Penetration Test
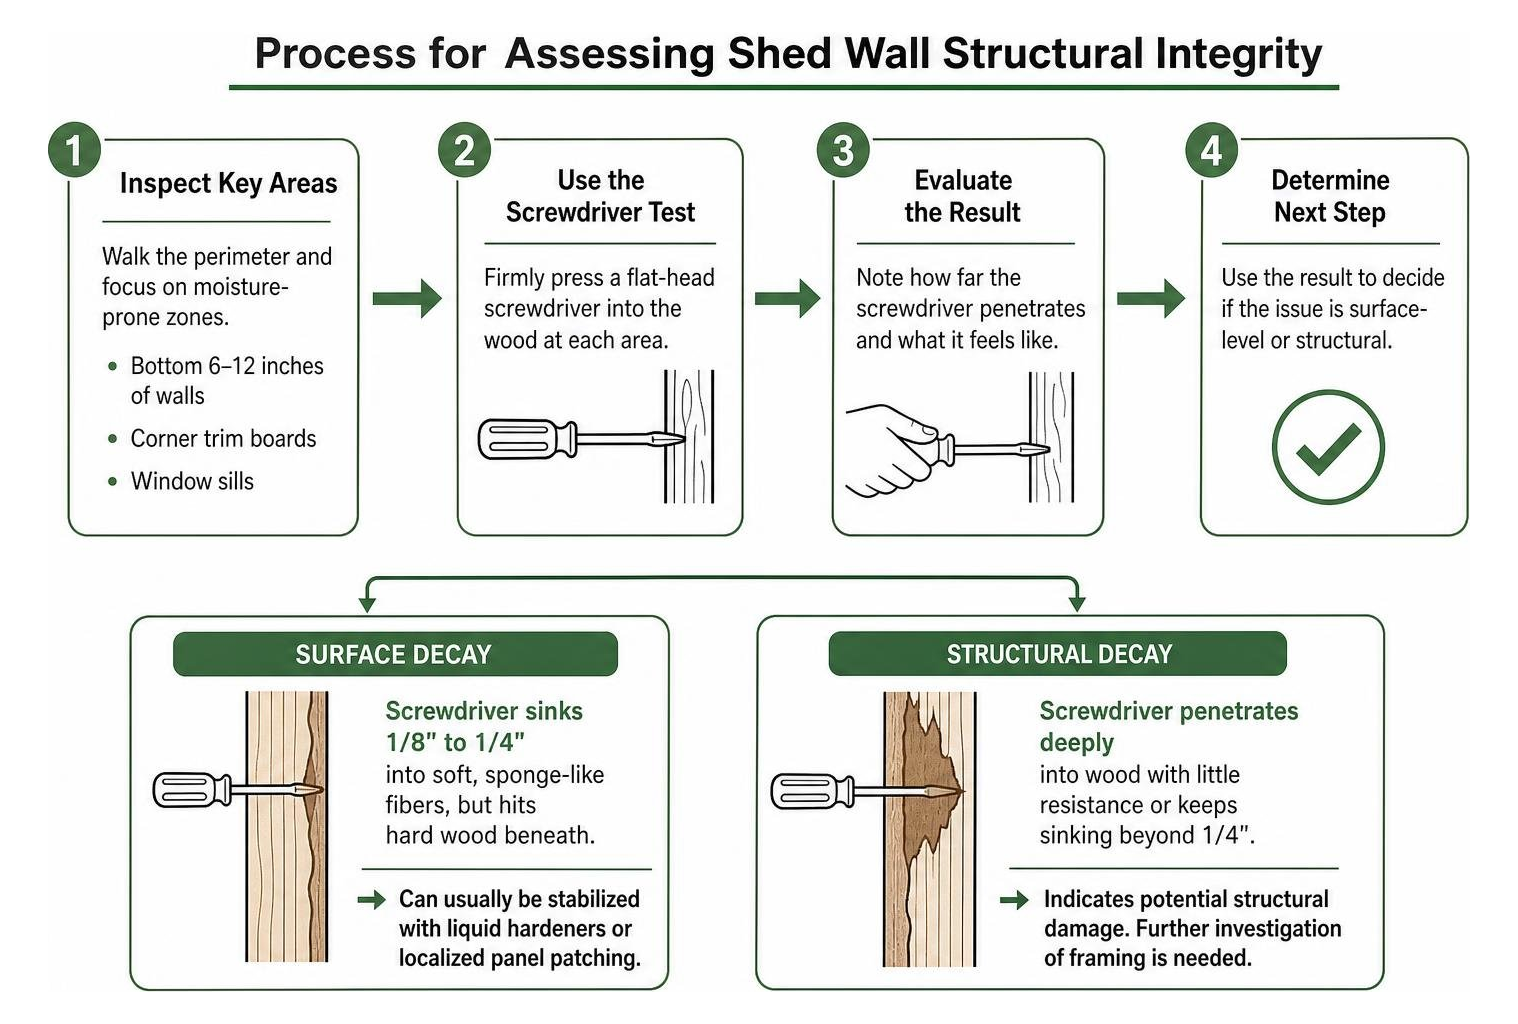
The simplest, most effective diagnostic tool is a standard flat-head screwdriver. Walk the perimeter of your shed and firmly press the screwdriver tip against the bottom 6 to 12 inches of the siding panels, corner trim boards, and around window sills.
- Solid Wood: The screwdriver tip meets immediate resistance and cannot penetrate past 1/16 of an inch without heavy force.
- Surface Decay: The tool sinks 1/8 inch to 1/4 inch into soft, sponge-like fibers, but hits hard wood beneath. This can usually be stabilized using liquid hardeners or localized panel patching.
- Severe Structural Failure: The screwdriver sinks deeper than 1/4 inch or pushes straight through the sheathing into the wall cavity with little resistance.
Inspecting Studs and the Sill Plate
If your exterior panel yields easily, look behind it. Open the shed door and examine the interior base. The horizontal 2×4 framing lumber resting on the concrete pad or floor joists is the bottom sill plate. If moisture has migrated into this plate or the bottom ends of the vertical studs, structural integrity is compromised. Rotted structural framing requires sistering new pressure-treated studs or jacking the wall to replace the bottom plate before you focus on patching and fixing rotted wood siding.
| Damage Assessment Factor | Minor Siding Rot (DIY Repair) | Severe Structural Decay (Major Overhaul) |
|---|---|---|
| Penetration Depth | Under 1/4 inch into outer panel | Complete pass-through into wall cavity |
| Sill Plate Condition | Firm, dry, and structurally sound | Spongy, crushed, or visibly crumbling |
| Affected Area | Bottom 2 to 10 inches of paneling | Framing studs rotted above 12 inches |
| Wall Alignment | Level and plumb; doors open smoothly | Wall sagging, out of square; doors bind |
| Estimated DIY Material Cost | $50 to $200 | $300 to $600+ (plus structural jacks) |
| Professional Repair Cost | $300 to $600 | $500 to $1,500+ |
Step-by-Step Guide to Repairing Rotted Shed Siding
When structural framing is sound and only the bottom strip of your shed sheathing is failing, you do not need to tear down the entire wall. Instead, cut away the damaged strip and install a spliced replacement section shielded by flashing. If the damage spans the full height of multiple walls, review this expert guide to siding replacement to plan a full teardown.

Essential Tools and Materials for Repairing Rotted Shed Siding
Gather your tools and materials before making your first cut:
- Tools:
- Circular saw with carbide-tipped wood blade
- Oscillating multi-tool (for corner cuts and flush trimming)
- Chalk line and 4-foot carpenter’s level
- Flat pry bar and claw hammer
- Cordless drill/driver
- Measuring tape and speed square
- Dripless caulk gun and paint brushes
- Personal protective equipment (safety goggles, dust mask, heavy work gloves)
- Materials:
- Replacement siding (matching 1/2-inch or 5/8-inch T1-11 plywood, engineered LP SmartSide, or solid PVC boards)
- Metal Z-flashing (galvanized steel or aluminum)
- Hot-dipped galvanized 8d siding nails or exterior-grade star-drive screws
- High-performance exterior polyurethane or hybrid polymer sealant
- Liquid wood hardener and two-part structural wood epoxy (for small localized patch repairs)
- Premium exterior wood bonding primer and 100% acrylic latex exterior paint
Repairing Rotted Shed Siding on Wood and T1-11 Panels
Follow this detailed repair procedure to replace rotted panel sections cleanly and permanently.
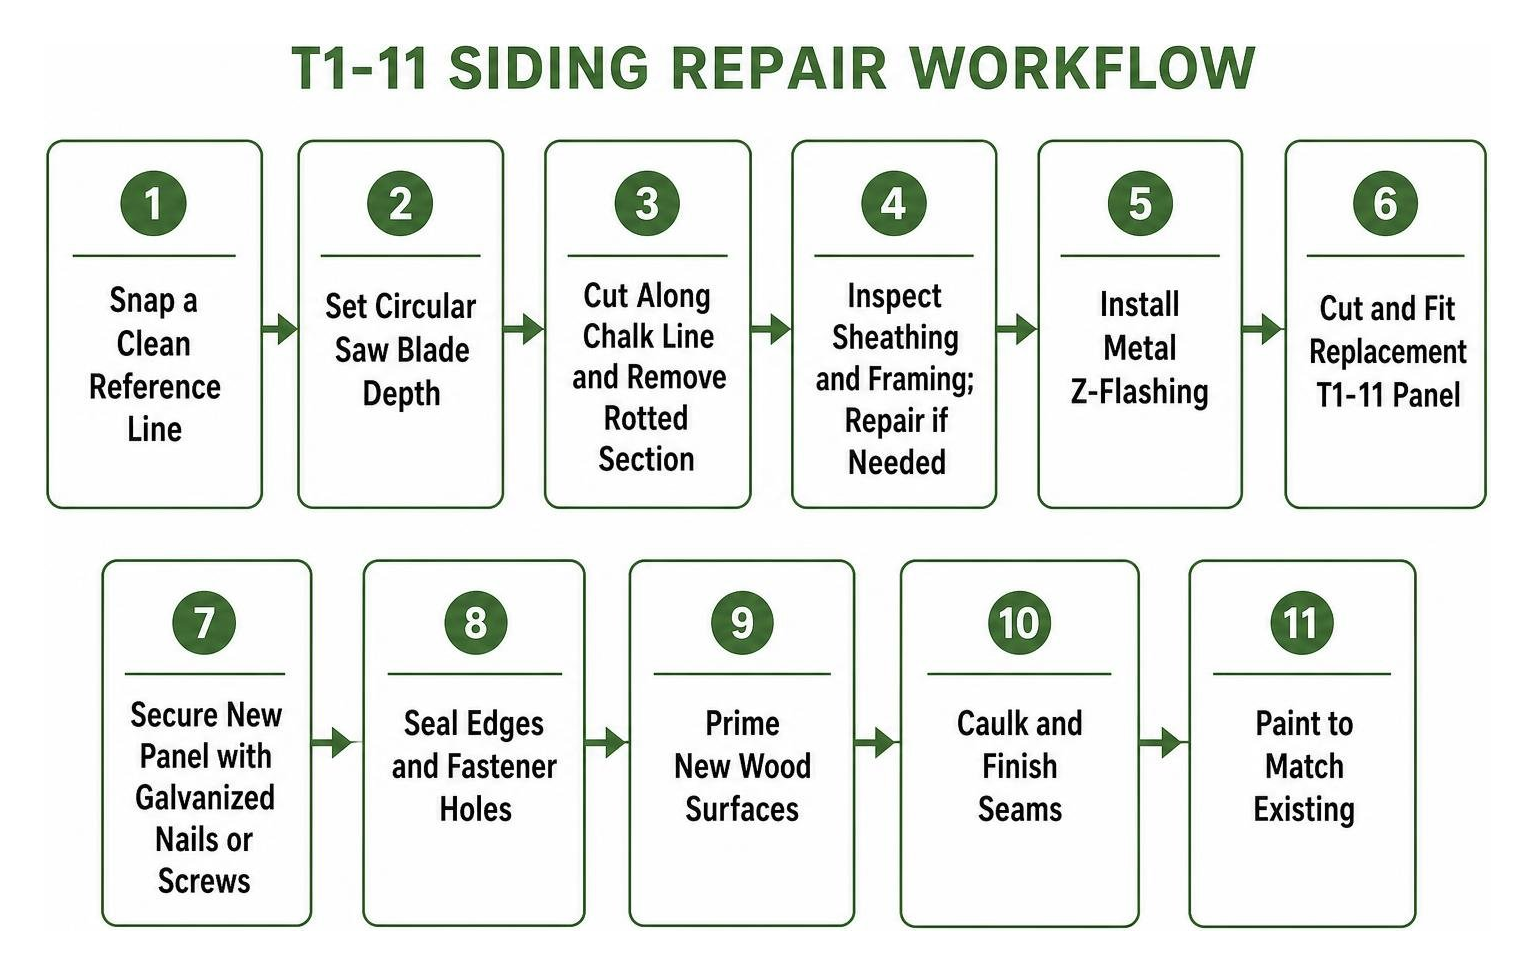
1. Snap a Clean Reference Line
Measure up from the bottom edge of the siding to a point at least 2 inches above the highest detected rot pocket. Typical cuts are made 11 to 12 inches up from the ground to accommodate standard trim sizing. Using your tape measure, mark this height at multiple points across the wall, then snap a level, horizontal chalk line across the entire damaged section.
2. Set Circular Saw Blade Depth
This step is critical: never cut blind into a wall cavity. Measure the exact thickness of your existing siding panel (standard T1-11 is either 1/2-inch or 5/8-inch thick). Set your circular saw blade depth to match this thickness exactly, or 1/16-inch shallower. This prevents the spinning blade from scoring or weakening the internal load-bearing wall studs.
3. Execute the Horizontal Cut
Put on eye protection and run your circular saw along the snapped chalk line. When approaching exterior corners, end posts, or door trim where the circular blade guard hits an obstacle, finish the final inches of the cut using an oscillating multi-tool.
4. Remove the Rotted Wood and Clear the Cavity
Pry the rotted lower wood section away from the wall studs using a flat pry bar. Remove any remaining nails left sticking out of the exposed framing studs using a claw hammer or locking pliers. Clean out debris, dead leaves, insect nests, and deteriorated insulation from the exposed bottom sill plate cavity.
5. Inspect Framing and Sister Studs if Needed
Examine the newly exposed studs. If any stud ends show minor surface softness, scrape away loose fibers, saturate the sound core with liquid wood hardener, and pack with two-part wood epoxy. If a stud has rotted significantly, sister it: cut a matching pressure-treated 2×4 at least 24 inches long, nest it tightly against the damaged stud resting on the sill plate, and drive pairs of 3-inch exterior screws every 6 inches in a staggered pattern. This provides a clean nailing base when fixing siding issues.
6. Install Metal Z-Flashing
Slide the tall vertical back-leg of your metal Z-flashing up underneath the cut bottom edge of the upper, surviving siding panel. The horizontal step of the Z-flashing should sit snugly against the cut bottom edge of the top sheet, while the front drip edge kicks outward.

Critical Best Practice: Never drive nails through the horizontal shelf of Z-flashing. Punctures on that flat surface invite water directly into the framing cavity. Secure the flashing only along its upper vertical flange underneath the top sheet if needed.
7. Measure, Prime, and Dry-Fit Replacement Panels
Measure the height from the bottom edge of your framing down to the ground, leaving a 1-inch to 2-inch gap between the bottom edge of the new board and the ground or concrete base. Cut your replacement material (T1-11, engineered wood, or rot-proof cellular PVC lumber) to length, sizing it 1/8-inch narrower than the horizontal opening to allow for natural thermal expansion.
The End-Grain Rule: The cut end-grain of wood behaves like a bundle of drinking straws, pulling groundwater upward through capillary action. Coat all four cut edges—especially the top and bottom raw end-grains—with exterior bonding primer and allow it to dry before fastening the board to the wall.
8. Fasten Following the 6-12 Rule
Tuck the primed top edge of the new replacement panel underneath the front drop-lip of your metal Z-flashing. Fasten the panel into the structural wall studs using hot-dipped galvanized siding nails or exterior screws. Follow the standard building fastening pattern: space fasteners every 6 inches along perimeter edges and every 12 inches across intermediate wall studs.
9. Seal Vertical Seams and Apply Paint
Do not caulk the horizontal gap where the upper siding meets the metal Z-flashing; that joint must remain open to allow incidental moisture to drain out. However, you must seal all vertical butt joints where the new panel meets existing panels or corner trim using a bead of exterior polyurethane or elastomeric sealant. Finish by applying two coats of exterior 100% acrylic latex paint over the repaired siding.
Repairing Damage on Vinyl and Metal Shed Siding
While wood is the most common material to suffer fungal rot, vinyl and metal outbuildings experience related moisture and impact failures that require specialized repair techniques.
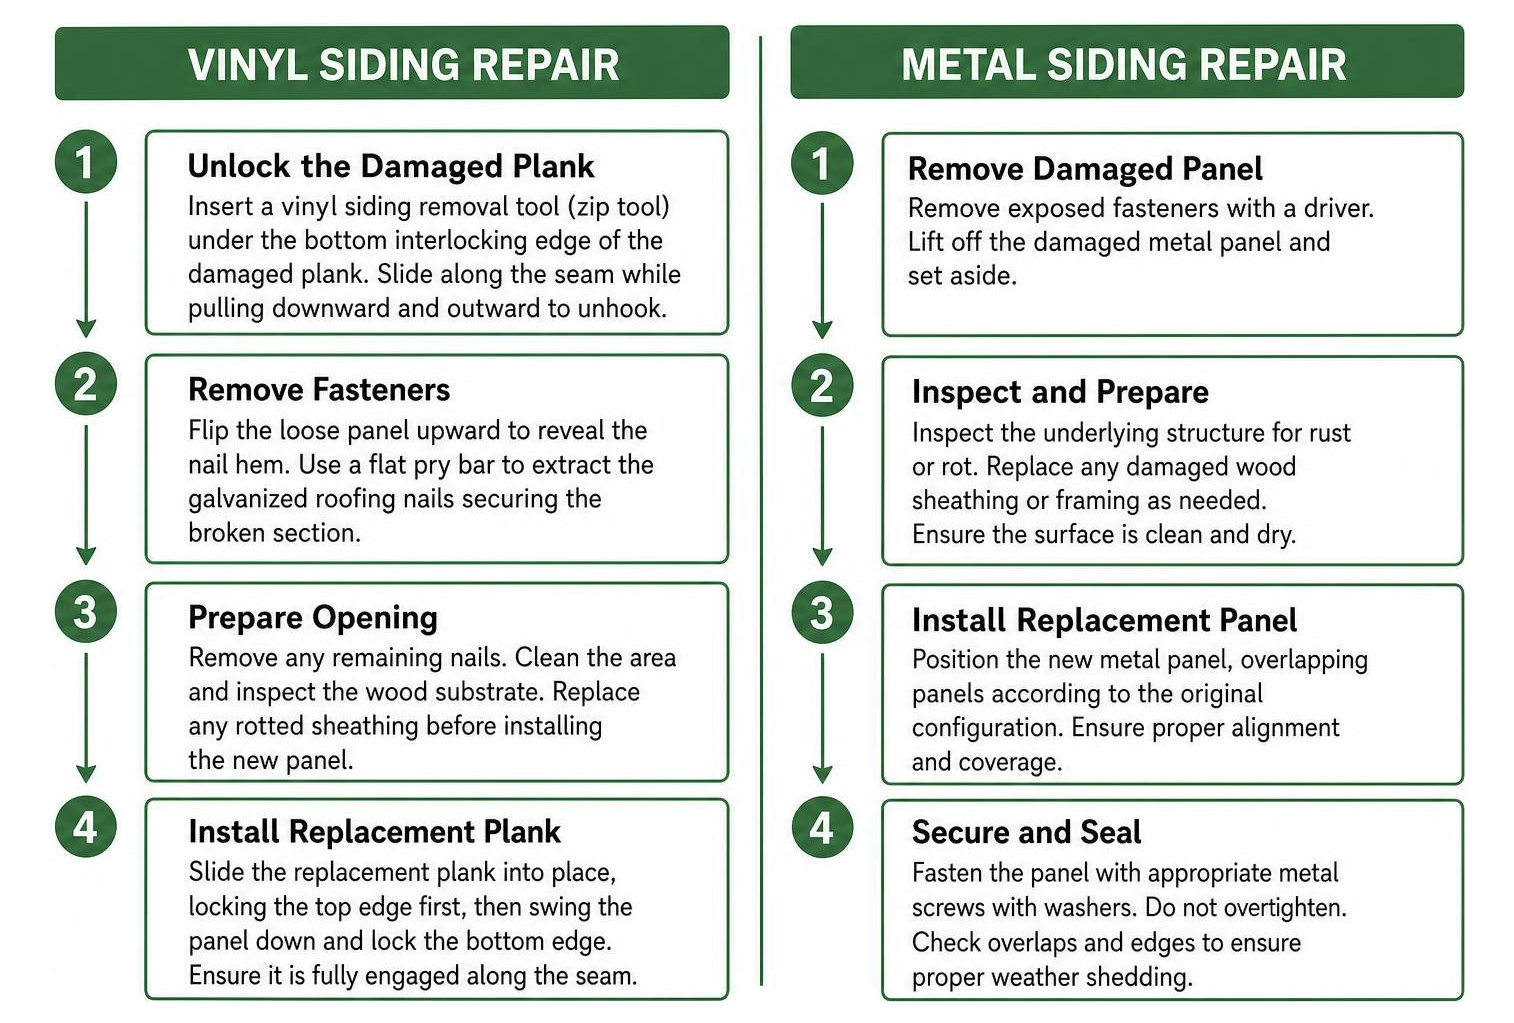
Repairing Vinyl Shed Siding
Vinyl siding does not rot, but it cracks easily from lawnmower debris, string trimmers, or freezing winter impacts, allowing water to rot the wood substrate behind it.
- Unlock the Damaged Plank: Insert a vinyl siding removal tool (zip tool) under the bottom interlocking edge of the damaged plank. Slide the tool horizontally along the seam while pulling downward and outward to unhook the lock.
- Remove Fasteners: Flip the loose panel upward to reveal the nail hem. Use a flat pry bar to extract the galvanized roofing nails securing the broken section.
- Hang the New Panel: Slide the top lock of the replacement vinyl panel into the upper existing piece, and push upward until it clicks into place.
- Fasten Loosely: Drive galvanized siding nails through the center of the pre-punched mounting slots into the wall studs. Leave a 1/32-inch gap (about the thickness of a dime) between the nail head and the vinyl to allow the panel to expand and contract across seasonal temperature swings. Hook the bottom lock using your zip tool. For homeowners managing multi-profile trim sections, our guide to board and batten siding repair covers similar panel-locking techniques.
Repairing Metal Shed Siding
Corrugated steel and aluminum shed panels are vulnerable to rust perforation along the bottom edge where wet soil or damp vegetation touches the metal.
- Cut Away Corroded Sections: Mark a straight line above the rust perforation and use an angle grinder equipped with a metal-cutting cutoff wheel to slice away the rotted metal strip. Wear heavy leather gloves and face protection to defend against metal burrs and sparks.
- Treat Framing and Add Drip Edge: Treat any exposed wood studs with a rust-inhibiting exterior primer. Fasten an aluminum drip edge or flashing profile along the cut framing line.
- Install Replacement Metal: Cut a matching gauge corrugated steel patch overlapping the upper panel by at least one full corrugation rib and 2 inches vertically. Fasten the patch using self-drilling galvanized sheet metal screws fitted with UV-resistant EPDM rubber sealing washers to stop fastener leaks.
Long-Term Prevention: Protecting Your Shed from Moisture
Completing a clean physical repair is only half the battle. If you do not eliminate the original moisture source that caused the rot, your new siding panels will deteriorate just as quickly. A 20-year lifespan is typical for a T1-11 shed without special care, but addressing drainage can push that lifespan well past 30 years.
The Drip-Line Defense: Ground Clearance and Splashback
Most shed panel failures occur in the bottom six inches of the siding due to splashback. When heavy rain pours off an un-guttered roof, it hits bare dirt or grass and rebounds up against the lower wall sheathing.
- Maintain a 6-Inch Ground Clearance: Ensure the bottom edge of your shed siding sits at least 6 inches above surrounding soil or turf. Grade the landscape around your shed so water flows away from the structure at a slope of at least 1 inch per foot for the first 4 to 6 feet.
- Install a Gravel Perimeter Trench: Dig a shallow trench 4 inches deep and 12 to 18 inches wide directly below the drip line around your shed’s perimeter. Line the trench with porous landscape fabric and fill it with 3/4-inch washed crushed stone. When roof runoff hits the gravel, water breaks its fall and drains downward instantly without bouncing muddy water back onto your siding.
- Add Gutters and Downspouts: Installing basic vinyl or aluminum gutters along the shed eaves collects roof water and routes it several feet away from the foundation, protecting siding, trim, and sill plates.
- Trim Surrounding Vegetation: Keep shrubs, decorative grasses, and tall weeds trimmed back at least 12 inches from the walls. Dense foliage traps humidity against the wood siding and blocks drying breezes, creating an ideal breeding ground for wood-destroying fungi.
If you inspect your outbuilding and find that foundational framing rot has spread extensively through multiple structural walls, review these signs it’s time to call a siding company to decide whether professional siding restoration is the safer choice.
Frequently Asked Questions About Shed Siding Repair
How much does it cost to repair rotted shed siding DIY vs hiring a pro?
DIY repairs typically cost between $50 and $200 for materials, whereas professional labor can range from $500 to $1,500 depending on the extent of the structural damage. If the damage is limited to the bottom 12 inches of exterior T1-11 or vinyl cladding, a homeowner with basic carpentry tools can complete the repair over a single weekend for the price of one sheet of siding, a length of Z-flashing, a tube of polyurethane sealant, and a gallon of primer. When decay extends deep into load-bearing sill plates, floor joists, or wall studs, structural jacking and framing repairs drive professional labor costs higher.
What is the best material to use for the bottom edge of a shed?
Cellular PVC lumber and factory-primed engineered wood (such as LP SmartSide) are the two best replacement materials for lower shed walls. Cellular PVC is impervious to moisture, will never rot, crack, or swell, and can be cut and nailed using standard woodworking tools. If you prefer the look of wood grain to match existing T1-11 plywood, pressure-treated exterior-grade plywood rated for ground contact (UC4A) or engineered strand composite boards coated with water-resistant zinc borate provide superior defense against fungal growth.
How do I stop moisture from wicking up the bottom of shed panels?
To prevent capillary action from pulling ground water up into siding panels, take three critical steps:
- Never allow siding to touch the ground: Maintain at least a 6-inch separation between siding and soil.
- Seal all end-grain cuts: Apply two coats of exterior oil-based or high-adhesion acrylic primer directly to the bottom cut edge of every wood panel before installation.
- Incorporate mechanical flashing: Install metal Z-flashing at horizontal joints and establish a crushed gravel drip edge beneath the roof overhangs to break water droplet surface tension and prevent ground splashback.
Conclusion
A rotted lower shed panel does not mean your outbuilding is destined for the landfill. By testing the depth of decay, clearing away fungal fibers, sistering damaged studs, and installing replacement panels with proper metal Z-flashing, you can restore structural integrity and keep your tools dry for years to come.
If you discover extensive structural decay across your shed, garage, or home exterior and want expert help in Southeastern Wisconsin—including Fort Atkinson, Lake Mills, Jefferson, Delavan, and Lake Geneva—the team at Smith Roofing & Exteriors is here to help. Reach out to us today for professional siding installation and repairs to keep your property protected against our harsh midwestern weather.