Why Wood Rot Is One of the Biggest Threats to Your Home’s Exterior
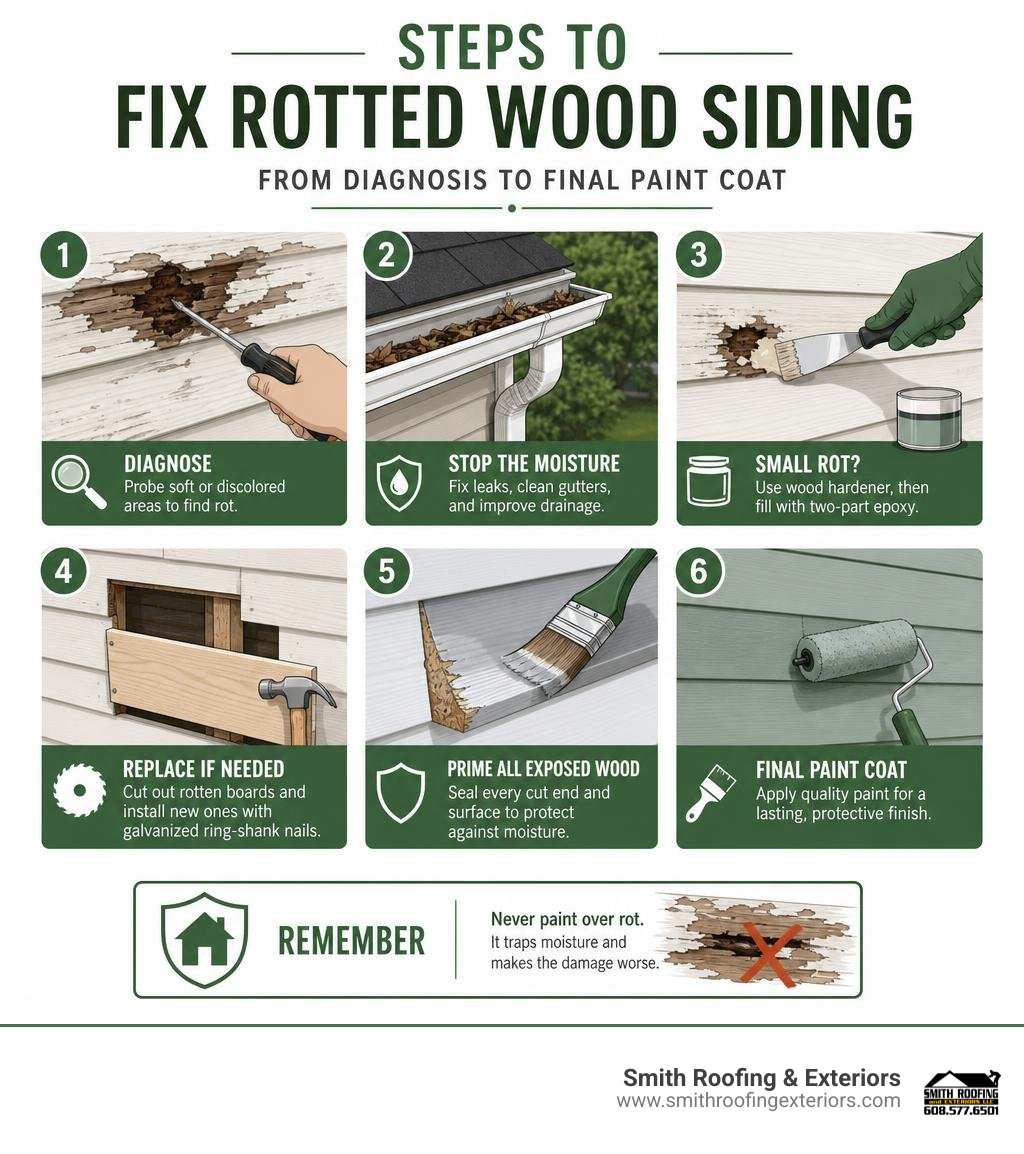
If you need to fix rotted wood siding, here’s the short answer:
- Find the rot — press a flathead screwdriver into soft or discolored areas. If it sinks in, the wood is rotted.
- Stop the moisture source — repair failed caulking, clean gutters, or fix drainage before touching the siding.
- Small rot (surface only)? — use a two-part epoxy wood filler after applying a wood hardener.
- Deep or widespread rot? — cut out and replace the full board using galvanized ring-shank nails.
- Prime all exposed wood — seal every cut end and surface before painting.
- Never paint over rot — it traps moisture and makes the damage worse.
Rotted wood siding is one of those problems that looks manageable from the outside but can quietly turn into a major structural headache. What starts as a soft spot near a window or a patch of peeling paint at the base of your wall can spread deep into the sheathing and framing if left alone — especially in Wisconsin’s wet springs and harsh freeze-thaw winters.
The good news? Most rotted siding can be repaired or replaced without touching the rest of the wall. You just need to know what you’re dealing with before you pick up a tool.
I’m Matt Smith, owner of Smith Roofing & Exteriors, and I’ve spent years helping Wisconsin homeowners fix rotted wood siding caused by everything from clogged gutters to failed caulking around windows. In this guide, I’ll walk you through exactly how to diagnose the damage, choose the right repair method, and make sure the rot doesn’t come back.
Essential fix rotted wood siding terms:
Understanding What Causes Wood Siding to Rot
Wood rot isn’t just an aesthetic eyesore; it is a biological process. Rot is caused by tiny wood-decaying fungi that eat away at the cellular structure of the wood fibers, leaving them soft, spongy, and brittle. For these fungi to survive and thrive, they need three basic elements: oxygen, a comfortable temperature, and constant moisture. Since we can’t change the air or the temperature in Southeastern Wisconsin, controlling moisture is our only weapon.
When moisture is allowed to sit on or sink into raw wood, the fungi go to work. This most frequently happens due to a few common culprits:
- Failed Caulking: Over time, the caulk seals around windows, doors, and joints shrink, crack, and fail, creating a direct path for rainwater to seep behind the siding.
- Clogged or Leaking Gutters: When gutters overflow, water cascades down the side of your home instead of flowing safely away through downspouts. This leaves your siding constantly soaked.
- Ground Splash-Back: The lowest courses of siding are particularly vulnerable. Rainwater hitting the ground or rooflines below splashes dirt and water back up onto the lower boards.
- Poor Airflow and Shrubbery: Overgrown bushes and trees that press against your home trap moisture against the wood, preventing it from drying out after a storm.
Common Areas Vulnerable to Rot
While rot can happen anywhere water pools, we see it most often in highly predictable locations:
- Window and Door Frames: Where horizontal trim meets vertical siding, failed caulk lines act like tiny water funnels.
- Near Rooflines and Gutter Paths: Siding installed too close to roof shingles will wick up water like a sponge.
- The Bottom Edge of the Siding: Where the wood sits closest to the ground, foundation, or decks.
- On the Shaded Sides of the Home: Shaded walls dry much slower after a storm, giving fungi a longer window to grow.
If you are noticing rot spreading near your roofline, you might also want to check out The Homeowner Guide To Specialized Roof And Soffit Repairs to ensure your roof, fascia, and soffits are properly protected.
How to Inspect and Diagnose Wood Siding Damage
Before you can fix rotted wood siding, you have to figure out how far the damage has spread. Siding damage usually falls into three tiers: cosmetic surface issues, structural board damage, or systemic wall cavity damage.
To get an accurate assessment, we recommend a three-step inspection:
- Visual Inspection: Look for peeling paint, dark water stains, bubbling finishes, or boards that look warped or cupped.
- The Probe Test: Use a simple tool like a flathead screwdriver to physically test the density of the wood.
- Moisture Meter Testing: To safely repair or paint wood, its moisture content must be below 19%. Anything above 19% requires drying out before you can apply primers, sealants, or fillers.
The Screwdriver Test to Identify Rot
The screwdriver test is the most reliable, low-tech way to find hidden dry rot or wet rot. Take a flathead screwdriver and gently press the tip into any discolored, bubbled, or suspicious-looking areas.
- Healthy Wood: The screwdriver will resist penetration and bounce off the surface.
- Rotted Wood: The screwdriver will sink easily into the wood, feeling soft, spongy, or crumbling under light pressure.
Be sure to test the wood every few inches around the damaged area to find the boundary where the rot stops and solid, healthy wood begins.
Checking Behind the Siding for Hidden Damage
If you find that your siding is completely soft, you need to check what is happening behind it. Once the wood siding fails, water can easily penetrate the underlying layers, causing structural damage.

When you pull back a damaged board, inspect the following:
- House Wrap / Weather-Resistant Barrier (WRB): Check for tears, holes, or signs of water passing through.
- Plywood Sheathing: Press your screwdriver into the sheathing. If the plywood is soft or crumbling, it must be cut out and replaced before installing new siding.
- Framing and Studs: Look for dark mold, wood rot, or structural weakening of the wall studs.
If you find soft sheathing or mold on the framing, stop and call a professional. For more details on diagnosing general exterior issues, check out How To Fix Siding Issues In 5 Simple Steps.
When to Replace vs. DIY Fix Rotted Wood Siding
Not every piece of damaged wood needs to be torn off. Depending on the depth of the rot and the overall condition of your home’s exterior, you can choose between a localized repair or a full board replacement.
| Damage Tier | Characteristics | Best Solution | Estimated Cost (per 100 sq. ft.) |
|---|---|---|---|
| Tier 1: Cosmetic | Surface cracks, minor soft spots, rot depth under 1/4 inch. | Two-part epoxy filler & wood hardener. | $20 to $80 (DIY materials) |
| Tier 2: Board Damage | Deep rot, split boards, structural failure of individual planks. | Full board replacement. | $400 to $1,200 (Professional) |
| Tier 3: Systemic | Widespread rot across multiple walls, soft sheathing, framing damage. | Full siding replacement & structural repair. | $1,500+ (Professional) |
We recommend using the 25% Rule: If the rot affects less than 25% of a board or a small isolated section of trim, a budget-friendly repair is ideal. If the rot covers more than 25% of your total siding area, or if the board is structurally split, replacement is the safer and more reliable option.
That different woods have different lifespans. While standard wood siding lasts 20 to 30 years, cedar siding can last up to 75 years, and premium cypress wood siding can last 100 years or more if properly maintained. If you have high-value cedar or cypress, patching is often preferred to maintain the historic look. For a comprehensive look at the differences, you can read A Full Guide on Wood Siding Repair and Replacement \| Family Handyman.
Using Epoxy to Fix Rotted Wood Siding on a Budget
For Tier 1 cosmetic damage, a high-quality, two-part epoxy system is your best friend. Brands like Abatron, System Three, or Advanced Repair Technologies chemically cure to become harder than the wood itself while remaining flexible enough to expand and contract with seasonal temperature changes.
To perform an epoxy repair:
- Remove the loose rot: Scrap or grind out the soft wood down to solid fibers.
- Apply penetrating wood hardener: This liquid consolidant penetrates deep into the remaining weakened wood fibers, binding them together and stopping the decay.
- Mix and apply the two-part epoxy: Press the mixed epoxy firmly into the cavity, overfilling it slightly.
- Sand and shape: Once fully cured, sand the patch flush with the surrounding wood.
- Prime and paint: Seal the patch with an exterior primer before painting.
For a detailed walkthrough of this process, see Professional Tips for Repairing Rotten Wood Siding.
When to Choose Full Board Replacement
If the wood is crumbling, split all the way through, or soft across the entire length of the board, epoxy won’t save it. You must cut out the damaged section and install a matching piece of wood.
If you have board and batten siding instead of horizontal lap siding, the process is slightly different because you have to remove the vertical battens first. You can learn more about this in our guide to Board And Batten Siding Repair Made Simple.
(Note: If your home has alternative siding materials, you can find helpful tips in our guides on Fixing Fiber Cement Siding For A Flawless Exterior or Vinyl Siding Repair Patching Things Up The Easy Way.)
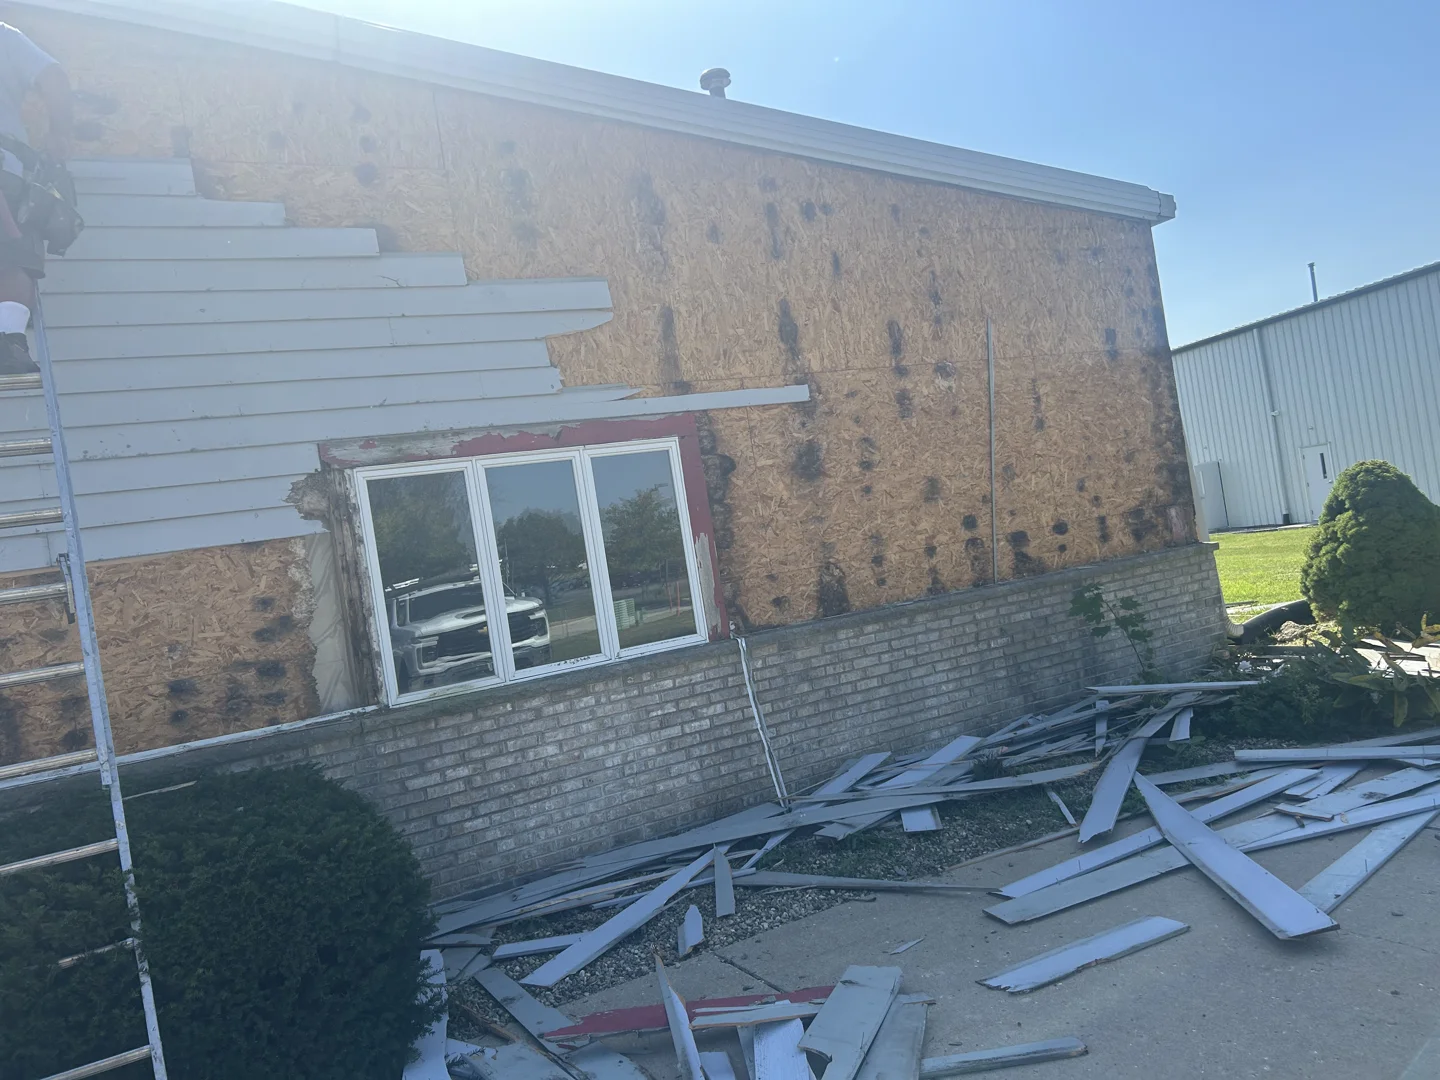
Step-by-Step Guide to Replacing a Full Lap Siding Board
Replacing a damaged piece of horizontal lap siding is a classic DIY carpentry project, but it requires patience and the right tools.
Tools and Materials Required:
- Oscillating multi-tool (or keyhole saw)
- Flat pry bar (and a scrap piece of 1/4-inch plywood)
- Wooden shims
- Utility knife
- Hammer and nailset
- 8d galvanized ring-shank nails
- Paintable exterior acrylic latex caulk
- High-quality exterior wood primer and paint
- Safety glasses and dust mask
Removing the Damaged Siding Safely
To replace a board without damaging the overlapping pieces above it, you have to work carefully.
- Score the Caulk Lines: Use a sharp utility knife to score the caulk lines at the joints and edges of the damaged board. This prevents the paint on adjacent boards from peeling or tearing when you remove the piece.
- Shim the Siding: Gently tap wooden shims under the bottom edge of the board directly above the damaged piece. This lifts it slightly (about 1/8 to 3/16 inch), exposing the nails holding your damaged board in place.
- Cut or Pull the Nails: Slide a hacksaw blade or an oscillating tool with a metal-cutting blade behind the board to cut the nails. Alternatively, use a flat pry bar to pull the nails. Pro tip: Place a piece of 1/4-inch plywood under your pry bar to protect the surrounding siding from being crushed.
- Make the Cut: If you are only replacing a section of a long board, mark your cut line centered directly over a wall stud. Use your oscillating tool to make a clean, vertical plunge cut.
- Pry Off the Board: Carefully pry the rotted board out from under the course above.
For a deeper dive into the mechanics of board removal, check out Wood Siding Repair: How to Fix Rot and Damage the Right Way.
Preparing the Wall Cavity and Sheathing
Once the board is out, don’t rush to nail the new one in. Take a moment to prep the wall cavity:
- Dry the Wall: If the sheathing or house wrap is damp, let it dry completely. The moisture content must be below 19% before you seal it back up.
- Repair the House Wrap: If you find any tears or holes in the weather barrier, patch them using high-quality house wrap tape.
- Check Wall Thickness: In older homes, you might find that modern siding boards are thinner than the original historic siding. If there is a thickness discrepancy, rip custom furring strips out of scrap wood and install them vertically to create a flush, solid mounting surface for your new board.
Installing and Sealing the New Board
Now you are ready to install the new piece of wood:
- Measure and Cut: Measure the opening carefully. Cut your replacement board 1/8 inch shorter than the opening. This leaves a 1/8-inch expansion gap at the joints to allow the wood to expand in our humid Wisconsin summers without cupping or warping.
- Prime All Six Sides: This is the most important step! Prime all four faces and, most importantly, both cut ends of the replacement board before installation. The end grain of wood acts like a bundle of drinking straws, wicking up water. Unprimed cut ends will start to rot within two wet seasons.
- Back-Caulk and Slide in Place: Apply a bead of high-quality acrylic latex caulk to the back edges of the joints (back-caulking) to prevent water from getting behind the wood. Slide the new board up under the course above, maintaining at least a 1-inch overlap.
- Nail It Down: Secure the board into the wall studs using 8d hot-dipped galvanized ring-shank nails. Ring-shank nails hold much tighter than smooth nails and won’t rust or leave ugly red streaks down your paint.
- Seal and Paint: Use a nailset to sink the nail heads slightly below the surface, fill them with exterior wood filler, sand them smooth, and apply your final coats of exterior paint.
For more helpful patching tips, see The Ultimate Siding Repair and Patching Guide | MyHomePros.
Frequently Asked Questions about Siding Rot
How much does it cost to fix rotted wood siding?
In the July 2026 market, professional wood siding repair generally ranges from $400 to $1,200 per 100 square feet, depending on the wood species (like pine vs. premium cedar) and the height of the repair. Siding contractor labor rates typically fall between $40 and $90 per hour.
If you live in the Burlington area and want a detailed breakdown of local repair pricing, check out our guide on Quick Fixes And Full Overhauls Siding Repair In Burlington.
Can you paint over rotted wood siding?
Absolutely not. Painting over rotted wood is a temporary cosmetic band-aid that actually accelerates the decay. Paint creates a sealed film over the wood, trapping moisture underneath. This trapped moisture feeds the rot-causing fungi, causing the wood to decay even faster beneath the surface. Always scrape, treat, and repair or replace the wood before applying paint.
How do you prevent wood siding from rotting again?
Prevention is the best way to protect your investment:
- Keep Landscaping Clear: Keep shrubs, bushes, and tree branches trimmed back at least 12 inches from your siding to allow proper air circulation.
- Maintain Your Gutters: Clean your gutters twice a year (spring and fall) to prevent water from overflowing down your siding.
- Maintain a Roof Gap: Ensure there is a 1-inch gap between your wood siding and your roof shingles to prevent the wood from wicking up water.
- Repaint Regularly: Wood siding should be repainted or restained every five to seven years to maintain a weather-resistant barrier.
Conclusion
Taking the time to fix rotted wood siding correctly protects your home’s structural integrity, preserves its curb appeal, and prevents small issues from turning into costly renovations down the road. Whether you decide to tackle a minor epoxy repair over the weekend or replace a few damaged lap boards yourself, the key is to stop the moisture source first and prime every single cut end.
If you find that the rot has spread deep into your wall sheathing, or if you simply don’t feel comfortable working on an extension ladder, we are here to help. At Smith Roofing & Exteriors, our experienced local team provides transparent pricing and high-quality materials to keep homes across Fort Atkinson, Lake Mills, Jefferson, Burlington, Delavan, Elkhorn, Lake Geneva, Walworth, and Edgerton safe and dry.
Ready to get your siding back in perfect shape? Schedule a Siding Consultation with us today, and we’ll help you find the right solution for your home!