Protect Your Home With Timely Residential Roof Repairs
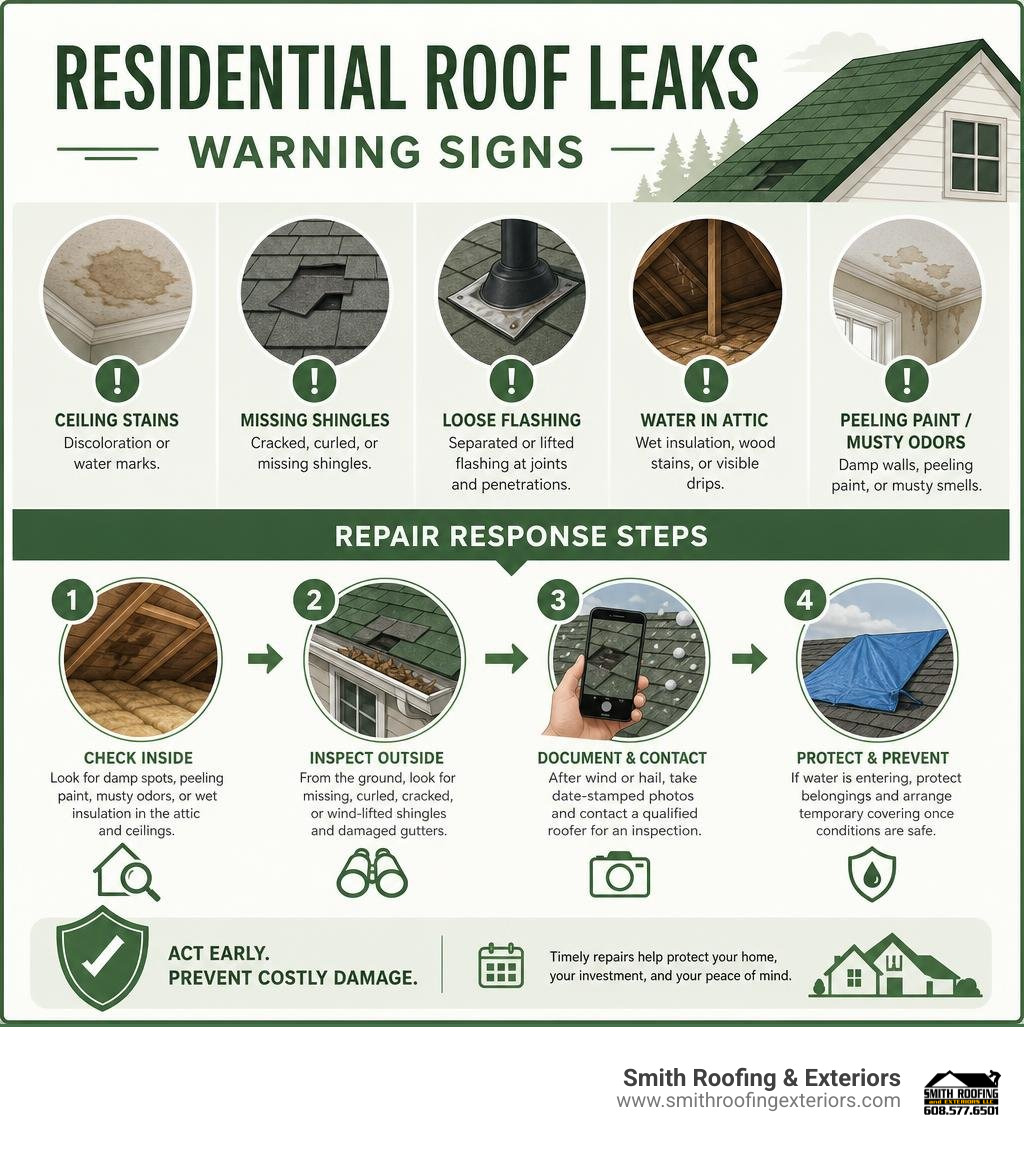
If you see a ceiling stain, missing shingles, loose flashing, or water in the attic, schedule a roof inspection as soon as weather allows. Residential roof repairs are usually most effective when damage is isolated and addressed quickly – before water reaches insulation, roof decking, walls, or ceilings.
Start with these practical steps:
- Check the attic and ceilings for damp spots, peeling paint, musty odors, or wet insulation.
- From the ground, look for missing, curled, cracked, or wind-lifted shingles and damaged gutters.
- After wind or hail, take date-stamped photos and contact a qualified roofer for an inspection.
- If water is actively entering the home, protect belongings and arrange temporary covering once conditions are safe.
Many leaks begin at roof transitions, not in the middle of a shingle field. Flashing around chimneys, vents, skylights, and walls is a frequent failure point, accounting for an estimated 40% to 50% of residential roof leaks. In Wisconsin, wind, hail, snow, ice dams, and freeze-thaw cycles can turn a small opening into costly interior damage fast.
A repair may be the right choice when the roof is under 15 years old, damage is limited, and the repair estimate is less than about 25% of replacement cost. But widespread leaks, brittle shingles across multiple areas, sagging decking, or repeated repairs can point to replacement instead.
I’m Matt Smith, owner of Smith Roofing & Exteriors. I help homeowners understand residential roof repairs so they can make informed choices about protecting their property from weather, water, and long-term wear.
Understanding Common Residential Roof Repairs and Failure Points
Roofing systems are complex assemblies designed to shed bulk water under extreme weather conditions. While an asphalt shingle roof may present a uniform surface, its vulnerability lies along transitions, valleys, joints, and penetrations. When moisture finds a minuscule gap, gravity and capillary action pull water beneath the underlayment, rotting plywood decking and saturating structural framing long before a wet spot appears on your drywall. Understanding the mechanics behind these failure points helps homeowners catch problems early.
Critical Flashing and Penetration Failures
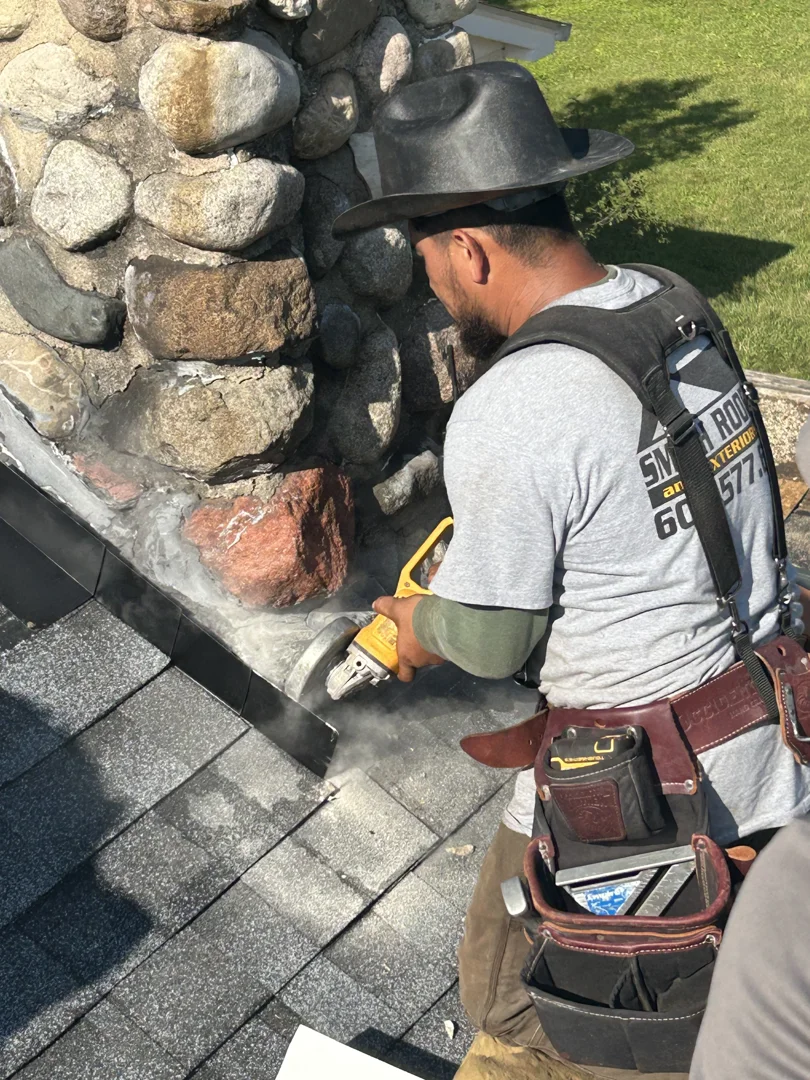
According to National Roofing Contractors Association (NRCA) field data and post-storm assessments, flashing failures cause between 40% and 50% of all residential roof leaks. Flashing consists of thin sheets of galvanized steel, aluminum, or copper installed at roof intersections, vertical wall transitions, chimneys, and dormers.
The primary culprits behind penetration leaks include:
- Step and Counter Flashing Deterioration: At sidewalls and chimneys, step flashing pieces overlap shingles in an L-shape pattern. Counter flashing is embedded into masonry mortar joints (reglets) to overlap the step flashing. Over time, mortar joints crumble, sealants dry out, or thermal expansion pulls metal away from brick, opening a direct funnel for driving rain.
- Chimneys Lacking Crickets: Chimneys wider than 30 inches without an upslope saddle or cricket (as mandated by IRC R903.2.1) collect debris, standing water, and heavy snowpacks against rear flashing seams.
- Vent Pipe Boot Degradation: Standard neoprene and EPDM rubber collars on plumbing vent stacks have an average lifespan of 10 to 15 years. Prolonged UV exposure causes the rubber to dry rot, crack, and pull away from the pipe, permitting water to travel down the stack straight into attic rafters.
- Skylight Seal Failure: Skylights face intense thermal stress. Perimeter apron flashing, head flashing, or factory glass seals fail under sustained solar baking and freeze-thaw cycles, leading to interior frame staining.
Ignoring these penetration points quickly compounds repair expenses; understanding the 5 reasons to fix roof leaks ASAP helps homeowners avoid major secondary drywall and structural framing expenses.
Wind, Hail, and Shingle Blow-Off Damage
Severe Midwestern storms bring extreme wind gusts and hail that compromise the structural integrity of residential roofing components. High winds lifting shingle tabs break the underlying factory thermal adhesive seal. Even if the shingle settles back down, the broken seal leaves the component vulnerable to shingle uplift and wind-driven rain penetration during subsequent storms.
Key exterior indicators of wind and hail distress include:
- Missing or Displaced Shingles: Entire tabs or architectural shingle segments blown away from high wind sheer.
- Creased Shingles: Horizontal crease lines across the top third of shingle tabs where uplifted shingles folded backward in the wind.
- Impact Punctures and Bruising: Hail strikes fracturing the internal fiberglass matting, dislodging protective mineral granules, and exposing asphalt to accelerated UV degradation.
- Granule Deposition in Valleys and Gutters: High-volume washouts of ceramic granules that strip UV protection and accelerate shingle aging.
When severe weather strikes, acting quickly to replace compromised components prevents water from saturating underlying synthetic underlayment. Reviewing the difference that a timely roof repair can make illustrates how rapid response preserves weatherproofing without requiring extensive restoration.
Ice Dams, Deck Rot, and Secondary Interior Water Infiltration
In Southeastern Wisconsin winter environments, chronic freeze-thaw cycles create destructive ice damming. Inadequate attic insulation and poorly balanced intake and exhaust ventilation allow warm interior air to heat the upper roof deck. Snow melts on the upper planes, flows downward to cold eaves and unheated overhangs, and refreezes into a thick ice ridge.
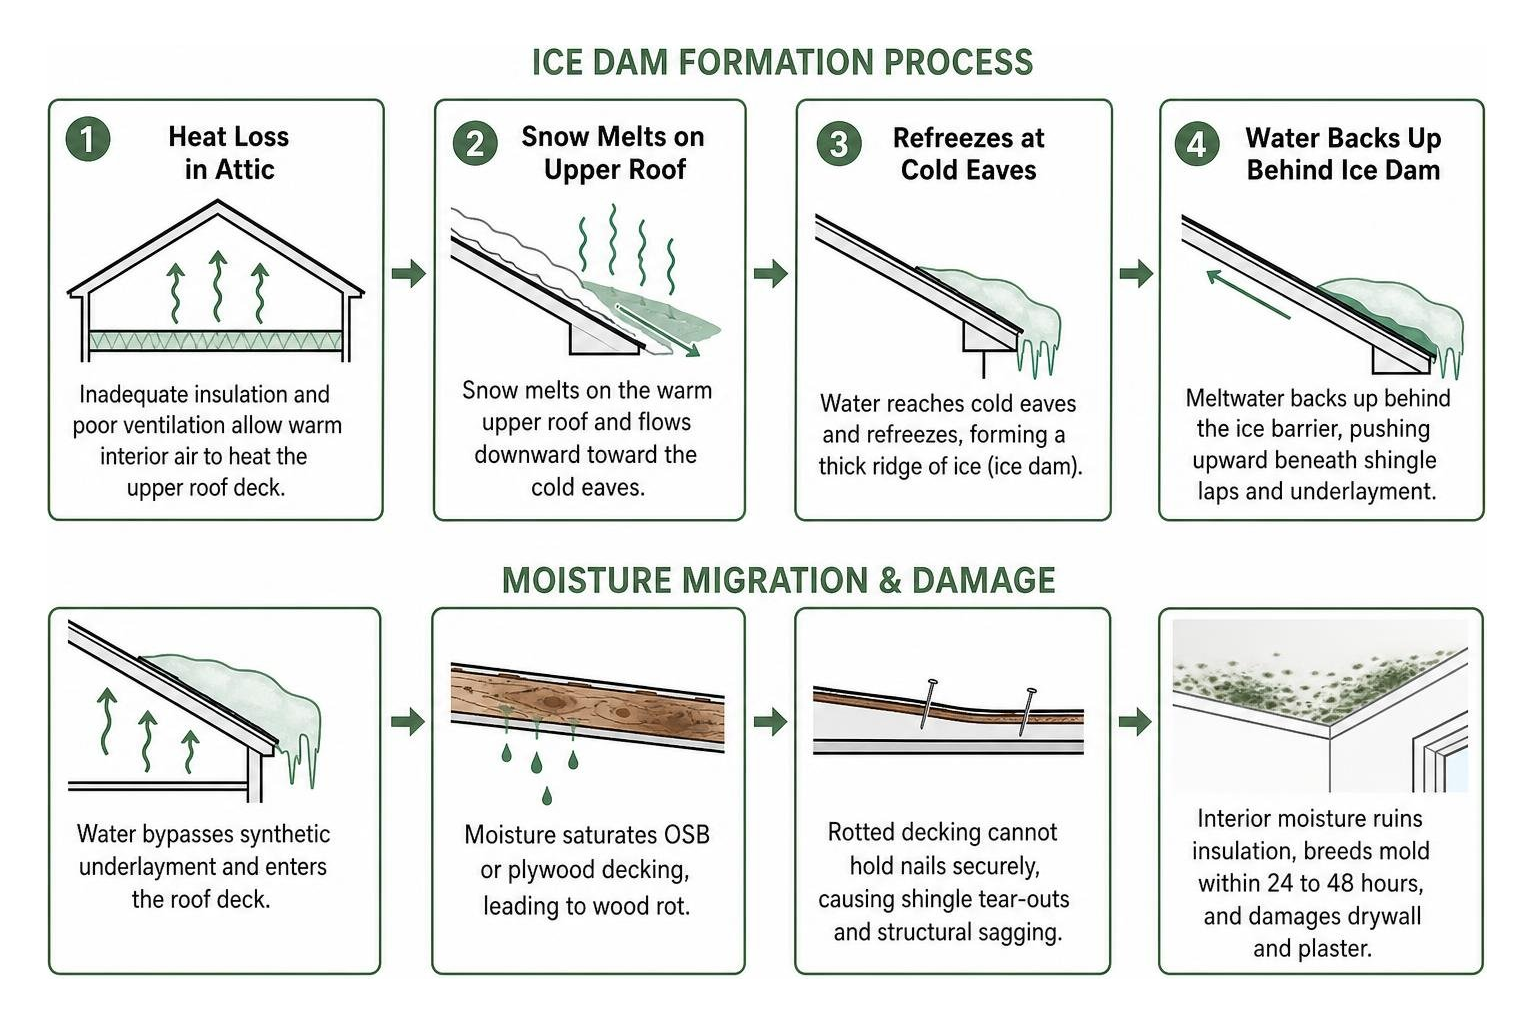
Trapped meltwater backs up behind this ice barrier, pushing upward beneath shingle laps and bypassing synthetic underlayment. The resulting moisture saturation leads to wood rot across oriented strand board (OSB) or plywood decking. Left unaddressed, rotted decking cannot hold roofing nails securely, causing shingle tear-outs and soft structural sagging. Inside the home, unchecked moisture ruins fiberglass insulation, breeds toxic mold colonies within 24 to 48 hours, and destabilizes plaster and drywall ceilings. Applying proper roof maintenance tips ensures balanced attic airflow and prevents costly winter water intrusion.
Repair vs. Replacement: Making the Right Call for Your Home
Determining whether to perform targeted repairs or invest in a full tear-off and replacement comes down to structural economics, system age, and the overall integrity of the roofing plane.
Evaluating Roof Age and the 25 Percent Cost Rule
A reliable industry standard is the 25 Percent Rule: if the estimated cost of localized repairs is under 25% of the total price of a new roof installation, and the existing system has substantial remaining service life, targeted repairs are generally the most financially sound choice.
Consider the following system factors:
- Age Benchmark: A standard 3-tab or architectural asphalt shingle roof under 15 years old with isolated storm damage is an ideal candidate for precision repair. Roofs approaching 20 years or older are nearing the end of their economic lifespan and usually warrant replacement, as aging shingles become too brittle to manipulate without cracking neighboring tabs.
- Scope of Failure: If water intrusion is confined to a single pipe boot, localized valley, or single wind-blown slope, precision restoration preserves your budget. However, if granule loss is uniform across all slopes, shingle edges are cupping, or multiple unrelated leaks are occurring across different rooms, continuing to patch individual spots becomes a financial drain.
Homeowners weighing these factors should review our comprehensive guide on roof repair vs replacement decision alongside the 5 signs that it’s time to install a new roof to assess their property accurately.
Assessing Costs for Standard Residential Roof Repairs
In 2026, the national typical cost to repair a residential roof leak ranges between $300 and $1,500, with the median residential repair landing between $600 and $850. Pricing varies based on the leak source, roof pitch, accessibility, and the condition of the underlying wooden deck.
The following table breaks down typical repair costs across common leak points:
| Repair Category / Failure Source | Estimated Cost Range (2026) | Primary Cost Drivers | Typical Labor Time |
|---|---|---|---|
| Plumbing Vent Pipe Boot | $150 – $400 | Rubber collar replacement, retrofit sleeves, polyurethane sealant | 1 – 2 Hours |
| Wind-Damaged Shingle Patch | $250 – $650 | Shingle bundle matching, unsealing neighboring tabs, nail extraction | 2 – 4 Hours |
| Valley Flashing Restoration | $600 – $1,800 | Water volume management, ice-and-water membrane, metal fabrication | 4 – 8 Hours |
| Chimney Step & Counter Flashing | $500 – $1,800 | Mortar reglet cutting, custom bent metal, cricket installation (+$300-$700) | 4 – 8 Hours |
| Skylight Perimeter Flashing | $450 – $1,200 | Siding/shingle removal, apron kit integration, deck inspection | 3 – 5 Hours |
| Rotted Decking Replacement | $300 – $1,000 (per sheet) | Structural OSB/plywood tear-out, joist inspection, re-nailing | 3 – 6 Hours |
Roof pitch significantly impacts repair pricing. Steeper pitches (such as an 8:12 or 12:12 slope) require specialized OSHA-compliant fall arrest systems, roof staging, and higher contractor insurance premiums, which naturally increases labor costs compared to standard walkable 4:12 pitches. Homeowners can read further technical specifications in 2026 roof leak repair cost and component standards.
Storm Damage, Emergency Response, and Insurance Claims
Severe convective storms, tornadic winds, and sudden hail can cause immediate, catastrophic roof failures that require urgent stabilization.
Spotting Emergency Hazards and Securing Temporary Protection
When an emergency structural breach occurs—such as a fallen tree branch penetrating the roof deck or wind tearing off large sections of underlayment—homeowners must act quickly to mitigate interior water damage. A 24-hour active leak producing a minor ceiling stain typically creates $300 to $800 in interior drywall and paint repairs. If left unchecked for six weeks, water infiltration can easily cause $4,000 to $12,000 in hidden structural framing rot, ruined insulation, and mandatory mold remediation.
Emergency mitigation priorities:
- Avoid Walking on Slippery Roofs: Never climb onto a roof during an active rainstorm or severe wind event.
- Deploy Protective Tarps: Secure a heavy-duty, UV-resistant 8-mil poly tarp extending over the roof ridge. Anchor the perimeter using 2×4 furring strips screwed through the tarp into structural framing, tucking upper edges beneath upslope shingles to prevent water from running underneath.
- Contain Interior Water: Place buckets and plastic sheeting under active drips, and make a small puncture in the center of sagging drywall ceilings to relieve pooled water weight and prevent an uncontrolled ceiling collapse.
Understanding how roof inspections can save homeowners thousands in repairs reinforces why rapid emergency response is critical to preserving your home’s value.
Navigating Homeowners Insurance for Storm-Related Roof Damage
Standard HO-3 homeowners insurance policies provide coverage for roof damage caused by sudden and accidental perils, including wind gusts, tornadoes, hail impact, and fallen trees. However, insurance carriers explicitly exclude gradual wear and tear, age-related deterioration, and deferred maintenance.
To ensure your claim is processed smoothly:
- Gather Clear Evidence: Take date-stamped photos of roof debris, ground-level shingle tabs, dented gutters, and interior water stains immediately following the weather event.
- Have a Professional Inspection First: Contact a qualified roofing contractor to conduct a thorough roof inspection before filing a claim. A professional inspection report provides detailed evidence of storm damage versus normal aging.
- Facilitate Adjuster Collaboration: Have your roofing contractor present during the insurance adjuster’s physical inspection. This ensures that hidden damage—such as fractured fiberglass underlayment mats or detached flashing—is properly included in the adjuster’s initial Scope of Loss.
DIY vs. Professional Execution: Longevity and Safety
While minor roof maintenance tasks appeal to handy property owners, roofing repairs involve inherent physical risks and technical precision.
When to Choose DIY vs Professional Residential Roof Repairs
Working on residential roofs exposes individuals to serious fall hazards. OSHA safety regulations (standard 1926.501) mandate fall protection for working heights exceeding six feet.
- Appropriate DIY Tasks: Homeowners with standard ladder safety training and flat or low-pitch roofs (4:12 slope or lower) can safely handle minor tasks like installing a retrofit rubber vent pipe collar (such as a Perma-Boot), clearing debris from valleys, or securing an accessible gutter joint.
- Professional-Only Repairs: Any work on steep pitches (6/12 and above), two-story homes, rotted structural decking, chimney counter-flashing cuts into masonry, or complex valley reconstructions should be left to trained professionals equipped with safety harnesses, roof anchors, and specialized tools.
Reviewing the practical steps in our guide on the easiest way to fix roof leak can help you decide whether a minor fix is within your comfort zone or requires an expert crew.
Temporary Patches vs. Permanent Component Restoration
A common mistake in residential roof maintenance is confusing a temporary surface patch with a true permanent repair.
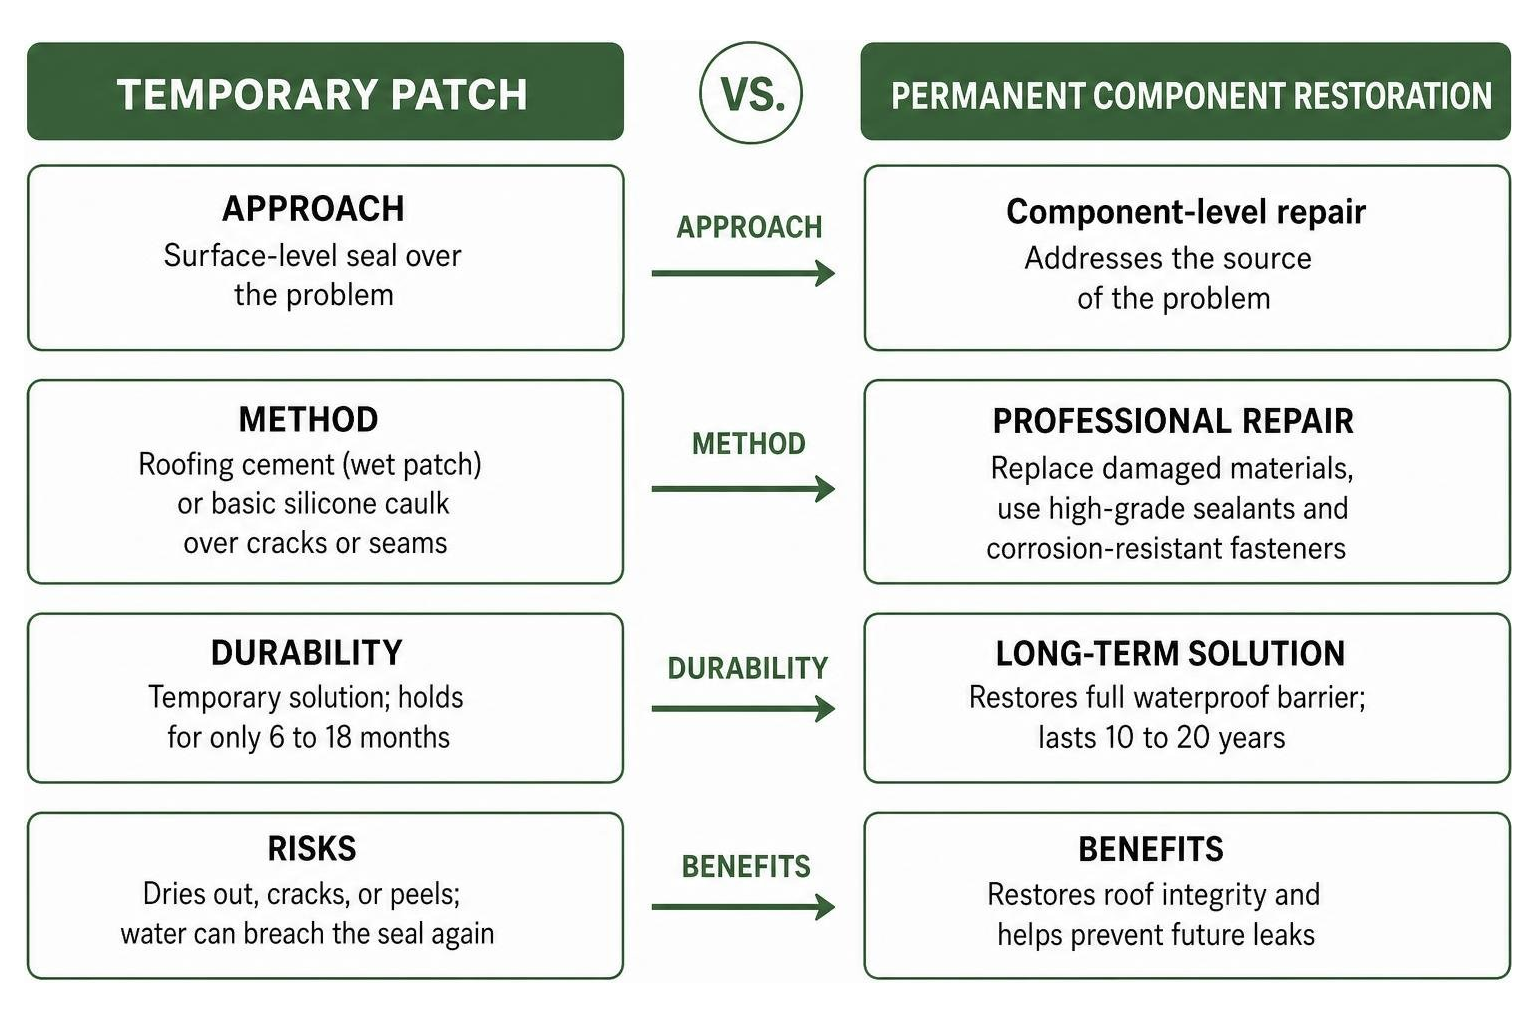
- The Temporary Patch: Spreading asphalt roofing cement (wet patch) or basic silicone caulk over cracked shingles, rusted flashing, or open seams creates an emergency barrier. However, asphalt cement dries out and cracks under intense summer UV exposure, while silicone adheres poorly to asphalt granules over time. A temporary patch typically holds for only 6 to 18 months before water breaches the seal again.
- The Permanent Repair: A permanent restoration requires carefully lifting adjacent shingles with a flat pry bar, pulling corroded nails, replacing rotted decking, and installing fresh self-adhered waterproof underlayment (ice-and-water shield). High-grade polyurethane or tripolymer sealants are applied beneath newly matched shingles and corrosion-resistant fasteners. A proper component-level repair restores the roof’s complete waterproof barrier and lasts 10 to 20 years.
Vetting Qualified Contractors for Quality Repairs
Selecting a trustworthy contractor ensures that your residential roof repairs comply with local building codes, manufacturer warranties, and rigorous safety standards.
When evaluating roofing companies, confirm the following essentials:
- Licensing and Active Insurance: Verify state contractor registration and confirm both General Liability and active Workers’ Compensation insurance directly with the insurance carrier.
- Manufacturer-Matched Materials: Ensure your contractor sources color-matched, spec-equivalent shingles from reputable manufacturers to maintain thermal expansion compatibility and curb appeal.
- Clear Written Scope of Work: Insist on a detailed proposal outlining the exact components being replaced, underlayment types, flashing gauges, and manufacturer/workmanship warranties rather than a generic “repair leak” estimate.
- Job Site Cleanup Protocols: A professional team conducts comprehensive ground cleanup using magnetic sweeps to clear dropped roofing nails and metal scraps from your yard, driveway, and landscaping.
Reviewing the clear signs you need a roofing company for repairs or replacement helps ensure you partner with an established, reliable local contractor.
Frequently Asked Questions About Residential Roof Restorations
How long does a typical roof repair take to complete?
Most standard residential roof leak repairs—such as replacing a pipe boot, swapping wind-damaged shingles, or repairing a step flashing joint—take 1 to 4 hours and are completed in a single day. More complex storm damage repairs involving multiple roof planes, structural wood deck tear-outs, or chimney masonry refabrication typically take 1 to 2 business days. Professional contractors stage materials and complete tear-outs systematically to ensure the roofing plane remains fully watertight by the end of each workday.
Can a leaking roof be repaired from inside the attic?
No. Attempting to seal a roof leak by spraying foam, caulk, or tar onto the underside of roof decking or rafters inside the attic does not solve the problem. Water travels along the topside of underlayment, rafters, and trusses, often entering the roof plane 5 to 15 feet upslope from where it drips into the attic. Sealing from the inside traps moisture against structural roof decking, accelerating wood rot, mold growth, and rafter failure. All effective roof leak repairs must be diagnosed and resolved from the exterior roofing assembly.
What is the difference between step flashing and counter flashing?
Step flashing and counter flashing work together as a two-part moisture barrier at vertical wall and chimney intersections:
- Step Flashing: Individual L-shaped metal pieces installed alongside each shingle course during roof installation. One leg rests flat on the roof deck beneath the shingle, while the vertical leg extends up the side of the wall or chimney.
- Counter Flashing: Metal flashing installed above step flashing. The top edge is embedded into a mortar joint (reglet cut) or fastened to the vertical wall, hanging down over the upright leg of the step flashing.
This overlapping design allows independent building movement and thermal expansion without breaking the waterproof seal, preventing water from penetrating the seam between the vertical wall and the roof plane.
Conclusion
Your home’s roof serves as its primary defense against severe weather, heavy snow, and high winds. Even minor breaches—such as a cracked plumbing boot, loose flashing piece, or displaced shingle—can lead to thousands of dollars in hidden framing rot, wet insulation, and drywall damage if left unaddressed. Routine seasonal roof maintenance, rapid post-storm inspections, and component-level repairs preserve structural integrity, maintain curb appeal, and extend the overall lifespan of your roofing system.
When severe storms strike or persistent leaks appear, partnering with an experienced, safety-certified professional ensures repairs are completed with precision and long-term durability. For expert residential roof repairs, thorough storm damage assessments, and 24/7 emergency response, contact the local professionals at Smith Roofing & Exteriors to schedule your on-site inspection.