What You Need to Know About Corrugated Roof Installation Before You Start
Corrugated roof installation is one of the most durable, cost-effective roofing projects a homeowner can tackle — whether you’re protecting a shed, barn, or full residential structure from Wisconsin’s punishing winters and storms.
Here’s a quick overview of the corrugated roof installation process:
- Choose your material — metal (galvanized steel, Galvalume, aluminum) or plastic (polycarbonate, PVC)
- Prepare the substrate — inspect framing, install synthetic underlayment, add drip edge
- Square your first panel — use the 3-4-5 triangle method at the eave
- Install panels bottom to top — overlap side laps by one corrugation, end laps by at least 6 inches
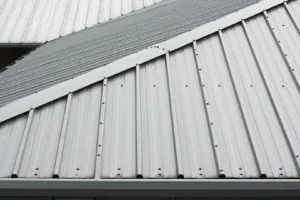
- Fasten through the crests — never the valleys — with neoprene-washer screws
- Seal and flash — install ridge cap, gable trim, and butyl tape at all transitions
- Inspect fasteners — check for proper washer compression and remove any metal shavings
Corrugated panels can last 40 to 50 years for standard metal, and over 100 years for terne (tin-stainless steel) — but only if installed correctly. A single misplaced screw or skipped step can lead to leaks, rust, and costly repairs down the road.
That’s exactly why this guide exists. I’m Matt Smith, owner of Smith Roofing & Exteriors, and I’ve spent years helping Wisconsin homeowners navigate corrugated roof installation on everything from rural outbuildings to full residential re-roofs. I’ll walk you through every step — clearly, honestly, and without the guesswork.

Quick corrugated roof installation terms:
Mastering Corrugated Roof Installation: Materials and Preparation
Before we grab the drill, we need to talk strategy. A successful corrugated roof installation in April 2026 starts long before you climb the ladder. In Southeastern Wisconsin, we deal with heavy snow loads and high winds, so your material choice and prep work are the foundation of a roof that lasts half a century.
One of the first things we check is the roof slope. For a standard 7/8″ corrugated panel, the absolute minimum pitch is 1:12. However, for most residential homes in Fort Atkinson or Lake Mills, we strongly recommend at least a 3:12 pitch. Why? Because a steeper slope sheds water and snow much faster, reducing the risk of “ice damming” and leaks at the overlaps.
We also use the “3-4-5 squaring method” to ensure the roof is perfectly rectangular. If your structure is even slightly out of square, your panels will start to “run” or look crooked by the time you reach the other side. You can learn more about why it’s worth investing in metal roofing for your home to see how these structural considerations pay off in long-term value.

Choosing the Right Corrugated Roof Installation Materials
Not all “wavy” sheets are created equal. Depending on whether you’re roofing a backyard shed in Jefferson or a commercial warehouse in Burlington, your material needs will vary:
- Galvalume & Galvanized Steel: These are the heavy hitters. Galvalume (an aluminum-zinc alloy) is incredibly rust-resistant and can last 40–60 years.
- Aluminum: Perfect for humid environments, aluminum won’t rust and can last up to 50 years.
- Polycarbonate & PVC: These are translucent plastic options. They are fantastic for greenhouses or skylights because they let in natural light, though they are noisier during rain than metal.
- Terne: This is a premium “old-school” material (stainless steel pressed between tin) that can literally last over 100 years.
When picking metal, pay attention to the “gauge.” In the roofing world, a smaller number means thicker metal. We typically use 26-gauge for residential roofs because it handles snow and hail better than the thinner 29-gauge often found at big-box hardware stores.
| Material Type | Expected Lifespan | Relative Cost | Best Use Case |
|---|---|---|---|
| Galvanized Steel | 20-30 Years | Low | Barns / Sheds |
| Galvalume | 40-60 Years | Moderate | Residential Homes |
| Polycarbonate | 10-20 Years | Low | Greenhouses / Patios |
| Aluminum | 50+ Years | High | Coastal / Humid Areas |
Essential Tools for Corrugated Roof Installation
You can’t do a professional job with just a hammer. To get that clean, “nailed it” look, you’ll need a specific kit. According to this How to Install Corrugated Roofing: DIY Guide and Expert Tips, having the right cutting tools is half the battle.
- Cutting Tools: An angle grinder is the fastest for straight cuts, but an electric nibbler is better for cutting across the corrugations without burring the edges. Tin snips are essential for detailed trim work.
- Fastening Tools: A high-quality cordless drill with an adjustable clutch is vital. You want the drill to stop before it crushes the neoprene washer.
- Layout Tools: A chalk line and a tape measure are your best friends for keeping rows straight.
- Safety Gear: Never step on a roof without a safety harness, gloves (metal edges are razor-sharp!), and eye protection.
Substrate and Underlayment Requirements
Your panels need a solid place to sit. In Southeastern Wisconsin, we often install panels over “purlins” (horizontal wood strips) spaced at 24-inch intervals. However, for a climate-controlled home, a solid plywood deck is better for insulation and noise reduction.
Before the metal goes down, you must install a moisture barrier. We always recommend synthetic underlayment over traditional felt paper. Synthetic material doesn’t tear, handles the heat of a metal roof better, and provides a “dry-in” period if it rains during your project. If you’re looking for Fort Atkinson/roofing/residential/installation-amp-replacement services, you’ll find that we prioritize these high-quality barriers to protect your attic from condensation.
Finally, install your eave trim (drip edge) along the bottom edge of the roof before the panels. This ensures water rolls off the roof and into the gutters rather than soaking into your fascia boards.
The Step-by-Step Installation Process
Now for the main event. Following a Step-by-Step Guide to Installing Corrugated Metal Roofing ensures you don’t miss the small details that prevent big leaks.
Proper Panel Overlap and Alignment
Always start your installation at the corner of the roof opposite the prevailing wind direction. If the wind usually blows from the west, start on the east side. This prevents wind-driven rain from being forced under the overlaps.
- Side Laps: Overlap panels by at least one full corrugation (the “wave”). If your roof has a very low pitch (under 3:12), overlap by two corrugations and use a bead of butyl tape between them.
- End Laps: If your roof is long enough to require two rows of panels, the top panel should overlap the bottom one by at least 6 inches.
- Squaring: Align your first panel so it overhangs the eave by about 1 to 2 inches. Double-check that it is perfectly square with your chalk line. If the first sheet is crooked, the whole roof will be.
Fastening Techniques: Crests vs. Valleys
This is where most DIYers make a critical mistake. For roofing, always drive your screws through the crests (the high points) of the corrugation.
Water naturally flows through the valleys. If you put a screw in the valley, you’re placing a hole exactly where the most water travels. By fastening on the crest, your screw stays high and dry. (Note: For wall siding, fastening in the valleys is standard, but for roofs, it’s crests only!)
- Spacing: Place screws every 12 inches vertically along the purlins. Horizontally, space them every 2 or 3 corrugations.
- Torque: Tighten the screw until the neoprene washer just barely begins to bulge past the metal screw head. If the washer is crushed and splayed out, you’ve over-tightened it, which will cause the rubber to crack and leak within a few years.
Check our Category/Metal Roof section for more visual guides on proper screw depth.
Handling Thermal Expansion in Plastic Panels
If you are using polycarbonate or PVC panels for a patio or greenhouse in Lake Geneva or Elkhorn, you have an extra challenge: heat. Plastic expands and contracts much more than metal.
To prevent the panels from buckling or cracking around the screws, you must pre-drill your holes. Make the holes about 10mm (roughly 3/8″) larger than the screw shank. This “oversized” hole allows the panel to slide slightly under the screw head as it grows in the summer sun and shrinks in the winter cold. Use specialized “poly-fast” screws that feature a larger washer to cover these expansion holes.
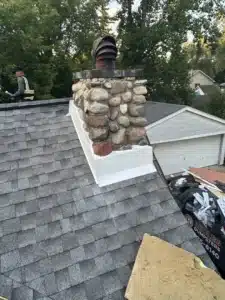
Sealing, Flashing, and Finishing Touches
A roof isn’t waterproof until the “trim” is on. This is what separates a professional corrugated roof installation from a leaky mess. You can see examples of these finishes in our guide on how to Upgrade Your Home with the Best Rated Roofers in Fort Atkinson, WI.
Installing Trim and Ridge Caps
- Gable/Rake Trim: This covers the exposed edges on the sides of your roof. It prevents wind from lifting the panels and keeps birds and squirrels out of your attic.
- Ridge Cap: This is the “V” shaped piece that sits at the very peak. Before you screw it down, install foam closure strips (which match the wavy profile of your panels) underneath the cap. This blocks wind-blown rain and snow from blowing up and over the top of your panels.
- Overlap: Ridge cap sections should overlap each other by 3 to 4 inches. Apply a bit of sealant at these joins for extra security.
Safety Protocols and Long-Term Maintenance
Safety is no joke. Metal panels are incredibly slippery, especially if there’s a light dew or dust on them.
- Walking on the Roof: If you must walk on the panels, only step where the underlying purlins or rafters are located. Stepping in the “flats” between supports will dent the metal and potentially break the seal of your fasteners. Wear soft-soled shoes to avoid scratching the paint.
- Cleaning Shavings: After cutting or drilling, you’ll have tiny metal fragments (called “swarf”) all over the roof. Sweep these off immediately. If left to sit, they will rust overnight, staining your beautiful new roof and potentially eating through the finish.
- Annual Inspection: Every spring, take a look at your neoprene washers. If any look cracked or loose, replace the screw. Clear out any leaves or debris from the valleys and gutters to ensure water can flow freely.
Frequently Asked Questions about Corrugated Roof Installation
What is the minimum slope for corrugated metal roofing?
For 7/8″ corrugated panels, the technical minimum is a 1:12 pitch (1 inch of rise for every 12 inches of horizontal run). However, in high-snow areas like Walworth or Edgerton, we recommend a 3:12 pitch for better performance. If your roof is flatter than 3:12, you must use butyl tape sealants at every side and end lap to prevent water from backing up.
Should screws be placed in the ridges or the valleys?
For corrugated roof installation, always place screws in the ridges (crests). This keeps the fastener above the water line. The only time we fasten in the valleys is for vertical wall siding, where water doesn’t pool or flow in the same way. Always use screws with neoprene washers to create a watertight seal.
How do I calculate how many panels I need?
First, calculate your total roof square footage (Length x Width). Add 15% to this number to account for the side and end overlaps. While a panel might be 36 inches wide, its “actual coverage” is usually only 32 inches because of that one-corrugation overlap.
Pro Tip: Try to order panels that are long enough to span from your eave to your ridge in one piece. This eliminates “end laps” and removes one of the most common leak points on a roof.
Conclusion
A successful corrugated roof installation is a legacy investment. When done right, it provides a “set it and forget it” shield for your home that can last 50 years or more. While the process is straightforward, the details—like squaring the first sheet, fastening on the crests, and choosing the right gauge—make all the difference between a dry home and a damp disaster.
If you’re feeling a bit overwhelmed by the math or the heights, don’t sweat it. At Smith Roofing & Exteriors, our experienced local team is here to help homeowners across Fort Atkinson, Lake Mills, and the surrounding Southeastern Wisconsin communities. We provide transparent pricing and superior materials to ensure your roof is “nailed it” perfect the first time.
Ready to upgrade your home with a roof that stands the test of time? Get expert help with your metal roof project and let us handle the heavy lifting!