Repair Rotted Cedar Siding Before Moisture Reaches the Wall
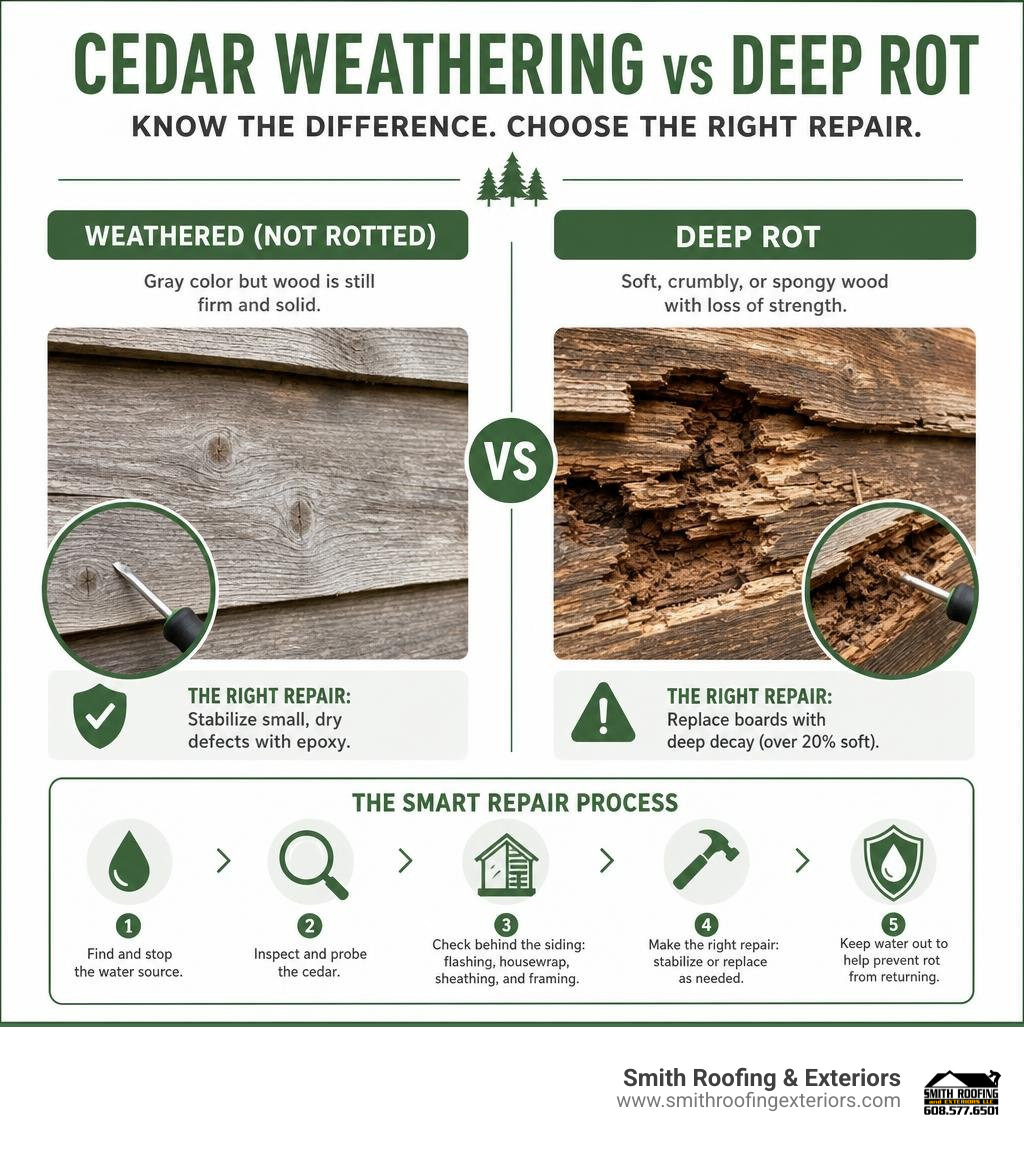
To repair rotted cedar siding, first find and stop the water source. Then probe the damaged wood with a screwdriver: cedar that looks gray but stays firm may only be weathered, while soft, crumbly, or spongy wood needs repair. Small, dry defects can often be stabilized with epoxy; boards with deep decay, especially when more than 20% is soft, should be replaced.
Cedar is naturally durable and can last up to 75 years with proper care. But Wisconsin snow, rain, splashback, clogged gutters, failed caulk, and tight roof or ground clearances can keep boards wet long enough for fungal rot to take hold.
The key is to fix more than the visible board. Check the flashing, housewrap, sheathing, and framing behind the siding before closing the wall back up. A clean-looking patch will fail quickly if water can still enter behind it.
I’m Matt Smith, owner of Smith Roofing & Exteriors, and I help property owners protect their homes through practical exterior maintenance and repairs. In this guide, I’ll show you how to repair rotted cedar siding, recognize when damage is structural, and take steps that help prevent the rot from returning.
Easy repair rotted cedar siding word list:
Assessing Cedar Siding: Surface Weathering vs. Deep Rot
Before picking up a saw, we need to know exactly what we are dealing with. Western Red Cedar contains natural chemical compounds called thujaplicins that give the wood its built-in resistance to decay and insect damage. Over years of heavy rain, snow accumulation, and relentless sun, UV radiation breaks down the lignin holding wood fibers together. When persistent moisture overwhelms those natural defenses, fungal decay sets in.
However, not every discolored or aged board is doomed. A cedar plank might look dark, silver-gray, or split on the surface while remaining structurally solid beneath the surface layer. Making the wrong call means either throwing away sound timber or accidentally painting over an active fungal colony.
Diagnosing Decay with the Screwdriver Probe Test
The most reliable way to tell the difference between cosmetic surface aging and active rot is the tactile pick test. Take a standard flathead screwdriver or an awl and gently press the tip into the suspect wood along bottom edges, end grains, and joints:
- Surface Weathering: The wood fibers resist the screwdriver point. Even if the surface is weathered gray or shows minor checking, the tool will not penetrate more than a 1/16-inch without heavy hand force. The cellular structure is healthy.
- Soft or Wet Rot: The tool tip sinks effortlessly into the wood with little or no resistance. The timber feels spongy, fibrous, or crumbly, often resembling wet cardboard.
- Dry Rot (Brown Rot): The wood surface may appear dry and show a cubical cracking pattern (often described as “alligatoring”). When probed, the wood crumbles into dry powder.
If your probe test reveals that decay is localized to a shallow surface area, patching and fixing rotted wood siding using wood consolidants and epoxy is an option. If the blade sinks straight through the board, that plank has lost its structural integrity.
Inspecting Moisture Barriers, Flashing, and Sheathing
Siding is only the outer rainscreen of your home’s exterior envelope. When rot is present on the outside, moisture may have breached the layers underneath.
When you uncover damaged cedar boards, take a close look at:
- The Weather-Resistive Barrier (WRB): Inspect the building wrap or asphalt felt behind the siding. Look for tears, brittle degradation, or areas where water was directed behind the paper rather than over it.
- Window and Door Flashing: Check for rigid Z-flashing above horizontal window and door trim. Missing head flashings or failed caulking joints let water run down behind the siding courses.
- Roof-to-Wall Intersections: Look for kick-out diverters where roof eaves terminate against a vertical wall. Without a proper kick-out flashing, roof runoff channels straight down inside the siding cavity.
- Underlying Sheathing and Studs: Press your screwdriver into the oriented strand board (OSB) or plywood wall sheathing behind the removed siding. If the sheathing or wall studs feel soft or show dark mold growth, the structural framing requires reinforcement before new siding can be installed.
Planning Your Fix: Minor Repairs vs. Board Replacement
Deciding whether to patch a damaged cedar section or replace the entire plank comes down to structural strength, the size of the defect, and long-term maintenance costs.
| Repair Method | Best For | Typical Damage Size | Expected Lifespan | Skill Level Required |
|---|---|---|---|---|
| Two-Part Epoxy Filler | Surface gouges, small splits, woodpecker holes | Under 2 inches; <20% of board | 10–15 years | Intermediate |
| Dutchman Patch | Localized end-rot, isolated clean splits | 2 to 12 inches along one edge | 15–20 years | Advanced |
| Full Board Replacement | Deep fungal decay, severe cupping, splitting | >20% of board length soft | 30–75 years | Intermediate to Advanced |
Patching Small Cracks and Holes with Epoxy Compounds
For minor insect damage, old fastener holes, or localized surface soft spots where less than 20% of the board is compromised, high-performance two-part epoxy systems offer a long-lasting fix. Standard exterior wood putty tends to shrink, crack, and pop out during seasonal expansion cycles, but two-part epoxy consolidants and fillers chemically bond to sound wood fibers while maintaining enough flexibility to move with temperature swings.
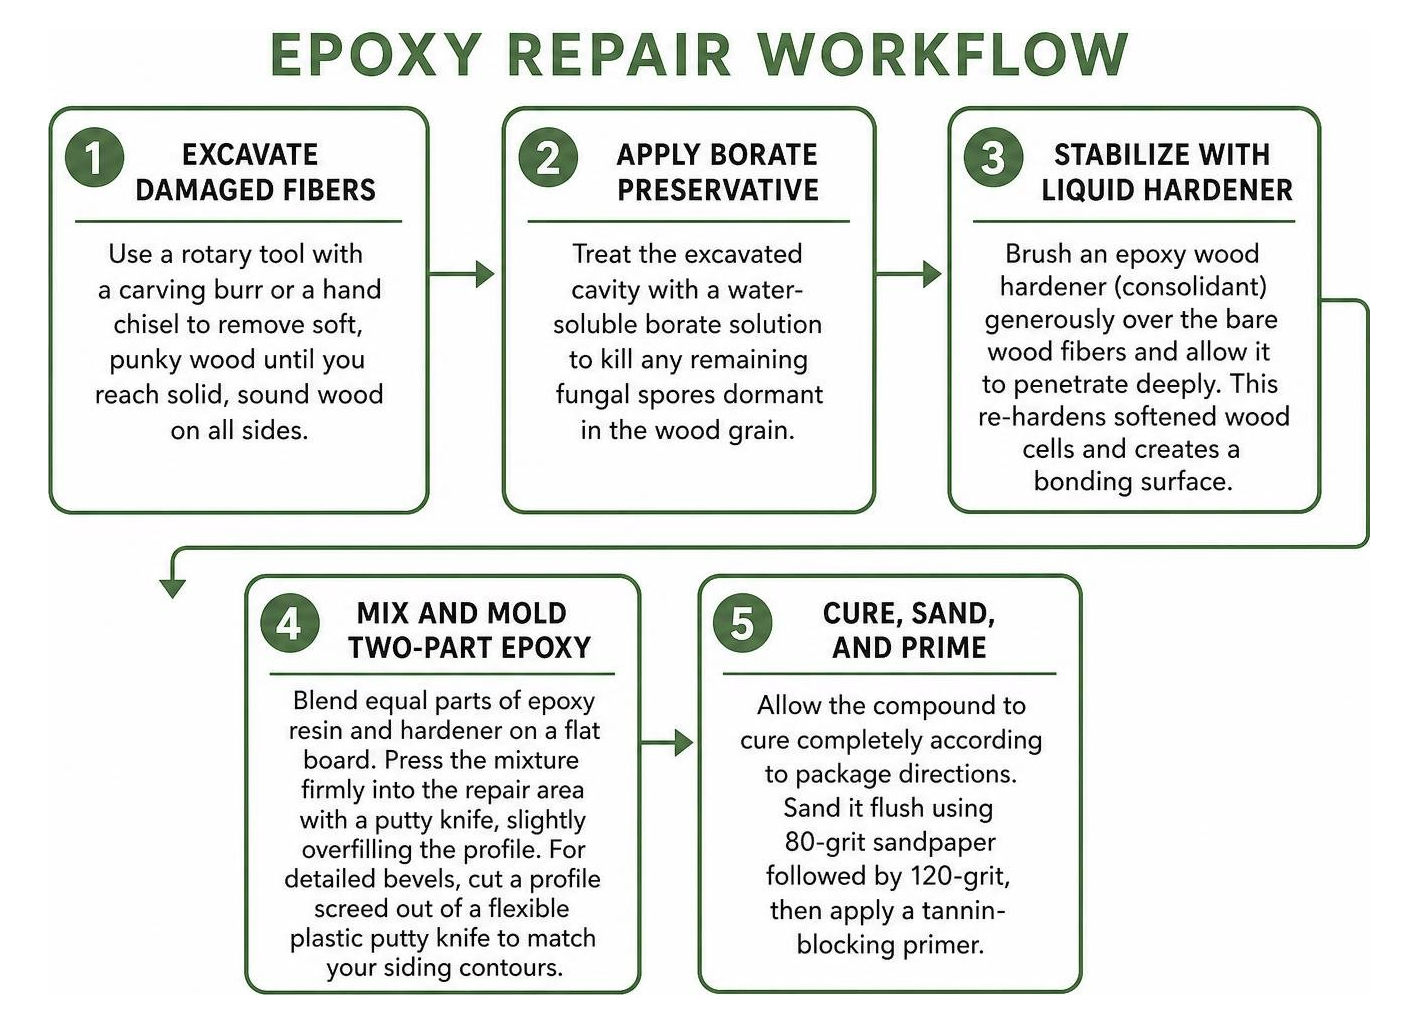
- Excavate Damaged Fibers: Use a rotary tool with a carving burr or a hand chisel to scrape away soft, punky wood until you reach solid, sound wood on all sides.
- Apply Borate Preservative: Treat the excavated cavity with a water-soluble borate solution to kill any remaining fungal spores dormant in the wood grain.
- Stabilize with Liquid Hardener: Brush an epoxy wood hardener (consolidant) generously over the bare wood fibers and allow it to penetrate deeply. This re-hardens softened wood cells and creates a bonding surface.
- Mix and Mold Two-Part Epoxy: Blend equal parts of epoxy resin and hardener on a flat board. Press the mixture firmly into the repair area with a putty knife, slightly overfilling the profile. For detailed bevels, cut a profile screed out of a flexible plastic putty knife to match your siding contours.
- Cure, Sand, and Prime: Allow the compound to cure completely according to package directions. Sand it flush using 80-grit sandpaper followed by 120-grit, then apply a tannin-blocking primer.
For a broader walkthrough on addressing minor exterior defects, read our guide on how to fix siding issues in 5 simple steps.
When to Repair Rotted Cedar Siding vs. Full Replacement
When is patching no longer worth the effort? We use two clear industry thresholds:
- The 20% Board Rule: If more than 20% of an individual cedar board is soft, punky, or broken, structural patching becomes unreliable. Cut out that entire section or replace the whole board.
- The 15% Wall Elevation Rule: If rot, warping, or moisture damage affects more than 15% of the total wall space on an elevation, spot-patching becomes a short-term bandaid that costs more in ongoing maintenance than a full refresh.
If multiple boards on one wall show continuous soft spots, water is likely trapped across the wall cavity. Recognizing these larger failures is critical; review the signs its time to call a siding replacement company to decide if full elevation replacement makes more financial sense. For detailed profiling advice on traditional lap styles, check out this guide on bevel cedar siding repairs.
How to Repair Rotted Cedar Siding: Step-by-Step Replacement
When an individual lap board is too decayed to stabilize with epoxy, replacing the damaged plank restores structural protection and weatherproofing to the wall.
Essential Tools and Materials
Before starting demolition, gather these trade-tested tools:
- Oscillating Multi-Tool: Fitted with a bimetal plunge-cut blade.
- Keyhole Saw or Mini Hacksaw Blade: To complete precision cuts without nicking the overlapping board.
- Thin-Profile Flat Pry Bar and Cat’s Paw: For gentle board separation without denting soft cedar.
- Plywood Scraps (1/4-inch): To serve as fulcrum blocks during prying.
- Replacement Cedar Stock: Kiln-dried Western Red Cedar matching your existing profile (bevel, shiplap, tongue-and-groove, or board-and-batten).
- Fasteners: Grade 304 or Grade 316 stainless steel ring-shank siding nails (7d or 8d, minimum 2-1/2 inch length).
- Finishes & Sealants: Oil-based exterior tannin-blocking primer, high-grade acrylic latex paint or penetrating oil stain, and elastomeric exterior sealant.
Step 1: Cutting and Safely Removing Damaged Boards
Working with cedar requires a light touch. Cedar is a softwood that dents easily under the pressure of standard claw hammers and heavy pry bars.
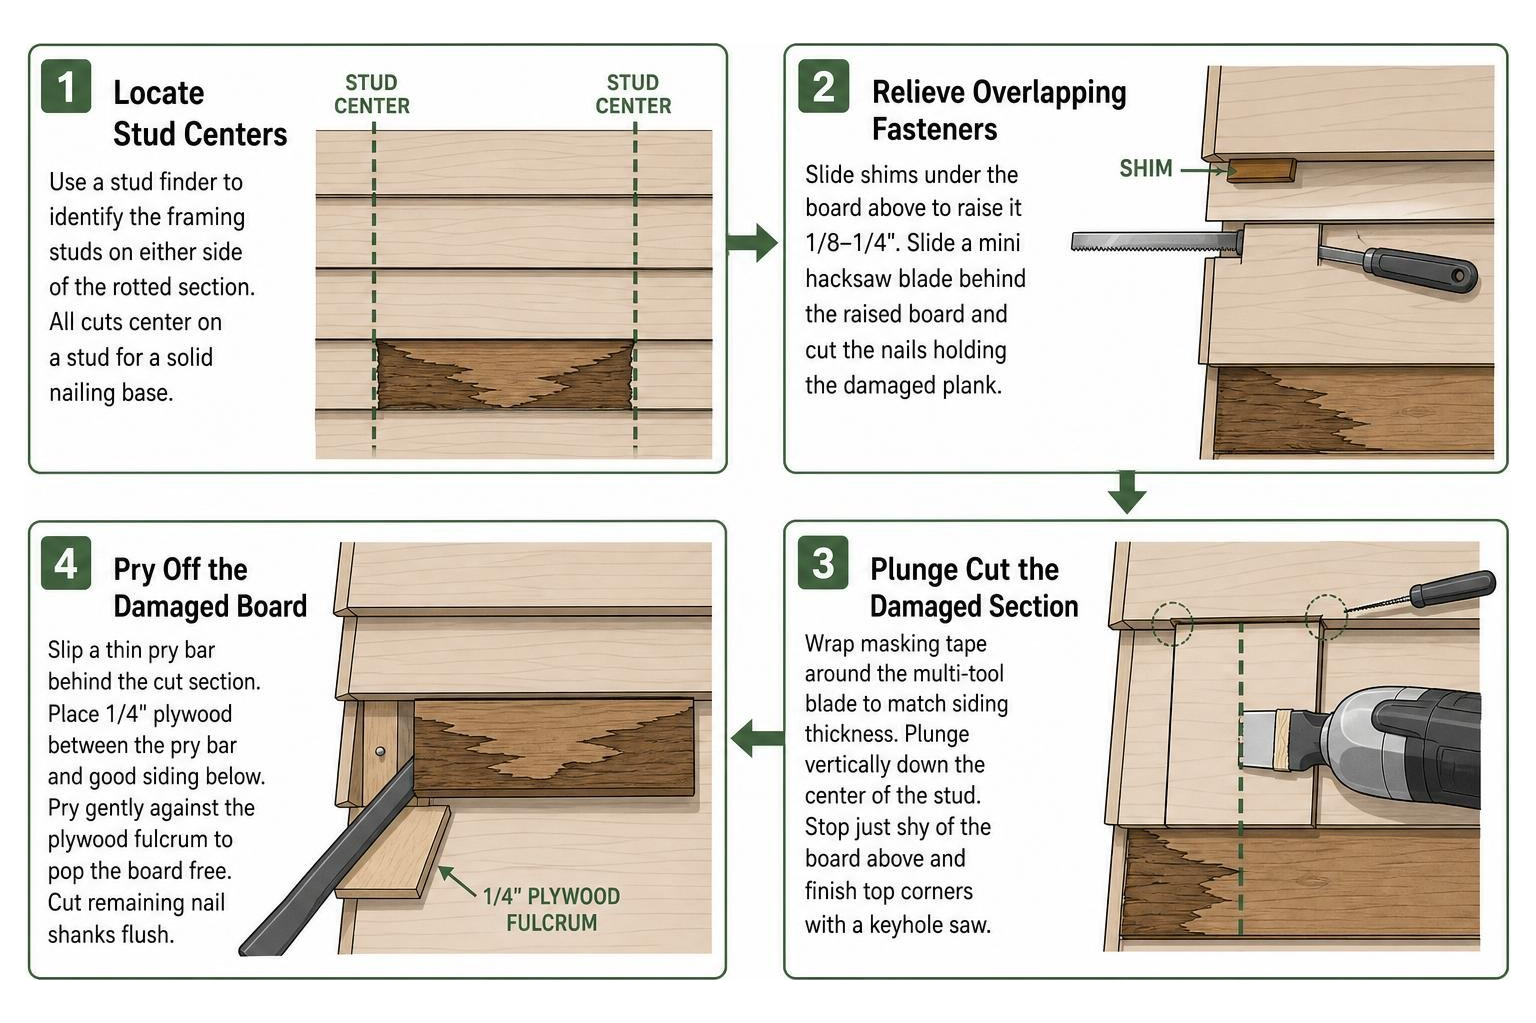
- Locate Stud Centers: Use a stud finder to identify the framing studs on either side of the rotted section. All siding cuts must center on a wall stud to provide a solid nailing base for the replacement plank.
- Relieve Overlapping Fasteners: Gently slide wood shims under the board directly above the damaged piece to raise it roughly 1/8 to 1/4 inch. Slide a mini hacksaw blade or reciprocating saw blade behind that board to slice through the blind nails holding the damaged plank in place.
- Plunge Cut the Damaged Section: Wrap a piece of masking tape around your oscillating multi-tool blade to match the exact thickness of your cedar siding. Plunge vertically down the center line of the stud. Stop just shy of the board above to protect its edge, finishing the top corner with a manual keyhole saw.
- Pry Off the Damaged Board: Slip a thin pry bar behind the cut section. Always place a scrap piece of 1/4-inch plywood between your pry bar and the good siding below. Pry gently against the plywood fulcrum to pop the board free without bruising the adjacent wood. Cut off any remaining nail shanks flush with the sheathing.
(Note: For cedar shakes or shingles, slide a specialized slate ripper up under the damaged shake to hook and sever the hidden roofing nails without disturbing surrounding courses.)
Step 2: Measuring, Profile Matching, and Back-Priming New Wood
Take a clean cutoff scrap from the old board to a dedicated lumber supplier to confirm the butt thickness, tip thickness, and total reveal height.
- Measure with Expansion Gaps: Measure the opening between the cut edges of the existing siding. Cut your replacement cedar board roughly 1/8-inch short overall to leave a 1/16-inch expansion gap at each butt joint. Wood expands during humid Wisconsin summers; fitting boards too tightly causes end-crushing and board buckling.
- Follow the 6-Side Sealing Rule: Never install raw, unfinished cedar against a building envelope. Apply a high-grade, tannin-blocking exterior primer to all six sides of the replacement piece: face, back, top edge, bottom edge, and both cut end grains. Back-priming balances internal moisture absorption from the home’s interior, stopping the boards from cupping or pushing paint off the face.
For detailed cleaning and prep steps on aged wood surfaces, read this guide on restoring and repairing aging cedar.
Step 3: Installing, Nailing, and Caulking the New Siding
With your replacement board cut, back-primed, and dry, installation can proceed:
- Slip Back-Flashing Behind Butt Joints: Cut a 3-inch wide strip of aluminum flashing, metal coil stock, or heavy building felt and slide it behind the vertical seam where the new board meets the old siding. This ensures that any water finding its way through the joint sheds safely down the exterior drainage plane rather than soaking into the sheathing.
- Position the Board: Slide the new board up under the upper course, maintaining a consistent reveal and at least a 1-inch overlap over the board below it.
- Single-Nail into Studs: Drive Grade 304 stainless steel ring-shank siding nails through the new plank directly into the wall framing studs. Fasten roughly 1/2-inch to 3/4-inch above the bottom butt edge, penetrating just above the top edge of the board underneath.
Important Carpentry Rule: Never nail through two overlapping layers of cedar siding at the same time. Single-nailing allows the boards to slide slightly as they expand and contract with humidity changes. Fastening both layers together locks the wood in place, causing boards to split lengthwise.
For homes clad in shake patterns, learn more about profile upkeep in our overview of cedar shake siding maintenance.
Preventing Future Rot: Sealing, Flashing, and Maintenance Schedules
Once your siding repairs are complete, proactive moisture management protects your investment and keeps future rot from taking hold.
Best Practices for Caulking, Flashing, and Ground Clearance
Rot rarely starts in the middle of a sound wall; it develops where water sits, splashes, or gets trapped behind trim joints.
- Ground and Concrete Clearances: Ensure that siding maintains at least 6 inches of clearance from finished soil grade and at least 2 inches of clearance from solid concrete surfaces (patios, steps, and driveways). This keeps continuous ground splashback from saturating bottom courses.
- Roofline Clearances: Maintain a 1-inch minimum gap between the bottom edge of cedar siding and sloped roof shingles along dormers or sidewalls. If the wood touches the shingles, it acts like a sponge, drawing moisture up into the grain through capillary action.
- Caulking Rules: Use high-grade elastomeric acrylic caulking around vertical window and door trim, corner boards, and wall penetrations. However, never caulk horizontal lap joints or the bottom edges of siding boards. Siding needs those open gaps to drain condensation and breathe.
Long-Term Staining and Inspection Schedule
Establishing a regular maintenance routine keeps cedar boards sealed against UV degradation and fungal rot:
- Stain Cycles (Every 3 to 5 Years): Cedar siding in Southeastern Wisconsin benefits from re-staining every 3 to 5 years, particularly on south- and west-facing elevations exposed to intense UV rays. Use a breathable, penetrating oil stain fortified with trans-oxide pigments. Unlike heavy film-forming paints that can trap moisture against the wood, penetrating stains sink deep into the pores, letting internal vapor pass safely through.
- Spring and Fall Inspections: Check gutter downspouts, roof kick-out flashings, and window perimeter caulking twice a year. Clear out clogged gutters promptly; overflowing water accounts for a large share of the rotted siding repairs we see.
- Gentle Cleaning: Clean cedar every 2 to 3 years using an oxygen bleach solution (sodium percarbonate) mixed with warm water to remove surface mold, mildew, and airborne spores. Never use high-pressure power washers on cedar siding; high pressure shreds delicate softwood fibers, drives water deep into the wall framing, and destroys the cellular grain.
Frequently Asked Questions About Cedar Siding Repair
What are the best fasteners to use on cedar siding to avoid staining?
Always use Grade 304 or Grade 316 stainless steel ring-shank siding nails. Cedar contains high levels of water-soluble tannins that chemically react with electro-galvanized or standard steel fasteners. When those metals corrode, they leave dark blue-black vertical streaks down the face of your siding that cannot be washed away.
Hot-dipped galvanized nails are an acceptable second choice if they meet ASTM A153 specifications, but stainless steel fasteners provide the best protection against tannin bleed and corrosion. Ring-shank threads also ensure the fasteners hold tight as the wood moves through seasonal climate cycles.
Can I caulk horizontal butt joints on cedar siding?
No, do not caulk horizontal butt joints where two siding boards meet end-to-end. Siding expands and contracts continuously along its length. Caulking these seams creates a rigid bridge that tears apart as temperatures drop, creating a small pocket that traps moisture against the end grains.
Instead of caulk, install a thin piece of aluminum or building felt back-flashing behind the seam and leave a clean 1/16-inch expansion gap. Any moisture entering the joint drains harmlessly down the metal without reaching the sheathing.
How do I match new cedar siding to weathered existing profiles?
Matching replacement cedar to weathered wood involves two steps: profile sizing and color toning.
First, bring a sample piece of your existing siding to a professional lumber yard to match the exact reveal, bevel angle, and butt thickness. Second, older sound cedar often oxidizes into a weathered gray or dark tone. After washing the surrounding wall with an oxalic acid wood brightener to balance the surface pH, apply a tinted penetrating oil stain to the new patch, blending the color into the surrounding boards.
Protecting Your Home’s Exterior Envelope
Cedar siding provides natural insulation and timeless curb appeal when properly maintained. By spotting moisture early with a screwdriver probe test, isolating the water source, using stainless steel fasteners, and sealing all six sides of replacement wood, you can address rotted areas and keep your wall system sound for decades.
If your exterior inspection uncovers widespread soft spots, damaged housewrap, or rotted wall sheathing across multiple courses, getting an experienced eye on the wall helps prevent hidden structural damage. Our team at Smith Roofing & Exteriors provides comprehensive inspections, expert carpentry repairs, and full cladding replacements across Fort Atkinson, Lake Mills, Elkhorn, and surrounding Southeastern Wisconsin communities.
Ready to restore your home’s exterior protection? Contact Smith Roofing & Exteriors for professional cedar siding repair and replacement to schedule an assessment with our local team.