Is Your Asphalt Roof Leaking? Here’s What to Do First
Asphalt roof repair is the process of fixing damaged, cracked, or missing shingles — and the underlayment beneath them — to stop leaks and protect your home before small problems become expensive ones.
Here’s a quick overview of the 7-step repair process:
- Break the seal on overlapping shingles with a flat pry bar
- Remove the damaged nails using a wood block for leverage
- Slide out the broken or missing shingle
- Inspect and patch the underlayment if needed
- Cut your replacement shingle to fit
- Fasten it with four galvanized roofing nails
- Seal the tabs with roofing cement
Asphalt shingles cover roughly three-quarters of U.S. homes — according to the Asphalt Roofing Manufacturers Association — and for good reason. They’re affordable, durable, and designed to be repaired. A single damaged shingle doesn’t mean you need a new roof. But left alone, even a small crack or lifted tab can let water in, and water damage spreads fast — especially through Wisconsin winters.
The good news? Many repairs are straightforward if you catch them early and follow the right steps.
I’m Matt Smith, owner of Smith Roofing & Exteriors, and asphalt roof repair is one of the most common calls I handle for homeowners across rural Wisconsin dealing with storm, wind, and freeze-thaw damage. In this guide, I’ll walk you through exactly how to assess, repair, and protect your roof — and when it’s smarter to call in a pro.

Identifying Damage: When to Choose Asphalt Roof Repair vs. Replacement
Knowing whether you need a quick patch or a total overhaul is the first step in protecting your investment. In our experience serving homeowners from Fort Atkinson to Lake Geneva, we see many folks panic at the first sign of a leak. However, roughly 20% of all roofing maintenance is just patching work. If the damage is localized—say, a stray branch cracked a few shingles or a high wind gust lifted a tab—a repair is likely all you need.
On the flip side, if your shingles are reaching the end of their 15-to-30-year lifespan, patching might just be a “Band-Aid” on a larger problem. Roof Repair Vs Replacement Whats The Right Move often comes down to the percentage of the roof affected. If more than 30% of the roof shows signs of failure, or if you are seeing widespread issues, replacement is usually more cost-effective in the long run.

| Feature | Patch Repair | Full Replacement |
|---|---|---|
| Typical Cost | $100 – $300 per area | $20,000 – $25,000+ |
| Time Required | 1 – 3 hours | 1 – 3 days |
| Longevity | Matches remaining roof life | 20 – 50 years |
| Best For | Storm damage, punctures | Aging, widespread leaks |
Common Signs of Asphalt Shingle Failure
Before you climb the ladder, look for these “red flags.” If you spot these, it’s time to look into Signs You Need A Roofing Company For Repairs Or Replacement:
- Granules in the Gutters: If your downspouts are spitting out what looks like dark sand, your shingles are losing their UV protection.
- Bald Spots: Areas where the granules have completely worn away, exposing the black asphalt underneath.
- Curled or Cupped Edges: This happens as the shingles dry out and lose their flexibility.
- Cracked Flashing: The metal around your chimney or vents is just as important as the shingles.
- Attic Leaks: If you see water stains on your rafters or insulation, the water has already bypassed your primary defenses.
For a deeper dive into these warnings, check out our guide on 5 Warning Signs That Your Shingle Roof Needs To Be Replaced.
Assessing the Underlayment and Flashing
A roof is a system, not just a layer of “scales.” Beneath those shingles lies the underlayment (often felt paper or synthetic wrap), which acts as a secondary water barrier. When performing an asphalt roof repair, you must check this layer. If the underlayment is torn or rotted, simply slapping a new shingle on top won’t stop the leak.
Similarly, pay close attention to the flashing—the galvanized steel or aluminum used to seal “penetrations” like chimneys and pipe boots. Flashing can last 50+ years, but the sealant around it often fails much sooner. If you see rusted metal or gaps in the caulk, that’s a primary suspect for leaks.
Essential Tools and Materials for DIY Patching
You don’t need a warehouse full of equipment to fix a few shingles, but having the right tools makes the job safer and more permanent.
The DIY Toolkit:
- Flat Pry Bar: Essential for breaking the sealant strips without tearing good shingles.
- Roofing Hammer: A standard hammer works, but a roofing hammer has a magnetized face to hold nails.
- Utility Knife: For trimming shingles to size.
- 1 1/4-inch Galvanized Roofing Nails: These resist rust and are the industry standard.
- Roofing Cement: Often called “bull” or “flash,” this is the glue that keeps everything watertight.
- Replacement Shingles: Ideally, these match your existing roof (more on that later).
- Small Wood Block: Use this as a fulcrum under your pry bar to prevent denting the shingles you aren’t replacing.
Choosing the Right Roofing Cements and Sealants
Not all “goop” is created equal. For most asphalt roof repair jobs, you want a high-quality asphalt plastic roof cement.
- Wet-Patch/Wet-R-Dri Formulas: These are lifesavers in Wisconsin. They are designed to stick even when the roof is damp, making them perfect for emergency repairs during a rainstorm.
- Rubberized Sealants: These stay flexible over time, which is vital as your roof expands and contracts with the temperature.
- Caulk Gun Tubes: For small cracks or sealing nail heads, a tube of sealant is much cleaner than a gallon bucket and a trowel.
The goal is to Seal Your Shingles And Stop The Leak without creating a mess that traps moisture.
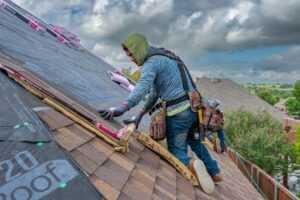
How to Repair Asphalt Roof Damage: The 7-Step Process
Ready to get to work? Follow these steps to ensure your patch is as durable as the rest of your roof. For more context on why we do it this way, read The Easiest Way To Fix Roof Leak.
Step-by-Step asphalt roof repair Process
Step 1: Break the Seal Asphalt shingles have a “self-sealing” strip that bonds them to the course below. Carefully slide your flat pry bar under the damaged shingle and the one directly above it. Gently wiggle the bar to break the bond without tearing the shingle.
Step 2: Remove the Nails This is where most DIYers get stuck. The nails holding your damaged shingle are actually covered by the shingle above it. Lift the overlapping shingle and use your pry bar to pop the nails out. Use a wood block under the bar to protect the good shingles from being crushed.
Step 3: Slide Out the Damage Once the nails are out, the damaged shingle should slide right out. If it’s stuck, check for a “high nail” that you might have missed.
Step 4: Inspect the Underlayment Look at the black paper underneath. Is it torn? If so, cut a small patch of 30# felt paper or use a heavy application of roofing cement to seal the tear before proceeding.
Step 5: Cut and Prep the New Shingle If you’re replacing a single “tab” (one-third of a standard shingle), use your utility knife to trim the new shingle to match. If replacing the whole shingle, ensure it’s the right length.
Step 6: Fasten the Shingle Slide the new shingle into the gap. Align it with the shingles to the left and right. Drive four galvanized nails into the nail line (the area just below the sealant strip). Do not overdrive them; the heads should be flush with the shingle surface.
Step 7: Apply the Final Seal Lift the tabs of the new shingle and the one above it. Apply a quarter-sized dab of roofing cement under each corner. Press down firmly. This ensures the roof is wind-resistant immediately, even before the sun has a chance to heat up the factory sealant.
Tips for Aesthetic Shingle Matching
A “sore thumb” repair can hurt your home’s curb appeal. If you can’t find an exact match at the local hardware store in Walworth or Delavan, try these tricks:
- The “Hidden Harvest”: If you have a shed or a very low-visibility part of the roof (like behind a chimney), “steal” a shingle from there and use the new, slightly mismatched shingle to fill that hidden spot.
- Check the Attic: Often, builders leave a bundle of shingles behind. Check your garage rafters or attic crawlspace first.
- Manufacturer Names: Look at the underside of a damaged shingle; sometimes the manufacturer and color name are printed there.
Even a slight mismatch will often blend in over 6–12 months as the new shingles weather. As we discuss in The Difference That A Timely Roof Repair Can Make, a waterproof roof is always more beautiful than a leaky one!
Safety Protocols and Best Practices for Roof Work
We cannot stress this enough: your safety is worth more than any repair. Roof work is inherently dangerous. Always follow OSHA fall protection guidelines to ensure a safe working environment.
- Ladder Safety: Always ensure your ladder extends 3 feet above the roof edge and is on stable, level ground.
- Non-Slip Shoes: Wear soft-soled boots or sneakers with good grip.
- Weather Awareness: Never work on a roof during high winds or if there is frost. In Southeastern Wisconsin, morning dew can make a roof as slippery as a skating rink.
- Fall Protection: For steep slopes, use a safety harness anchored to the roof structure.
Fixing leaks promptly is essential to prevent mold and structural rot. For more on the urgency of these repairs, see 5 Reasons To Fix Roof Leaks Asap.
Working in Wet Conditions and Emergency Fixes
If it’s currently pouring rain and you have a “drip-drip” in the living room, a permanent asphalt roof repair might have to wait.
- Emergency Tarps: Use a heavy-duty tarp. Tuck the top edge under a row of shingles higher up the roof and secure the sides with 2×4 boards. Never nail through the top of a tarp exposed to rain.
- Sheet Metal “Slides”: A 12×12-inch piece of galvanized sheet metal can be slid under shingles to bridge a hole temporarily.
- Wet-Surface Cement: Use products labeled “Wet Patch” to goop over cracks. It’s messy, but it works until the sun comes out.
When to Call a Professional for asphalt roof repair
While we love empowering DIYers, some jobs are best left to the experts at Smith Roofing & Exteriors. You should Call Roof Repair Contractor To Fix Your Roof if:
- The Pitch is Too Steep: If you don’t feel 100% comfortable walking on the slope, stay off it.
- Structural Rot: If the roof feels “spongy” or soft when you step on it, the wood decking underneath is rotted and needs replacement.
- Widespread Damage: If you have dozens of missing shingles after a Lake Mills windstorm, a professional crew can dry it in much faster.
- Warranty Concerns: Many shingle warranties require professional installation to remain valid.
Cost of Professional asphalt roof repair
How much does it cost to have us come out? Generally, a professional asphalt roof repair for a single area ranges from $100 to $300. This covers the inspection, materials, and the labor of a trained technician. When you consider the cost of buying a whole bundle of shingles and a gallon of cement you might only use once, the professional option is often quite competitive. For a full breakdown, check our The Price Of Protection Shingle Roof Repair Cost Guide.
Frequently Asked Questions about Asphalt Roofs
How long does a properly patched asphalt shingle last?
A properly executed patch is considered a permanent repair. It should last exactly as long as the surrounding shingles. If your roof has 10 years of life left, your patch should too. For more on longevity, see What Are The Signs That Its Time For Shingle Roof Replacement.
What routine maintenance prevents future asphalt roof damage?
- Gutter Cleaning: Clogged gutters lead to “ice dams” in Jefferson and Edgerton, which force water under your shingles.
- Tree Trimming: Keep branches at least 6 feet away from the roof to prevent scouring and puncture damage.
- Annual Inspections: Catching a lifted tab in the spring prevents a leak in the fall.
What are the most common DIY mistakes to avoid?
- Over-nailing: Driving nails too deep cuts the shingle.
- Trapping Moisture: Applying too much cement can actually trap water and cause the wood underneath to rot.
- Ignoring Flashing: Most “shingle leaks” are actually flashing leaks. Don’t ignore the metal!
Conclusion
At Smith Roofing & Exteriors, we believe that a well-maintained roof is the heartbeat of a safe home. Whether you’re tackling a small asphalt roof repair yourself in Burlington or looking for a full restoration in Fort Atkinson, the key is to act fast. Asphalt shingles are a fantastic choice for Wisconsin homes because of their resilience and ease of repair.
If your roof repair feels a bit too high or too complex, don’t risk it. Give us a call. We provide transparent pricing and 24/7 emergency services to all our neighbors in Southeastern Wisconsin.
To learn more about why asphalt is the king of roofing, read our guide on the Top Benefits Of Choosing Asphalt Shingle Roofing For Your Home. Stay dry out there!