Why a Brick and Cedar Shake House Is Worth a Second Look
A brick and cedar shake house is one of the most visually striking combinations in residential exterior design — and it’s not hard to see why. Over 62,000 photos of red brick and cedar shake homes exist on Houzz alone, and hundreds of homeowners are searching Pinterest every day for design inspiration on this exact pairing.
Here’s a quick snapshot of what makes this exterior combination work:
| Feature | Brick | Cedar Shake |
|---|---|---|
| Primary role | Lower level, foundation, accent | Upper level, gables, dormers, roofing |
| Lifespan | 50–100+ years | 20–25 years (natural); 50+ years (composite) |
| Maintenance | Very low | Moderate to high (natural); low (composite) |
| Visual character | Solid, grounded, traditional | Warm, textured, rustic |
| Best pairing zones | First floor, porch piers, entryway | Gable ends, upper story, accent panels |
The idea is simple: brick anchors the bottom of the home with weight and permanence, while cedar shakes soften the upper levels with warmth and texture. Together, they create a balanced, layered look that works across multiple architectural styles — from Craftsman and Tudor to Cape Cod and ranch-style remodels.
That balance isn’t always easy to get right, though. Material transitions, flashing details, maintenance schedules, and color choices all play a role in whether the finished result looks intentional or thrown together.
I’m Matt Smith, owner of Smith Roofing & Exteriors, and I’ve spent years helping Wisconsin homeowners navigate exactly these kinds of exterior decisions — including the specific challenges of keeping a brick and cedar shake house looking great through harsh Midwestern winters. Let’s walk through everything you need to know to get it right.
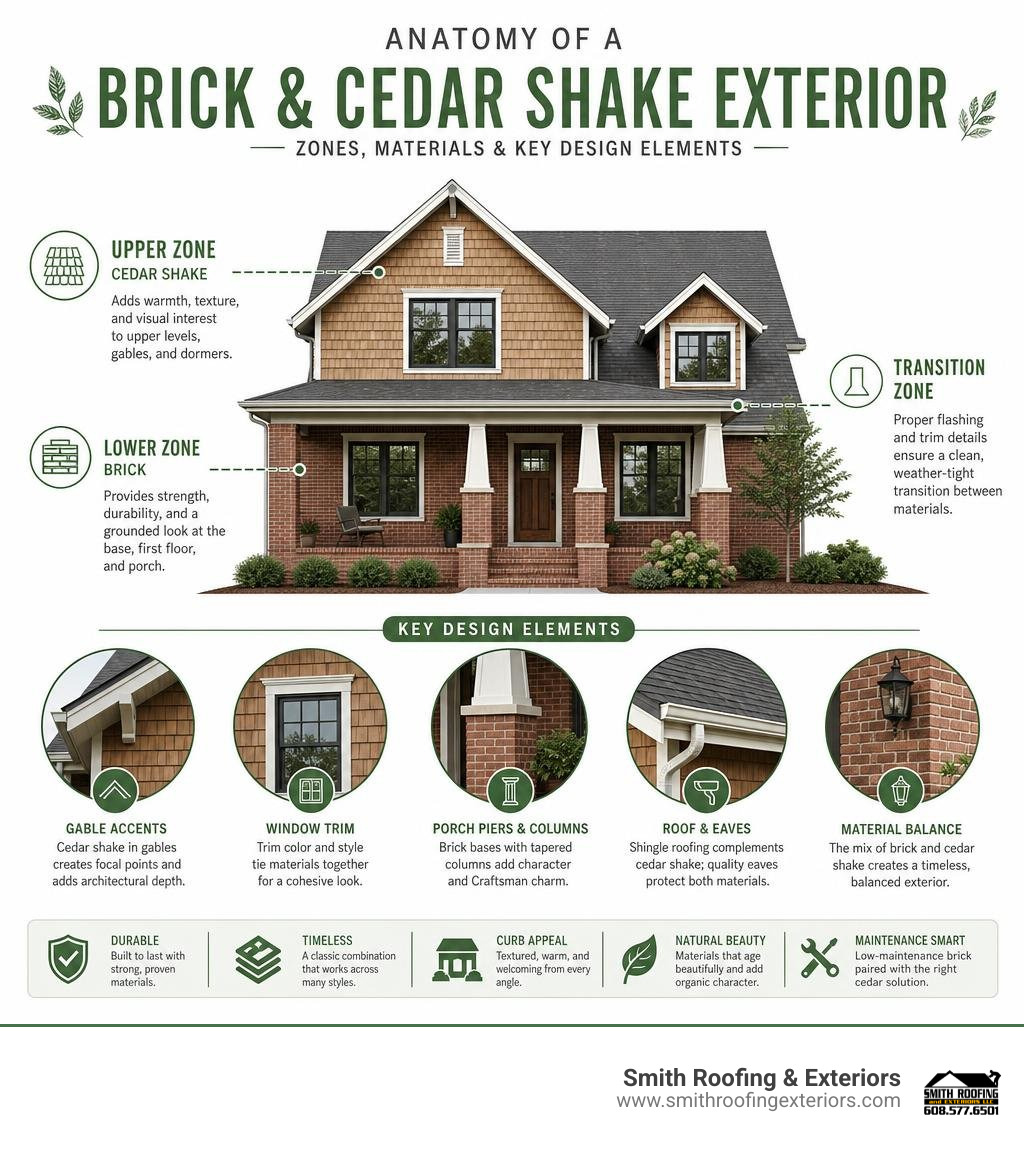
Key terms for brick and cedar shake house:
Design Considerations for a Brick and Cedar Shake House
Combining masonry and wood siding is an art form. If you don’t plan carefully, the heavy weight of brick can easily overwhelm the rustic, organic look of cedar shakes. To make a brick and cedar shake house work, you have to think about visual balance, scale, and the physical transitions where the two materials meet.
One of the best ways to soften the appearance of large brick walls is by using raked horizontal joints during installation. Recessing the horizontal mortar lines while keeping the vertical joints flush reduces the visual scale of the brickwork, making it feel less imposing and more textured. This texture bridges the gap between the smooth elegance of refined masonry and the rough-hewn, hand-split nature of cedar.
Additionally, always consider the rule of gravity in design: place the heavier material (brick) on the bottom and the lighter material (cedar shakes) on top. Placing heavy brick over wood siding creates an unsettling, top-heavy look that disrupts the home’s natural proportions.
Architectural Styles and House Plans
Certain architectural styles are practically built for this combination.
- Tudor Style: Traditionally features heavy brick lower levels, clinker bricks (dense, dark-colored bricks with rugged textures), and steep gable roofs. Stained cedar shakes on the gables or roof pair beautifully with copper gutters to highlight the historic European charm.
- Craftsman Style: Emphasizes natural materials. A popular Craftsman configuration is a brick foundation or porch piers transitioning into natural cedar shake siding on the main body of the house.
- Dutch Colonial: Known for its iconic gambrel roof. A classic look involves a red brick lower skirt, white siding, and a multi-toned cedar shake roof.
- Nantucket Style: Often combines light-colored natural stone or brick accents with weathered gray cedar shake siding to create a relaxed, coastal feel.
- Ranch Homes: A half-brick, half-shingle facade is a highly popular way to remodel mid-century ranch homes, breaking up long, monotonous flat surfaces with dynamic texture.
For a modern take on how these materials can be integrated to handle harsh environments while looking spectacular, look at architectural marvels like the Greenpoint Brooklyn Townhouse: Stick House, Brick Garden – Abruzzo Bodziak Architects . This project showcases a rhythmic grid of cedar panels and a resilient brick base, proving that the pairing is as much a modern engineering choice as it is a nod to traditional style.
If you are building from scratch, a highly searched 3-bedroom house plan featuring this exact exterior blend offers 1,952 square feet of heated space, demonstrating how a 10-on-12 roof pitch and a brick-to-shake transition can create a beautifully proportioned, energy-efficient family home.
Color Palettes and Accent Choices
The color palette you choose will dictate whether your home feels historic, rustic, or contemporary.
- Classic Warmth: Pair traditional red brick with natural tan cedar shakes. This warm, organic look is highly elevated by adding copper accents—like half-round gutters and flashing—which develop a gorgeous green patina over time.
- Modern Contrast: Match a deep red or brown brick with weathered gray shakes, black shutters, and crisp white trim. This provides a sharp, clean contrast that looks fresh and sophisticated.
- Earth Tone Harmony: For a more muted, contemporary feel, try pairing light brick with mushroom, taupe, or dark charcoal shakes.
Staining the undersides of porch overhangs or entryways with a warm, natural cedar stain is another great trick to tie the entire look together.
Natural Cedar Shakes vs. Synthetic and Composite Alternatives
When planning your brick and cedar shake house, you must decide whether to use natural wood or modern synthetic/composite alternatives. Both have distinct advantages, but their maintenance requirements, lifespans, and costs could not be more different.
| Metric | Natural Cedar Shakes | Composite/Synthetic Shakes |
|---|---|---|
| Average Lifespan | 20–25 years (requires strict upkeep) | 50+ years |
| Maintenance Cycle | Clean & treat every 5–7 years | Virtually maintenance-free |
| Material Behavior | Patinas to silver-gray; prone to rot/splitting | Holds original color; highly weather-resistant |
| Fire Rating | Class C (unless treated with expensive retardants) | Class A or C (highly fire-resistant) |
| Impact Resistance | Susceptible to hail damage | Class 4 Impact Rating (highest possible) |
| Upfront Cost | High (materials and specialized labor) | Moderate to High (but half the lifetime cost of wood) |
Pros and Cons of Natural Cedar Shakes
Natural cedar shakes are hand-split from logs, giving them an irregular, highly textured, and three-dimensional appearance that machine-sawn shingles simply cannot match. They act as excellent natural insulators, keeping your home warmer in Wisconsin winters and cooler in the summer.
Over time, untreated cedar ages from a golden honey color to a soft taupe, and eventually into a classic, weathered silver-gray. You can even accelerate this graying process by spraying the wood with ferrous sulphate (an iron salt that reacts with natural wood tannins).
However, natural wood comes with a catch. It is highly labor-intensive to install and requires professional cleaning and chemical treatments every 5 to 7 years to prevent rot, mold, mildew, and insect damage. Without this regular upkeep, natural shakes can quickly cup, warp, and split.
The real-world labor involved is no joke—as documented in the detailed DIY restoration of a 100-year-old cottage in The Cedar Shake Siding Reveal at the Poplar Cottage (It’s DONE!) — The Grit and Polish , which took two and a half years of painstaking work to install and align correctly.
Pros and Cons of Composite and Synthetic Shakes
For homeowners who want the look of real wood without the constant maintenance headache, synthetic and composite shakes are a game-changer. These shingles are engineered from recycled polymers and materials to mimic the exact depth, shadow lines, and texture of natural wood.
Premium synthetic options achieve a Class 4 impact rating (the highest wind and hail resistance rating available) and Class A fire ratings, making them highly desirable in areas with strict building and fire codes. They also feature advanced UV-resistant coatings, such as Kynar-based finishes, which prevent fading and discoloration from sun exposure.
A fantastic example of this technology in action is detailed in Composite Shingles with Authentic Looks Help Preserve Family Legacy on Seven Island Lake – Extreme How To . In this lakeside remodel, high-performance composite shingles were used to withstand severe lakeside weather while keeping a classic 1950s rustic aesthetic.
These products are so visually authentic that even industry professionals struggle to tell them apart from real wood. You can read more about how these synthetic systems preserve historic charm in case studies like the Signature Project: Poland House | Brava Roof Tile or the complete exterior overhaul featured in Replacing Cedar with a Brava Roof, LP Siding, and Custom Copper in Independence, MN – Anchor Roofing & Exteriors MN .
Technical Installation and Water Management
The line where your brick masonry meets your cedar shake siding is a high-risk zone for water infiltration. Because brick is porous and absorbs water, and wood expands and contracts with moisture, this transition must be detailed perfectly. If it isn’t, water will seep behind the siding, rot your wood framing, and cause structural damage.
Proper Flashing at the Brick and Cedar Shake House Transition
To prevent water damage, the transition must be managed with a continuous drainage plane and proper flashing.

- Sloped Rowlock Course: The top course of brick directly below the siding transition should be sloped outward (like a window sill) to shed water away from the wall.
- Z-Flashing / Drip Cap: A heavy-duty metal Z-flashing must be installed over the top of the brick. This flashing runs up behind the housewrap (weather-resistive barrier) and drapes down over the front face of the brick, forcing water to drop off the front of the wall rather than running behind it.
- Weep Holes: Ensure that weep holes are left open in the bottom course of brick and directly above the flashing line to allow any trapped cavity moisture to escape.
Best Practices for Using Cedar Shakes as Siding
When applying cedar shakes as siding, proper alignment is everything.
- Starter Course: Always install a double-layer starter course at the bottom of the wall. The bottom edge must be flared out slightly using a starter strip or shim (kick-out) to ensure subsequent courses lay at the correct angle to shed water.
- Fasteners: Use only stainless steel or hot-dipped galvanized nails. Standard nails will quickly rust, leaving ugly black streaks running down your beautiful cedar siding.
- Joint Offsets: Alternate shake widths and ensure that vertical joints in adjacent courses are offset by at least 1.5 inches to prevent water from finding a direct path through the seams.
- Shingles vs. Shakes: Shakes are split from logs for a rustic, highly textured look, whereas shingles are sawn smooth on both sides for a more uniform, tailored appearance.
Common Installation Mistakes to Avoid
- Using Flat Trim Boards: Installing a flat 1x wood trim board directly at the horizontal brick-to-siding transition acts as a water shelf, catching rain and accelerating rot.
- Over-Caulking: Do not try to seal the junction between the lower course of shakes and the upper course of brick with caulk. It will degrade under UV exposure, crack, and trap moisture behind the siding.
- Improper Nailing: Nailing shakes too high or too tight prevents them from expanding and contracting naturally, leading to cupping and splitting.
Cost, Maintenance, and Longevity Comparison
Choosing the materials for your brick and cedar shake house is a balancing act between upfront budget and long-term maintenance costs.
Comparing Siding and Roofing Options
While natural cedar shake offers unmatched organic beauty, it is one of the most expensive siding options to purchase and install. If you are looking for lower-maintenance or more budget-friendly alternatives, here is how they stack up:
- Vinyl Siding: Extremely budget-friendly and virtually maintenance-free. If you want the look of shakes without the wood price tag, vinyl shake siding is a fantastic option. Learn more about why Why Vinyl Siding Installation Is a Smart Investment for Homeowners.
- Engineered Wood (e.g., LP SmartSide or Hardie Board): Offers incredible durability, realistic wood grain textures, and excellent resistance to moisture and insects. To explore pricing, check out How Much Does It Cost to Reside a House with Hardie Board and The Real Cost of Hardie Panel Siding in 2026.
- Asphalt Shingles: If you are using shakes on your roof, transitioning to high-quality architectural asphalt shingles can save you thousands of dollars while still providing great depth and shadow lines. Read about the Top Benefits of Choosing Asphalt Shingle Roofing for Your Home.
The Role of Maintenance in Extending Exterior Lifespan
If you choose natural cedar, a strict maintenance schedule is your only defense against premature failure.
- Annual Inspection: Look for warped, cracked, or loose shakes, especially after severe winter storms.
- Gentle Cleaning: Wash the siding every spring to remove dirt, mold, and algae. Never use a high-pressure power washer on wood shakes—it will shred the wood fibers. A garden hose and a soft-bristle brush are all you need.
- Chemical Treatments: Re-apply water-repellent sealants or stains every 5 to 7 years to protect the wood from moisture absorption and UV damage.
Catching small issues early prevents costly, full-scale siding replacements down the road. Keep an eye out for the 5 Signs It’s Time to Install New Siding on Your Home, and don’t underestimate the 5 Benefits of Professional Roof Maintenance to keep your home’s envelope secure.
Frequently Asked Questions about Brick and Cedar Shake Homes
Is cedar siding better than vinyl for a brick and cedar shake house?
“Better” depends on your priorities. Cedar siding offers unmatched natural beauty, incredible texture, and excellent natural insulation, but it requires significant maintenance and has a high upfront cost. Vinyl siding is highly affordable, virtually maintenance-free, and easy to install, but it lacks the organic warmth and premium resale value of real wood.
How often do natural cedar shakes require maintenance?
Natural cedar shakes require professional cleaning and chemical treatment (sealing or staining) every 5 to 7 years. In humid, shaded, or highly wooded areas, you may need to clean them more frequently to prevent moss and mold growth.
Can you use composite shakes to replace natural cedar?
Yes! Premium composite shakes are designed specifically to replace natural cedar. They match the exact dimensions, shadow lines, and textures of real wood while providing a 50+ year lifespan, a Class 4 impact rating, and a Class A fire rating without any of the painting, staining, or rot concerns.
Conclusion
A brick and cedar shake house is a timeless design choice that brings together the rugged strength of masonry and the organic warmth of wood. Whether you choose the historical authenticity of natural cedar or the high-performance durability of modern composite alternatives, the key to a long-lasting, beautiful exterior lies in the quality of the installation and water management.
At Smith Roofing & Exteriors, we specialize in high-quality roofing, siding, and gutter installations across Southeastern Wisconsin—including Fort Atkinson, Lake Mills, Jefferson, Burlington, Delavan, Elkhorn, Lake Geneva, Walworth, and Edgerton.
If you are ready to update, restore, or build your dream brick and shake home, our experienced local team is here to help with superior materials, transparent pricing, and expert craftsmanship. Explore our services to learn All About Roofing and Siding, and contact Smith Roofing & Exteriors today to schedule your free consultation!