What That Wet Spot on Your Ceiling Is Really Telling You
Fixing a wet spot in your ceiling comes down to five steps:
- Find and fix the source (roof, plumbing, or HVAC)
- Protect the area (buckets, electrical shutoff, photos)
- Dry it out completely (fans, dehumidifier, moisture meter)
- Repair the drywall (patch, tape, mud, sand)
- Prime and paint (oil-based stain-blocking primer first, then ceiling paint)
That brownish, irregular ring spreading across your ceiling is never just a cosmetic problem. It is a warning sign that moisture has already been building up — sometimes for weeks — inside your ceiling cavity, soaking insulation, softening drywall, and quietly setting the stage for mold growth. And mold can start colonizing wet building materials in as little as 24 to 48 hours.
The stain you see on the surface is almost always smaller than the actual damage hidden above it. Water travels sideways along joists and framing before it ever drips down, so what looks like a small ring could be masking a much larger moisture problem you can’t see yet.
The good news? If you act quickly and in the right order, many ceiling water repairs are manageable — and even preventable going forward.
I’m Matt Smith, owner of Smith Roofing & Exteriors, and after years of helping Wisconsin homeowners track down and fix the roof and exterior issues that lead to fixing wet spots in ceilings, I’ve seen how a small ignored stain can turn into a costly structural repair. Let’s walk through exactly what to do, step by step.
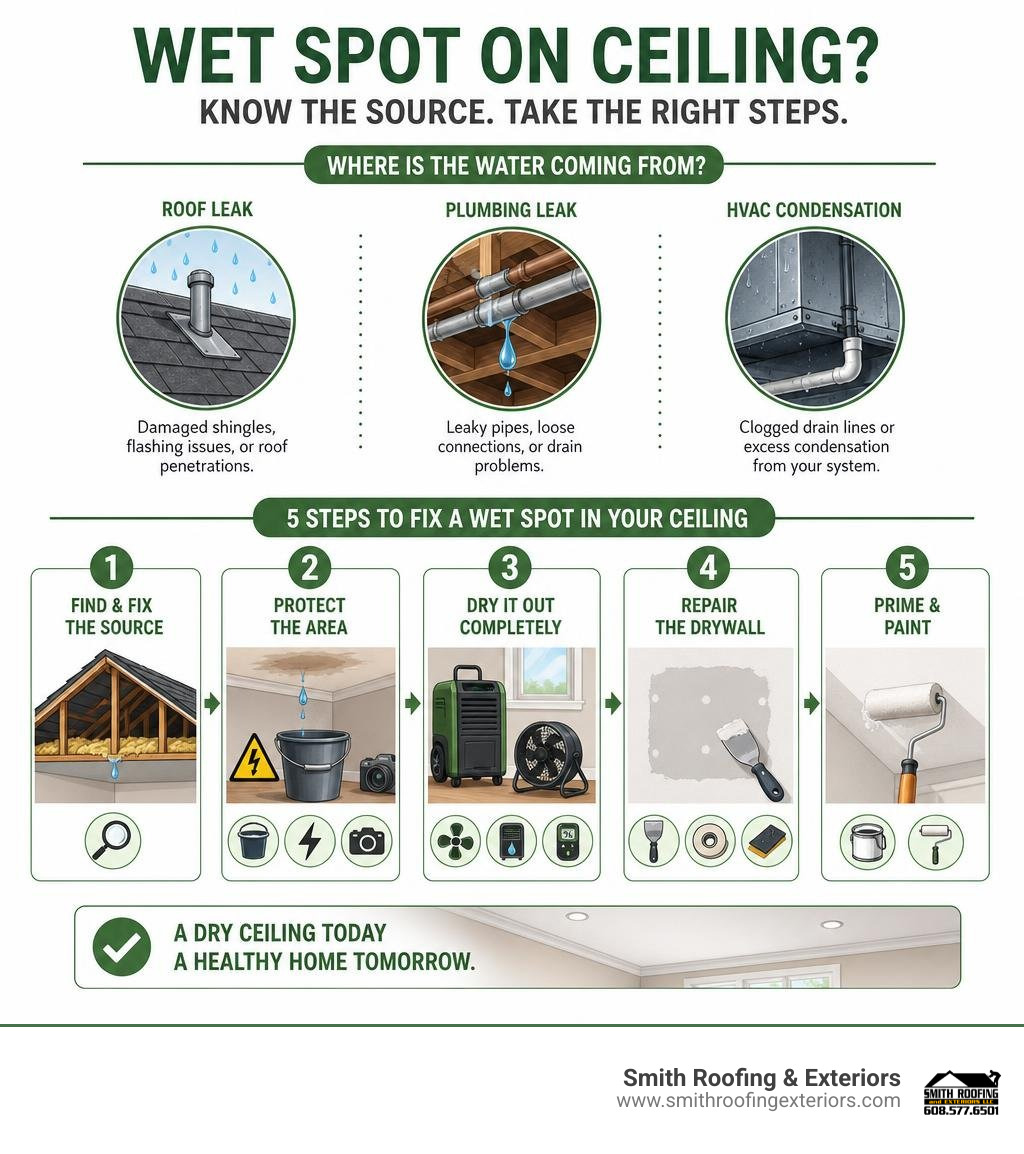
Quick look at fixing wet spot in ceiling:
Diagnosing the Source of Your Ceiling Water Stain
Before you run to the hardware store for drywall tape and paint, you have to play detective. Trying to patch or paint over a water stain without stopping the water first is like putting a tiny adhesive bandage on a burst pipe—it is a temporary mask that is guaranteed to fail. In fact, because interior latex paint is water-soluble, applying fresh paint directly over an active or unsealed water stain will dissolve the stain’s minerals, causing the ugly discoloration to bleed right back through to the surface as it dries.
To prevent this “ghost stain” effect, you must pinpoint exactly where the moisture is coming from. When you see a water spot on your ceiling, it is a symptom of a larger, hidden moisture problem. For a detailed breakdown of how hidden moisture spreads behind drywall, you can read Water Damage on Ceiling: Expert Repair & Prevention Guide – Eagle Restoration.
Is It a Roof Leak or a Plumbing Problem?
The physical characteristics of the stain, its location, and when it appears can tell you almost everything you need to know about its origin:
- The Weather Connection (Roof Leaks): If the wet spot only appears or expands during heavy rainstorms, or during the winter and spring thaw periods here in Southeastern Wisconsin, you are likely dealing with a roof leak. Water often enters through degraded pipe boots (which typically last 10 to 15 years before cracking), damaged shingles, or compromised chimney flashing. Because water follows the path of least resistance, it rarely drips straight down. It will run along sloped rafters, electrical wires, or drywall seams, showing up as a ceiling stain 3 to 6 feet away from the actual roof penetration. Understanding why you should never ignore a residential roof leak even if it is small is crucial, as even minor drips can rot your home’s structural framing over time.
- The Constant Drip (Plumbing Failures): If the stain grows consistently regardless of the weather outside, or if it suddenly expands after someone takes a shower or flushes a toilet upstairs, plumbing is the prime suspect. A localized stain directly beneath an upstairs bathroom is frequently caused by a degraded toilet wax ring, a cracked shower pan, or missing bathtub caulk.
- The Color and Ring Patterns: The visual appearance of the stain holds valuable clues. A yellowish-brown ring (often called the “halo effect”) is caused by water wicking through the drywall and dissolving wood tannins or paint surfactants, leaving them behind as the water evaporates. If you see dark, concentric rings—resembling the rings on a tree stump—it means you have an intermittent, cyclical leak that pools and dries repeatedly. On the other hand, a copper or greenish stain typically points to a pinhole leak in a copper plumbing pipe above.
HVAC Condensation and Attic Ventilation Issues
Not every wet spot is caused by a hole in the roof or a broken pipe. In many homes, the culprit is actually condensation:
- Duct Sweating: During hot, humid Wisconsin summers, uninsulated or poorly insulated HVAC ductwork running through a hot attic will “sweat.” Cold air rushing through the metal ducts causes moisture from the humid attic air to condense on the outside of the pipes. This moisture eventually drips onto the ceiling drywall below, often creating a series of wet spots that follow a straight line along the path of the ductwork.
- Poor Attic Ventilation: If you notice random, faint yellowing across your entire ceiling rather than a single concentrated stain, poor attic ventilation may be to blame. When humid air from your living space escapes into the attic and cannot vent out, it condenses on the underside of the roof deck and drips down onto the insulation.
- Ice Dams: During cold winter months in Fort Atkinson and Jefferson, ice dams can form on the edges of your roof. When snow melts on the upper portions of the roof and refreezes at the cold eaves, it creates a dam of ice that traps melting water. This water backs up under the shingles, penetrates the roof deck, and drips into your ceiling.
To learn more about how moisture behaves inside a ceiling cavity after a leak, check out Ceiling Water Damage Repair After Leaks or Flooding | Superior Restoration of Kentuckiana Corp.
Immediate Steps for Fixing Wet Spot in Ceiling
Once you spot a damp area or an active drip, the clock starts ticking. You have a critical 24-to-48-hour window to dry out the wet materials before mold spores begin to germinate and colonize your drywall and insulation. Acting quickly not only protects your family’s health but also prevents minor water damage from turning into a major structural failure. There are several vital reasons to fix roof leaks ASAP, including preventing structural wood rot and avoiding costly interior repairs.
Step-by-Step Emergency Mitigation
If you notice a wet spot on your ceiling, follow this immediate safety and containment protocol:
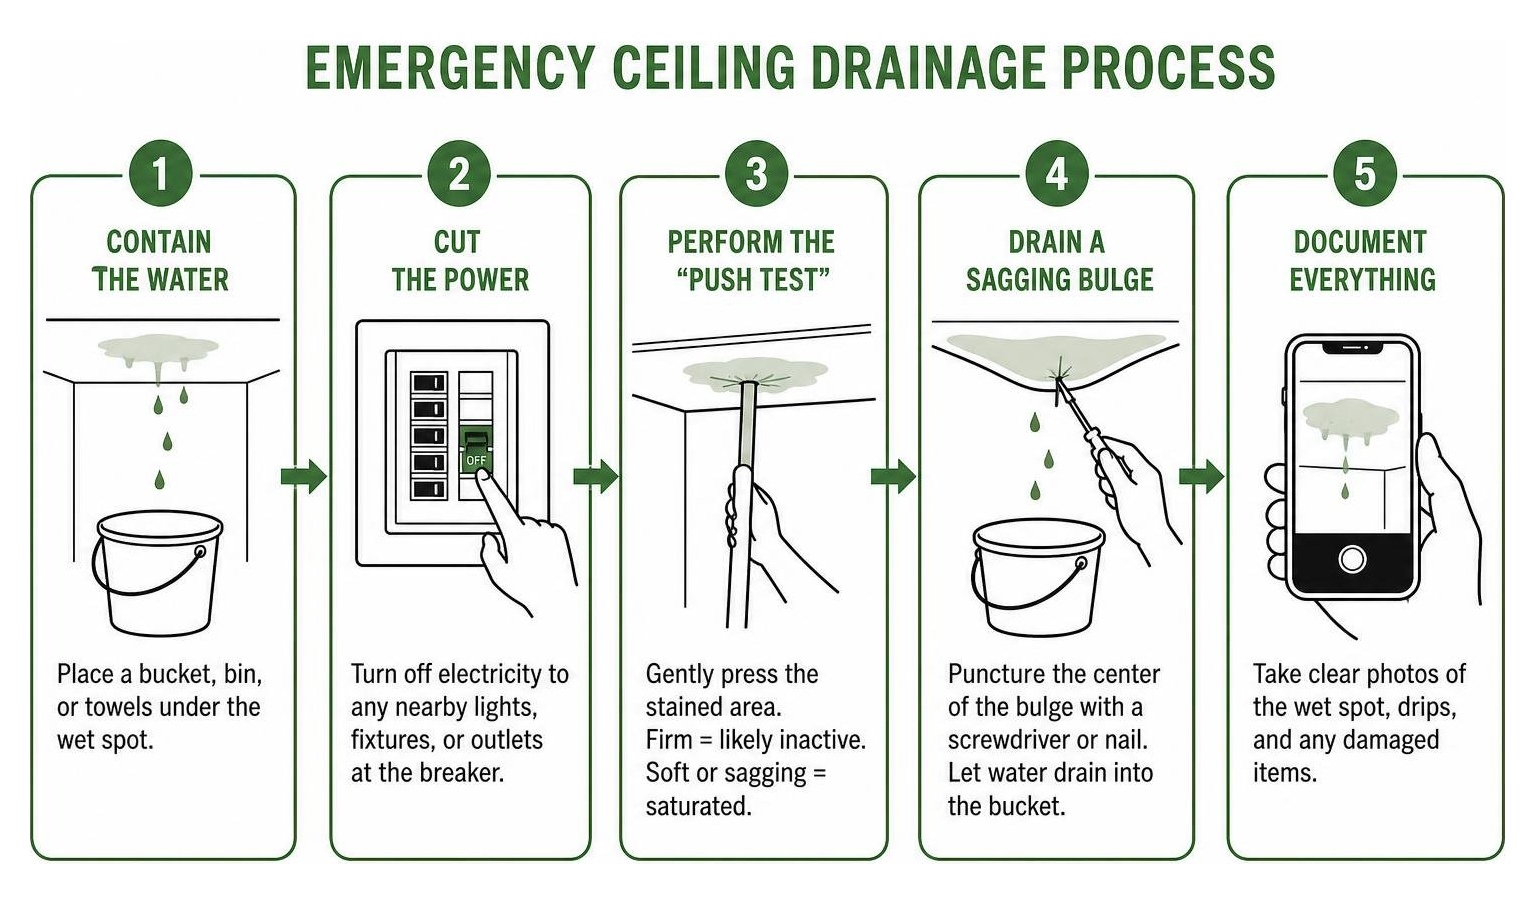
- Contain the Water: Place a bucket, plastic bin, or heavy towels directly under the wet spot to protect your flooring, furniture, and electronics.
- Cut the Power: If the wet spot is near a ceiling light fixture, ceiling fan, or electrical outlet, go to your main breaker panel and shut off the electricity to that circuit immediately. Waterlogged electrical wiring is a severe fire and shock hazard.
- Perform the “Push Test”: Using a broom handle or your finger (while standing on a sturdy ladder, not directly underneath), gently press on the stained area. If the drywall feels firm and dry, the leak may be inactive or very slow. If it feels soft, spongy, or sags, the drywall is saturated and structurally compromised.
- Drain a Sagging Bulge: Saturated drywall can weigh hundreds of pounds and collapse without warning. If you see a visible bulge where water is pooling, place a large bucket underneath, stand back, and carefully puncture the center of the bulge with a small screwdriver or nail. This acts as an emergency pressure relief valve, allowing the trapped water to drain safely into the bucket instead of causing a catastrophic ceiling collapse.
- Document Everything: Take clear photos of the wet spot, any active drips, and any damaged personal property. This documentation is essential if you plan to file a homeowners insurance claim.
Drying Out the Ceiling Cavity
To successfully fix a wet spot, the entire ceiling cavity—including the drywall, wood joists, and insulation—must be dried completely. Simply running a household fan in the room is not enough to dry the trapped space behind the drywall.
- Remove Saturated Insulation: Wet fiberglass batt insulation permanently loses its R-value because it compresses under the weight of the water. Cellulose insulation acts like a sponge, holding moisture against wood framing and accelerating rot. If the insulation above the ceiling is saturated, it must be removed and discarded.
- Set Up Commercial Airflow: Use high-velocity air movers to blow air across the damp ceiling surface. If you have cut an inspection hole or removed damaged drywall, aim the fans so they circulate air directly into the open ceiling cavity.
- Lower the Humidity: Run a dehumidifier in the closed room to pull moisture from the air, keeping the relative humidity below 60% (ideally closer to 30% to 40% during the drying process) to stop mold growth in its tracks.
- Verify Dryness with a Moisture Meter: Professional structural drying is only considered complete when wood materials are confirmed to be below 16% moisture content (ideally under 12% for patching). You can use a penetrating moisture meter to test the joists and surrounding drywall before closing up the ceiling.
How to Repair and Paint a Water-Damaged Ceiling
Once the source of the leak is completely resolved and the ceiling cavity is entirely dry, you can begin the physical repair process. Depending on the severity of the damage, this may be a simple cosmetic DIY project or a job that requires professional restoration.
| Damage Level | Typical Repairs Required | Estimated Cost Range | DIY vs. Professional |
|---|---|---|---|
| Minor | Stain cleaning, sealing, and cosmetic painting of a small, dry area. | $50 – $150 (DIY) / $300 – $800 (Pro) | Safe for DIY |
| Moderate | Cutting out and replacing a section of drywall (up to 10 sq. ft.), taping, and mudding. | $150 – $300 (DIY) / $1,000 – $3,500 (Pro) | DIY-friendly with the right tools |
| Severe | Replacing large sections of drywall, structural joist repair, and professional mold remediation. | $5,000 – $15,000+ | Professional required |
For a deeper dive into pricing and repair options, read Ceiling Repair After Water Leak: What to Do and What It Costs | WaterDamageFinder.
When DIY is Safe for Fixing Wet Spot in Ceiling
You can comfortably handle fixing a wet spot in your ceiling yourself if:
- The stained area is small (under 2 to 3 square feet).
- The drywall is completely dry, firm, and shows no signs of sagging or crumbling.
- There is no visible mold growth or musty odor.
- The water came from a clean source (Category 1 water, like a clean water supply line or rainwater), rather than dirty plumbing or sewage.
For minor cosmetic repairs, start by cleaning the stained area with a mild bleach solution (1 cup of household bleach to 3 cups of warm water) to fade the water stain and kill any surface mildew. Wear protective gloves and safety goggles during this step. Once the area is dry, apply an oil-based or shellac-based stain-blocking primer. Standard water-based latex primers will allow the stain to bleed through, but oil-based primers lock the minerals in place.
When to Call a Professional for Fixing Wet Spot in Ceiling
You should put down the drywall saw and call in a professional if:
- The drywall is sagging, spongy, or crumbling.
- The affected area exceeds 10 square feet.
- You smell a strong, persistent musty odor or see black or green mold spots.
- The water source was contaminated (Category 3 “black water,” such as a toilet overflow or sewage backup).
- The ceiling contains asbestos (very common in textured or “popcorn” ceilings installed before 1980). Disturbing these materials without proper containment poses severe health risks.
Step-by-Step Drywall Patching and Painting
If you need to replace a section of water-damaged drywall, follow these steps to achieve a seamless, professional-grade finish. For more detailed instructions on drywall repair, you can refer to How to Fix Water Damaged Ceiling Drywall: Step-by-Step Guide.

Step 1: Cut Out the Damaged Drywall
Use a stud finder to locate the ceiling joists on either side of the damaged area. Mark a clean square or rectangle around the water-damaged section, ensuring the cut lines extend to the centerlines of the solid wood joists. Cut along your marked lines using a utility knife and a drywall saw. Remove the damaged drywall and inspect the exposed joists for structural rot.
Step 2: Install Wood Backing Support
If the edges of your cut do not land directly on joists, you must add support. Cut scrap 1×4 lumber or 2×4 backing boards approximately 6 inches longer than the opening. Place them inside the ceiling cavity across the unsupported edges and secure them by driving drywall screws through the existing ceiling drywall into the wood backing.
Step 3: Cut and Attach the Drywall Patch
Measure the opening and cut a replacement drywall patch to fit. Ensure the patch is the exact same thickness as your existing ceiling (typically 1/2-inch or 5/8-inch). Secure the patch to the joists and wood backing using drywall screws driven every 8 inches along the edges.
Step 4: Tape, Mud, and Sand
Apply self-adhesive mesh tape or paper tape over the seams of the patch. Paper tape is generally preferred for ceilings because it resists sagging while the joint compound cures. Apply three thin, feathered coats of joint compound over the tape using a drywall joint knife. Let each coat dry completely, and sand lightly between coats. Extend the final coat of joint compound 12 to 16 inches beyond the edges of the patch to blend it seamlessly into the surrounding ceiling.
Step 5: Prime and Paint
Once the final coat is sanded smooth and wiped free of dust, apply a high-quality, oil-based stain-blocking primer. Let the primer dry for at least 2 hours. Finally, paint the repaired area using a non-reflective ceiling-specific latex paint. For smooth ceilings, use a 3/8-inch nap roller cover; for textured ceilings, use a thicker 3/4-inch to 1-1/4-inch nap roller to ensure even coverage.
Frequently Asked Questions about Ceiling Water Damage
Can I just paint over a dry water stain on my ceiling?
No. Even if the water stain is completely dry, you cannot simply paint over it with standard latex ceiling paint. Because interior latex paints are water-soluble, the water-soluble mineral salts and wood tannins in the stain will dissolve into the wet paint layer and bleed right back through to the surface as it dries. To cover a water stain permanently, you must first seal it with an oil-based or shellac-based stain-blocking primer. Once the primer is dry, you can safely apply your standard latex ceiling paint. For an in-depth look at stain behavior and chemistry, check out Water Stain on Your Ceiling? What It Means and What to Do About It | GOAT Home Services Blog | GOAT Home Services.
How quickly does mold grow after a ceiling leak?
Mold can begin growing on wet ceiling materials, drywall, and insulation within 24 to 48 hours under warm, humid conditions. Because mold spores are microscopic and travel through the air, they quickly colonize damp, dark spaces like the ceiling cavity. This is why immediate drying and moisture mitigation are so critical. If you suspect mold has already established itself, or if the dampness has persisted for more than 48 hours, consult a professional to ensure safe remediation. You can find more tips on early detection and prevention in How to Spot and Repair Early Signs of Water Damage on Your Ceiling – allon space.
Does homeowners insurance cover ceiling water damage repairs?
It depends on the cause of the leak. Standard homeowners insurance policies generally cover water damage that is caused by a sudden and accidental event, such as a burst pipe, an overflowing appliance, or a sudden roof failure during a severe storm. However, insurance policies typically do not cover damage caused by slow, gradual leaks or lack of maintenance—such as a roof shingle that has slowly degraded over ten years or a bathtub seal that has been slowly leaking for months. To maximize your chances of a successful claim, document all damage thoroughly with photos, keep a detailed timeline, and consult the ultimate guide to roof repair insurance and claims.
Conclusion
Fixing a wet spot in your ceiling is a race against the clock. What starts as a faint yellow ring can quickly escalate into sagging drywall, structural wood rot, and hazardous mold growth if left unaddressed. By understanding the visual clues of the stain, performing immediate emergency mitigation, and ensuring the ceiling cavity is completely dry before patching, you can protect your home’s structural integrity and keep your family safe.
Preventative maintenance is the best way to avoid these headaches entirely. We highly recommend conducting a home inspection 2 to 3 times a year—especially before and after the harsh Wisconsin winter season. Check your attic insulation, keep your gutters free of debris, and inspect your roof for damaged shingles or cracked pipe boots.
If you suspect your ceiling wet spot is being caused by an active roof leak, don’t wait for the ceiling to make the decision for you. Our experienced local team at Smith Roofing & Exteriors is here to provide transparent pricing, superior materials, and 24/7 emergency services to protect your home in Fort Atkinson, WI, and the surrounding Southeastern Wisconsin communities. Schedule a professional roof repair today to stop the drip before it starts.