What Is Roof Ventilation Design — and Why Does It Matter?
Roof ventilation design is the process of planning how fresh air enters and exits your attic to control heat, moisture, and air pressure. Done right, it protects your roof, lowers energy bills, and prevents serious damage like mold and ice dams.
Here’s what good roof ventilation design involves:
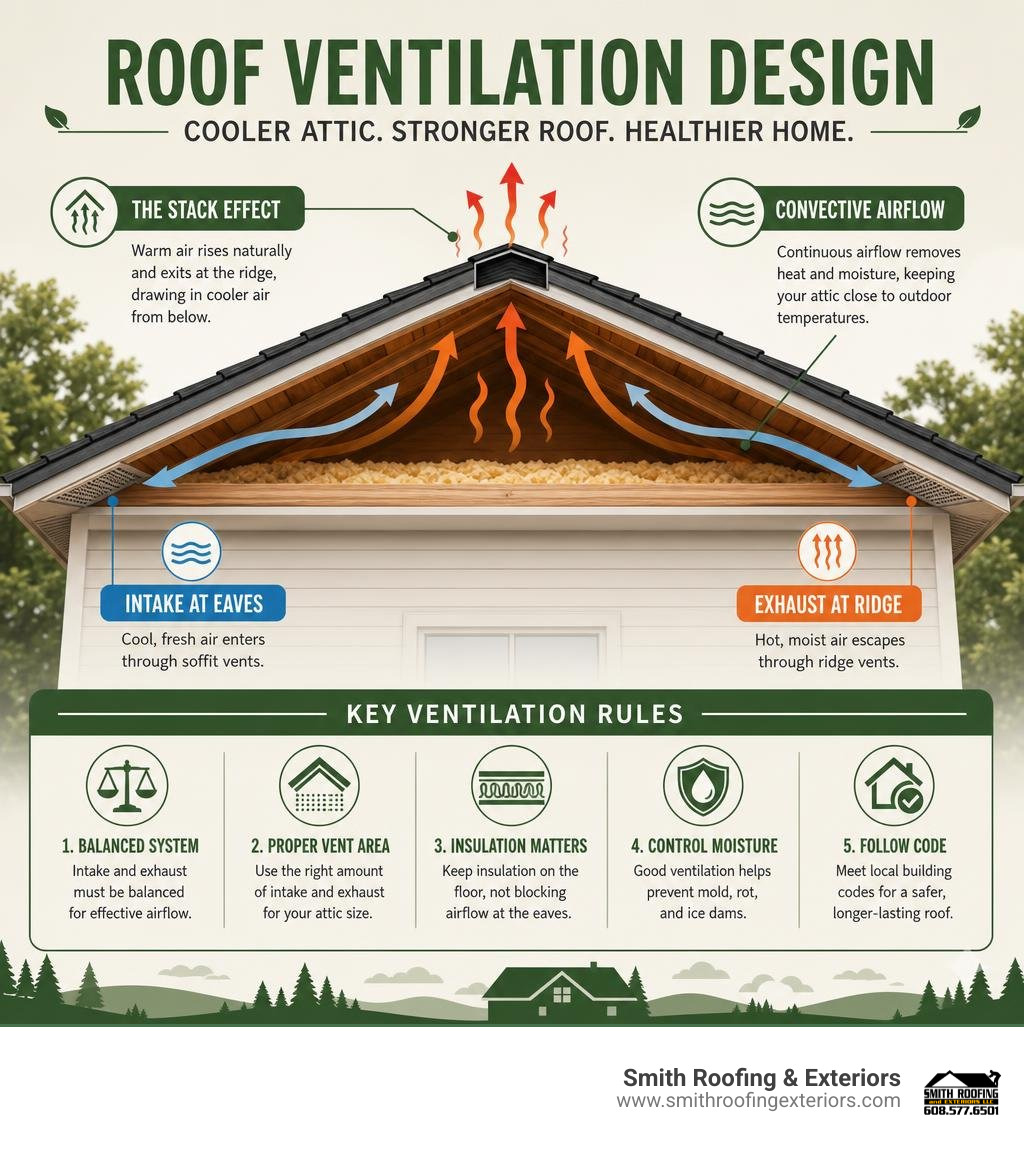
- Intake vents (at the eaves or soffits) pull cool, fresh air into the attic
- Exhaust vents (at or near the ridge) push hot, moist air out
- Balanced airflow keeps the attic close to the outdoor temperature year-round
- Proper insulation placement keeps conditioned air inside your living space
- Code-compliant sizing ensures enough ventilation area for your attic’s square footage
Without this system working together, your attic can turn into a pressure cooker — literally. Attic temperatures can exceed 165°F in summer, which accelerates shingle aging, drives up cooling costs, and creates the perfect conditions for moisture damage in winter.
This is a problem that hits especially hard in Wisconsin, where brutal summers and freezing winters put your roof through the full range of stress a building can face.
I’m Matt Smith, owner of Smith Roofing & Exteriors, and roof ventilation design is one of the most critical — and most misunderstood — parts of every roofing project I work on. Let’s walk through everything you need to know to get it right.
Roof ventilation design terms to know:
The Core Principles of Roof Ventilation Design
To understand how a roof breathes, we have to look at the basic laws of physics. Air isn’t static; it moves in response to temperature differences and external wind forces. A successful roof ventilation design relies on two primary drivers: natural convection (the stack effect) and wind pressure.
First, let’s talk about convection. According to physics, hot air rises because it is less dense than cold air. In an attic, as the sun beats down on the roof deck, the air inside heats up. If there is an opening at the top of the roof (the exhaust) and an opening at the bottom (the intake), this hot air will naturally escape through the top, pulling cooler outside air in through the bottom. This continuous, self-sustaining loop is known as the stack effect.
Second, wind pressure plays a massive role. When wind blows against your home, it creates high pressure on the windward side and low pressure on the leeward side (and over the ridge). This pressure difference acts like a vacuum, actively sucking air out of the ridge vents and pulling fresh air in through the soffits.
When designed correctly, these two forces work in perfect harmony. You can read more about how these forces interact in our detailed guide on The Complete Guide To Roof Ventilation.
Why Attic Airflow Matters in Hot and Cold Climates
In Southeastern Wisconsin, we get the worst of both worlds: humid, sweltering summers and freezing, snowy winters. This means our roofs have to do double duty.
During the summer, the goal of ventilation is cooling. When solar radiation hits your shingles, attic temperatures can easily skyrocket over 165°F. Without proper airflow, that heat gets trapped. It radiates downward through your ceiling insulation, forcing your air conditioner to work overtime and sending your energy bills through the roof.
In the winter, the goal shifts from cooling to moisture control. We generate a surprising amount of moisture inside our homes through showering, cooking, and breathing. This warm, humid air rises and leaks into the cold attic space. According to research on Roof ventilation | BRANZ , when this warm, moist air hits the freezing underside of your roof deck, it reaches its dew point and condenses into liquid water. This is the exact same process that causes water droplets to form on a cold soda can on a hot summer day. If that moisture cannot escape via proper ventilation, it will drip onto your insulation, ruin your drywall, and rot your roof trusses.
Furthermore, a warm attic in winter is the primary cause of ice dams. When heat escapes from your living space into an unventilated attic, it warms the roof deck, melting the snow on top. That melted snow runs down to the cold eaves (which overhang the house and remain freezing), where it refreezes into a thick band of ice. This ice dam traps subsequent runoff, forcing water backward under your shingles and directly into your home.
The Costly Risks of Poor Roof Ventilation Design
When a roof cannot breathe, the consequences are swift and expensive. Here are the major risks we regularly see when inspecting homes with poor ventilation systems:
- Mold and Mildew Growth: Damp, dark, and warm attics are a paradise for mold. Once mold takes hold in your attic insulation and sheathing, it can easily migrate into your living spaces, severely compromising your family’s indoor air quality.
- Wood Rot and Structural Failure: Constant moisture exposure weakens the plywood sheathing and rafters. Over time, the wood softens and rots, leading to sagging rooflines and, in extreme cases, partial structural collapse.
- Accelerated Shingle Degradation: Your shingles are designed to take a beating from the sun, but they aren’t meant to be baked from both sides. Extreme attic heat literally cooks asphalt shingles from underneath, causing them to curl, blister, lose their protective granules, and fail years before their warranty expires.
- Sky-High Utility Bills: When your attic is acting like an oven, your HVAC system has to run constantly to keep your home comfortable.
If you suspect your attic is trapping heat or moisture, we highly recommend reading about Why Thermal Imaging Is The Coolest Way To Spot A Hot Mess. Using thermal technology, we can see exactly where heat is escaping and where moisture is pooling without tearing into your walls. Catching these issues early is a key part of smart homeownership, which we cover in Dont Wait For Leaks With These Proper Roof Maintenance Tips and The Essential Guide To Roof Tune Ups And Preventative Care.
Vented vs. Unvented Roof Assemblies
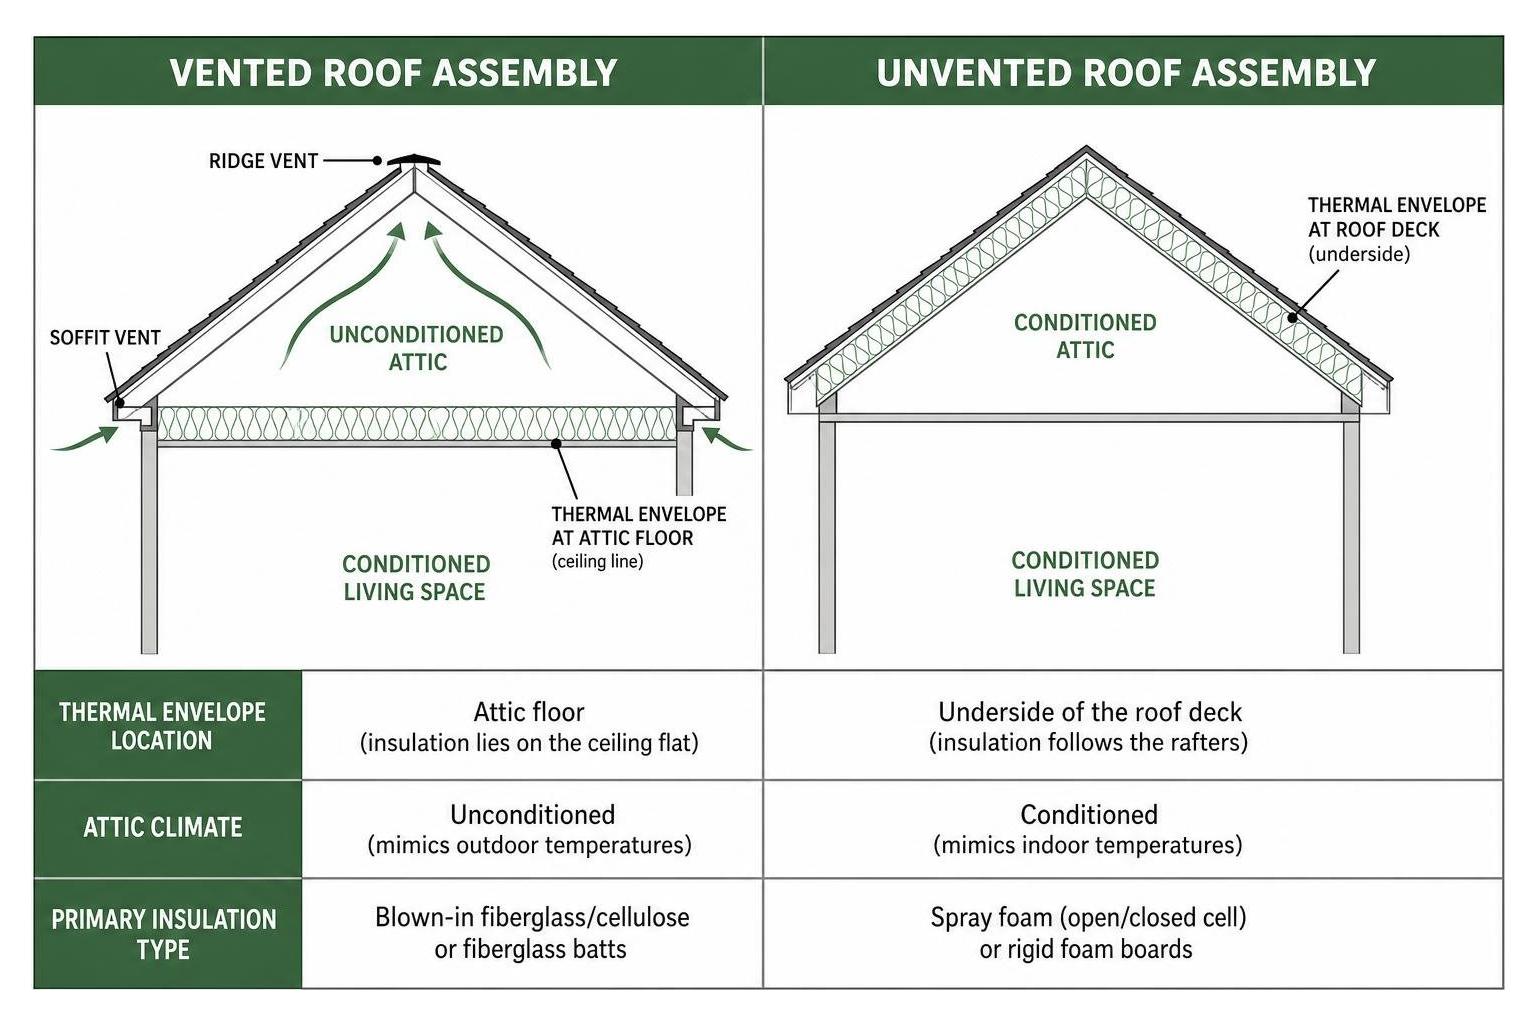
When building or heavily remodeling a home, one of the biggest decisions you’ll make is whether to design a vented or unvented roof assembly. This choice changes where your home’s “thermal envelope” (the boundary between conditioned indoor air and unconditioned outdoor air) is located.
| Feature | Vented Roof Assembly | Unvented Roof Assembly |
|---|---|---|
| Thermal Envelope Location | Attic floor (insulation lies on the ceiling flat) | Underside of the roof deck (insulation follows the rafters) |
| Attic Climate | Unconditioned (mimics outdoor temperatures) | Conditioned (mimics indoor temperatures) |
| Primary Insulation Type | Blown-in fiberglass/cellulose or fiberglass batts | Spray foam (open/closed cell) or rigid foam boards |
| Moisture Management | Relies on continuous airflow to sweep moisture away | Relies on airtightness and vapor retarders to prevent condensation |
| Best Used For | Standard residential homes with simple rooflines | Vaulted ceilings, finished attics, or homes with HVAC ducts in the attic |
| Risk of Ice Dams | Very low (if air sealed and insulated properly) | Moderately low (if thermal bridging is controlled) |
Designing a Classic Vented Attic
The vented attic is one of the most successful and foolproof building assemblies in architectural history. It works beautifully in almost every climate, as long as you follow three golden rules: complete air sealing, adequate insulation, and unobstructed air pathways.
First, you must air-seal the attic floor. Many homeowners think attic insulation is enough, but insulation is like a wool sweater — it stops heat transfer, but it doesn’t stop air drafts. You must use caulk, canned spray foam, and flashing to seal every single wire penetration, plumbing pipe, chimney chase, and light fixture in your ceiling. If you skip this step, warm, humid air from your home will constantly leak into the attic, wasting energy and causing moisture issues.
Second, you need proper insulation depth. In Wisconsin, building codes require high R-values to keep your home warm. However, you must ensure that the insulation is full depth all the way to the outer edge of the wall.
Third, you must maintain a clear channel for air to travel from the soffits up into the attic. As insulation is blown in, it can easily spill over and clog your eave vents. To prevent this, we install rafter baffles (also called wind chutes). These plastic or foam channels keep the insulation from blocking the airflow. For the best performance, the airspace in the vent chute should be a minimum of 2 inches deep, though the International Residential Code (IRC) calls for a minimum of 1 inch.
If you are planning to convert your attic into a usable room, be sure to read Dont Let Your Attic Suffocate A Guide To Finished Attic Ventilation to learn how to vent sloped ceiling rafter bays properly.
Unvented Roofs and Condensation Control
An unvented roof (often called a “hot roof”) brings the attic inside the thermal envelope of the home. Instead of insulating the attic floor, we apply insulation directly against the underside of the roof sheathing. This is highly beneficial if you want a finished third floor or if your heating and cooling ductwork is located in the attic.
However, unvented roofs require absolute precision. Because there is no moving air to sweep away moisture, you must prevent moisture from ever reaching the cold roof sheathing. This is typically done using air-impermeable insulation, such as closed-cell spray foam, or by installing rigid foam insulation boards on top of the roof deck before laying down shingles.
In cold climates like Wisconsin, the insulation must be thick enough to keep the interior surface of the roof deck above the dew point. If the deck gets too cold, any indoor humidity that migrates through the drywall will condense on the wood, leading to hidden rot.
It is also worth noting that shingles installed on unvented roof assemblies operate at roughly 2°F to 3°F warmer than shingles on vented assemblies. While this sounds minor, building science studies show this slight temperature increase can reduce the service life of asphalt shingles by roughly 10%.
How to Calculate Net Free Ventilating Area (NFVA)
You can’t just guess how many vents your roof needs. To design an effective system, you must calculate the Net Free Ventilating Area (NFVA). NFVA is the actual, unobstructed open area through which air can freely pass. Vents have grates, screens, and louvers to keep bugs and rain out, which reduces the actual opening size. A vent that is 12×12 inches (144 square inches of total size) might only have 50 to 60 square inches of NFVA.

To calculate your home’s ventilation needs, follow these steps:
- Measure the Attic Floor: Calculate the total square footage of your attic floor (Length x Width). Do not measure the slope of the roof — only the flat floor footprint.
- Apply the Ventilation Ratio: Determine which building code rule applies to your home (usually the 1/300 rule).
- Convert to Square Inches: Convert the resulting square footage of ventilation into square inches (since most vent manufacturers rate their products in square inches of NFVA).
- Split the Total: Divide the total required NFVA between intake and exhaust.
The 1/300 Rule vs. the 1/150 Rule
The U.S. Federal Housing Authority (FHA) and the International Residential Code (IRC) establish two primary standards for attic ventilation:
- The 1/300 Rule: This is the standard rule for most modern homes. It recommends a minimum of 1 square foot of net free ventilating area for every 300 square feet of attic floor space. However, to qualify for the 1/300 rule, two conditions must be met: the attic floor must be thoroughly air-sealed, and the ventilation must be balanced between intake and exhaust.
- The 1/150 Rule: If your attic floor is not well air-sealed, or if you cannot install a balanced system (for example, if you only have exhaust vents and no intake), the code requires you to double the amount of ventilation. You must provide 1 square foot of NFVA for every 150 square feet of attic floor space.
Let’s look at a quick mathematical example. If you have a home in Jefferson, WI with a standard 1,200-square-foot attic floor:
- Under the 1/300 rule: $1200 / 300 = 4\text{ sq. ft.}$ of total NFVA.
- Convert to square inches: $4\text{ sq. ft.} \times 144 = 576\text{ square inches}$ of total required NFVA.
Balancing Intake and Exhaust in Roof Ventilation Design
A balanced ventilation system is critical. In a perfect world, you want a 50/50 split: half of your ventilation area should be low (intake at the eaves) and half should be high (exhaust at the ridge).
However, real-world building science suggests that a 60/40 or 75/25 split favoring the intake is actually superior. Here is why: if you have slightly more intake area than exhaust area, it gently pressurizes your attic. This positive pressure prevents the exhaust vents from sucking conditioned air up from your living space through tiny ceiling leaks.
Conversely, you must never have more exhaust than intake. If your ridge vents have a higher NFVA than your soffit vents, the system will create negative pressure. To satisfy the exhaust demand, the system will pull air from the easiest source available — which is often the conditioned, humid air inside your home, pulled through recessed lights, attic hatches, and wall cavities.
Choosing Your Ventilation Hardware: Passive vs. Powered Vents
When choosing your ventilation hardware, you have to decide between passive systems (which rely entirely on natural wind and gravity) and active/powered systems (which use electricity or solar power to turn fans).
At Smith Roofing & Exteriors, we almost always recommend passive systems. They have no moving parts to break, cost nothing to operate, and work continuously. However, there are times when powered systems are useful. You can read a complete breakdown of these choices in our review of To Vent Or Not To Vent Top Energy Efficient Roof Vents Reviewed.
If you are dealing with a damp attic, you might also want to read Dont Blow It The Ultimate Guide To Bathroom Roof Ventilation to make sure your bathroom fans aren’t dumping moist air directly into your attic space.
Intake Vent Options: Soffit, Fascia, and Drip Edge
Intake is the foundation of your ventilation system. Without it, exhaust vents cannot function. Here are the most common intake options:
- Soffit Vents: These are installed on the underside of your roof overhang (the eave). They can be individual rectangular grates cut into the wood, or continuous perforated vinyl/aluminum panels. Continuous soffit vents provide the maximum amount of balanced airflow.
- Over-Fascia Vents: If your home has no eaves or soffits (common in some historic homes in Fort Atkinson), you can install over-fascia vents. These are thin, low-profile vents that sit on top of the fascia board, just underneath the shingles, allowing air to slip into the rafter bays.
- Drip Edge Vents: Similar to fascia vents, these combine a standard metal drip edge with a built-in ventilated slot, providing a sleek intake pathway right at the roof’s edge.
For specialized steel or metal roofs, specialized intake and cavity batten systems are required to manage condensation, as detailed in the technical guidelines for VENTILATION IN STEEL ROOFING and the asi-ncc-lysaght-compliance-guide-roof-ventilation.
Exhaust Vent Options: Ridge Vents, Box Vents, and Turbines
Exhaust vents must be placed at or very near the highest point of the roof to let hot, rising air escape:
- Ridge Vents: These run continuously along the entire peak of your roof. Once the roof deck is cut back at the peak, a low-profile plastic vent is installed over the gap, and shingles are nailed on top to match the rest of the roof. Ridge vents are highly efficient, aesthetically invisible, and provide uniform exhaust.
- Box Vents (Louver Vents): These are static, square-shaped vents installed near the ridge. They are ideal for roofs that don’t have a continuous ridge line, though you need to install multiple units to get enough NFVA.
- Wind Turbines (Whirlybirds): These classic spinning vents use the slightest breeze to spin a turbine, drawing air out of the attic. They are highly effective but visually prominent.
- Powered Attic Ventilators (PAVs): These electric or solar-powered fans actively pull air out of the attic. While they can reduce peak summer attic temperatures by over 20°F, their overall seasonal benefit is modest on well-insulated homes, and they can pull air out of your house if the attic isn’t perfectly sealed. If you’re considering a DIY fan project, see our Beat The Heat With This Diy Roof Fan Installation Guide.
For advanced passive exhaust designs, systems like VENT-A-ROOF , VENT-A-ROOF , and VENTILATION AND offer highly integrated, continuous passive ventilation that blends seamlessly with modern architectural lines.
Frequently Asked Questions about Roof Ventilation
How does a complex roof design affect ventilation?
Complex roofs with multiple hips, valleys, dormers, and vaulted ceilings make roof ventilation design much more challenging.
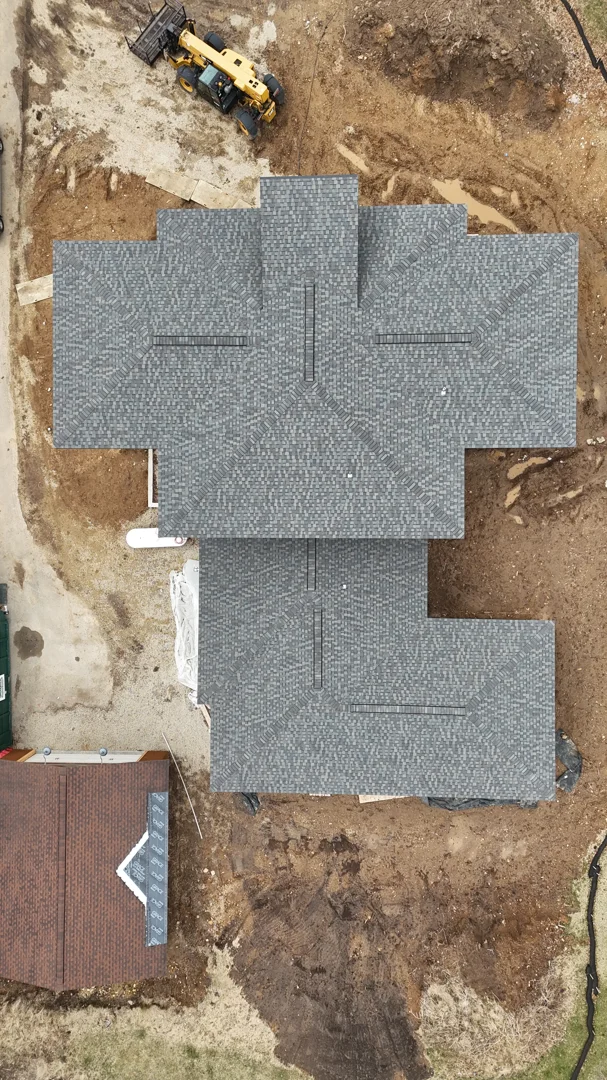
On a classic hip roof, the ridge line is very short, which means there isn’t enough space to install a standard length of ridge vent. In these cases, we have to use specialized hip-ridge vents or a series of strategically placed box vents to ensure adequate exhaust.
For vaulted ceilings (also known as cathedral ceilings or skillion roofs), each individual rafter bay acts as its own miniature attic. Air cannot move sideways from one bay to another. This means every single rafter bay must have its own dedicated intake vent at the bottom and exhaust vent at the top, with a continuous 2-inch airspace maintained above the insulation.
Does an unvented roof void my shingle warranty?
This depends entirely on the shingle manufacturer. Historically, almost all asphalt shingle manufacturers required active, balanced ventilation to honor their warranties. However, as unvented roof designs have become more popular and scientifically proven, many major manufacturers have updated their policies.
Today, most leading brands will cover shingles installed over unvented roofs, provided the roof assembly is designed in strict compliance with local building codes and the insulation prevents structural condensation. Because shingles on unvented roofs run 2°F to 3°F warmer, some manufacturers may slightly reduce the coverage period or require specific underlayments. Always check the fine print of your specific shingle brand before finalizing your design.
Can I combine different types of exhaust vents?
No! This is one of the most common and costly mistakes we see. You should never mix different styles of exhaust vents — such as combining a ridge vent with a gable vent, or adding a powered fan next to static box vents on the same attic space.
When you mix exhaust vents, you “short-circuit” the system. Air always takes the path of least resistance. If you have a ridge vent at the very top of your roof and a gable vent on the side wall, the ridge vent will pull air from the nearby gable vent instead of pulling it from the soffit vents at the bottom of the roof. This leaves the lower half of your attic completely stagnant, trapping heat and moisture where it causes the most damage. Pick one exhaust system and stick with it across the entire roof plane.
Conclusion
Getting your roof ventilation design right is one of the smartest investments you can make in your home’s longevity, structural health, and energy efficiency. Whether you are building a new home in Lake Mills, retrofitting a historic property in Jefferson, or replacing a roof in Fort Atkinson, a balanced system tailored to our cold Wisconsin winters and hot summers will protect your roof deck for decades to come.
To learn more about how your roof impacts your monthly utility costs, check out our resource on the role of roofing in energy efficiency.
If you are ready to stop worrying about ice dams, mold, or high cooling bills, our experienced local team at Smith Roofing & Exteriors is here to help. We serve homeowners throughout Fort Atkinson, Jefferson, Lake Mills, Burlington, Delavan, Elkhorn, Lake Geneva, Walworth, and Edgerton with transparent pricing and superior materials. Contact us today to schedule a comprehensive roof and attic inspection!