Why Metal Roof Leaks Demand a Fast, Proper Fix

Metal roof patching is one of the most effective ways to stop a leak before it turns into a five-figure repair bill.
Here’s the quick answer if you’re in a hurry:
How to patch a metal roof (quick overview):
- Find the leak — trace water stains back to the actual entry point
- Prep the surface — remove rust, debris, and old sealant with a wire brush and sandpaper
- Cut a metal patch — size it at least 3x the hole diameter with a 2-inch overlap on all sides
- Secure it — use self-tapping screws with neoprene washers
- Seal the edges — apply a silicone or polyether sealant rated for metal roofs
- Test it — spray with water and check for drips inside
Metal roofs are built to last — often 40 to 70 years with proper maintenance. But even the toughest roof can develop holes, rust spots, or leaks around fasteners and flashings over time. Harsh Wisconsin winters, freeze-thaw cycles, and heavy storms all take their toll. And ignoring even a small leak? That average $375 patch repair can quickly snowball into thousands of dollars in water damage, mold, and structural repairs.
I’m Matt Smith, owner of Smith Roofing & Exteriors, and I’ve handled metal roof patching on everything from rural farm buildings to residential homes across Wisconsin. Let’s walk through exactly how to get it done right — and when it’s smarter to call in a pro.
Glossary for metal roof patching:
When to Choose Metal Roof Patching vs. Panel Replacement
Before climbing up with a bucket of sealant, you need to decide if a patch is a safe, long-term solution or just a temporary band-aid on a dying roof.
When you evaluate a damaged roof deck, you should verify its structural integrity per ASTM E2278 standards. If a tree branch or hailstone has punctured a clean, isolated hole under 3 inches in diameter, metal roof patching is highly effective and can easily last 10 to 20 years. However, if the metal around the damage is severely corroded, thin, or structurally compromised, a patch won’t hold.
If you want to understand the long-term value of your system, check out The Complete Guide to Metal Roofing. Ignoring even a minor puncture can cause water to travel along the underside of the panels, rotting out your decking far from the actual leak. For more on this, read our guide on Why You Should Never Ignore a Residential Roof Leak Even If It Is Small.
| Feature / Scenario | Metal Roof Patching | Entire Panel Replacement |
|---|---|---|
| Hole / Puncture Size | Under 3 inches in diameter | Over 3 inches or extensive tearing |
| Material Cost | $15 – $50 (DIY materials) | Hundreds per panel + matching profile |
| Average Pro Cost | $200 – $600 (Avg. $375) | $1,000 – $3,000+ |
| Structural Integrity | Excellent for isolated, minor punctures | Required for collapsed or heavily rusted panels |
| Aesthetics | Visible patch (unless painted to match) | Seamless, factory-finished appearance |
| Lifespan | 10 – 20 years with proper sealing | 40 – 70 years (matches roof lifespan) |
Essential Tools and Materials for a Durable Repair
If you are going to tackle this yourself, do not cut corners on your gear. Using the wrong metal or a cheap, non-flexible sealant will guarantee a leak during the next big freeze-thaw cycle in Southeastern Wisconsin.

Here is your master checklist of tools and materials:
- OSHA-approved ladder (minimum 300 lb rating per OSHA 1926.1051) with a sturdy stabilizer
- Tin snips (10-inch offset snips work best for clean, burr-free cuts)
- Wire brush and 400-grit sandpaper (for removing rust and scoring the metal surface)
- Cordless drill/driver with magnetic hex head bits
- Self-tapping roofing screws equipped with EPDM/neoprene washers
- Double-sided butyl roofing tape meeting ASTM D1970 specifications
- Rust-inhibiting primer and manufacturer-approved touch-up paint
- Isopropyl alcohol and lint-free microfiber cloths
- High-performance metal roof sealant
For a professional-grade seal, we highly recommend using a high-solids, solvent-free mastic like NovaFlex Metal Roof Repair & Patch Mastic. It is a 100% silicone formula that stays flexible, won’t crack under extreme temperatures, and cures to a translucent finish that blends in with your roof panels.
Selecting the Best Sealant for Metal Roof Patching
The metal panels on your home are constantly expanding and contracting as the temperature swings from hot summer afternoons to freezing Wisconsin nights. This thermal movement means you must use a sealant with high elongation and flexibility.
- Silicone Sealants: The gold standard. Formulas like NovaFlex offer 500% to 650% elongation, are 100% solvent-free, and are rain-safe in just one hour. They resist UV breakdown and will not dry out or crack.
- Polyether Sealants: Excellent adhesion and high solids content. They stand up well to moisture and can be applied in cold weather.
- Urethane Sealants: Strong adhesion but can degrade faster than silicone when exposed to intense, direct UV sunlight over several years.
- Asphalt/Roofing Tar: Never use black asphalt tar on a metal roof. Asphalt products cure to a rigid state, dry out, crack within a year, and chemically react with premium factory-applied PVDF (Kynar 500) coatings, causing rapid paint failure and rust.
For detailed recommendations on different roof surfaces, see our guide on The Best Roof Sealant for Flat Roofs and Where to Find Them. If you are caught in an emergency situation, products like those outlined in the Storm Patch Wet/Dry Sealant Specifications can be applied in wet conditions to stop active leaks until a permanent metal patch can be installed.
Step-by-Step Guide: How to Patch a Metal Roof
Let’s get to work. Only attempt this repair on a dry, calm day when the metal roof isn’t slick or dangerously hot. Always wear safety glasses, cut-resistant gloves, and soft-soled, non-slip shoes.

Step 1: Surface Preparation and Rust Removal
The number one reason DIY patches fail is poor surface preparation. If you apply sealant over dirt, rust, or old roof cement, it will peel off within a single season.
- Clear the area: Use a putty knife to scrape away any old, failing caulking or sealant.
- Scrub the rust: Take your wire brush and 400-grit sandpaper to scrub away all surface rust and corrosion down to bare, shiny metal.
- Clean and degrease: Wipe the entire area clean using isopropyl alcohol and a lint-free microfiber cloth. This removes manufacturing oils, pollen, and fine dust.
- Prime the metal: Apply a high-quality, rust-inhibiting primer over any exposed steel to halt the oxidation process. Let it dry completely according to the manufacturer’s instructions.
Step 2: Sizing and Cutting the Metal Patch
Your patch must be made of the same metal type and gauge as your existing roof (e.g., galvanized steel, Galvalume, or aluminum) to prevent galvanic corrosion (a chemical reaction that occurs when dissimilar metals touch and get wet).
- Measure the damage: Measure the puncture or hole to the nearest 0.1 inch.
- Calculate patch size: Your metal patch must be at least three times the diameter of the hole, ensuring a minimum of a 2-inch overlap on all sides.
- Cut the patch: Use your tin snips to cut the patch. Ensure the edges are completely burr-free (within a 0.02-inch tolerance) and round off the sharp corners. Sharp 90-degree corners catch snow, ice, and debris, which can eventually pry the patch loose.
Step 3: Securing and Sealing the Metal Roof Patching Area
Now we secure the patch so it functions as a permanent, watertight extension of your roof panel.
- Apply butyl tape: Apply double-sided butyl roofing tape (meeting ASTM D1970) to the backside perimeter of your patch, about 1/4 inch from the edge.
- Position the patch: Place the patch directly over the cleaned, primed damage. Press down firmly with at least 35 psi of contact pressure to compress the butyl tape.
- Fasten the patch: Secure the patch using self-tapping roofing screws with neoprene washers. Space the screws about 1 to 1.5 inches apart around the perimeter. Drive them straight—do not over-tighten them (which crushes and ruins the neoprene washer) or under-tighten them (which leaves a gap for water).
- Seal the edges: Use masking tape to create a clean border 1 inch outside the patch. Apply a continuous, bubble-free bead of high-performance silicone sealant over the edges of the patch and the screw heads. Smooth the sealant with a putty knife or gloved finger, then pull the masking tape while the sealant is still wet.
- Cure: Allow the sealant to cure for at least 4 hours before handling, and 24 hours before exposing it to heavy rain. For more on emergency sealing alternatives, refer to The Ultimate Guide to Flex Sealing Your Leaky Roof.
Step 4: Testing the Completed Repair
Once the sealant has fully cured (typically 24 to 48 hours), you must verify that your patch is actually watertight.
- Water spray test: Direct a garden hose at the patch, spraying at approximately 2 psi from a downward angle (simulating heavy rain) for 5 minutes.
- Inspect the interior: Go into the attic or look under the roof deck to check for any signs of moisture, dampness, or active drips.
- Moisture meter check: If you have access to the roof decking from underneath, use a moisture meter to confirm that the moisture level remains below 0.5% after the test.
- Inspect the sealant: Check the top of the patch for any pinholes or bubbles larger than 2 mm. If any are found, apply a small touch-up of sealant to close them.
Addressing Complex Issues: Flashing, Seams, and Penetrations
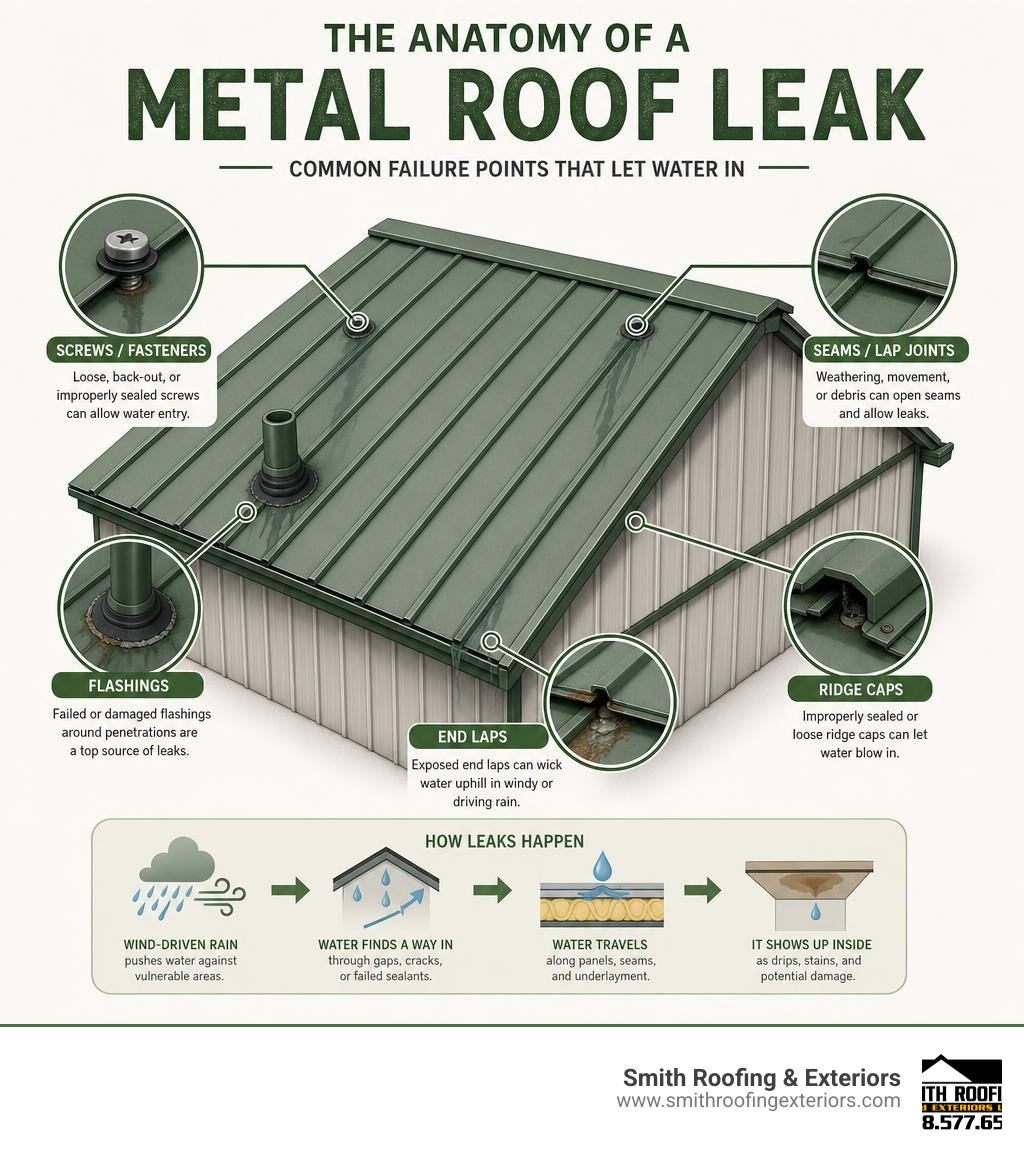
Not all leaks are simple punctures in the middle of a flat panel. In fact, most metal roof leaks occur at transitions, overlaps, and roof penetrations.
- Stack Flashings and Pipe Boots: Rubber pipe boots (or stack flashings) seal the pipes that vent your plumbing. Because rubber degrades under UV light much faster than metal, these boots typically last only half as long as the metal roof itself. If a boot is cracked, you must cut away the old rubber and install a retrofitted split-boot flashing, securing it with a generous bead of silicone and self-tapping screws.
- Seams and Overlaps: Metal roof panels overlap at the seams. Over time, thermal expansion can cause these seams to split slightly. Capillary action—where water is drawn upward through tiny gaps against gravity—can pull moisture right under the seam. To fix this, we back-seal the overlap with butyl tape or apply a reinforced fabric tape embedded in a high-solids silicone coating.
- Curb Flashings: Large penetrations like HVAC units or skylights rely on metal curb flashings. Debris can get trapped on the high side of these curbs, holding moisture and causing rust. Regular cleaning and applying a liquid-applied restoration membrane are the best ways to keep these areas watertight. If you need a quick overview of fixing these areas, check out The Easiest Way to Fix Roof Leak.
Frequently Asked Questions about Metal Roof Repairs
What is the average cost and lifespan of a metal roof patch?
A professionally installed metal roof patch typically costs between $200 and $600 (averaging around $375), depending on accessibility and the extent of the damage. If you choose to go the DIY route, materials will run you between $15 and $50. When properly prepped, secured, and sealed with high-quality silicone, a metal patch can easily last 10 to 20 years.
Why do roofing screws cause the majority of metal roof leaks?
Roofing screws are the single most common source of metal roof leaks. Over time, the rubber neoprene or EPDM washers degrade, dry out, and crack under constant UV exposure and temperature swings.
Additionally, installation errors play a massive role:
- Over-driven screws crush the washer, causing it to squeeze out and split.
- Under-driven screws fail to compress the washer enough to create a seal.
- Crooked screws prevent the washer from sitting flat, leaving a wedge-shaped gap.
- Missed framing occurs when a screw misses the wood or metal purlin underneath, leaving an open hole.
How do climate and roof slope affect patching materials?
In Southeastern Wisconsin, our roofs experience extreme temperature swings, heavy snow loads, and freeze-thaw cycles. This makes high-performance, flexible sealants non-negotiable.
On low-slope roofs, water drains slowly and can pool around patches, seams, and flashings. Low-slope patches require a complete perimeter seal of high-solids silicone to prevent standing water from backing up under the patch. On steep-slope roofs, water drains rapidly, meaning the primary focus is ensuring shed-water flows smoothly over the top of the patch without getting caught on the upper edge.
Conclusion
A small hole in your metal roof doesn’t have to mean a full, expensive replacement. With the right tools, some patience, and a high-quality silicone sealant, metal roof patching is a highly reliable way to protect your home and keep your structural decking dry.
However, climbing onto a metal roof can be dangerous, especially on steep slopes or older, weathered panels. If you have widespread rust, multiple leaks, or simply aren’t comfortable working at heights, it is always safest to call in a certified professional.
At Smith Roofing & Exteriors, we have spent years helping homeowners keep their properties safe and dry. Our local team serves communities throughout Southeastern Wisconsin, including Fort Atkinson, Lake Mills, Jefferson, Burlington, Delavan, Elkhorn, Lake Geneva, Walworth, and Edgerton. We bring the right safety gear, commercial-grade materials, and transparent pricing to every single job.
Don’t let a small drip turn into a major structural headache. Schedule a professional roof repair with Smith Roofing & Exteriors today, and let our experienced team handle the hard work for you!