Get a Free Wind Damage Roof Inspection for Your Insurance Claim
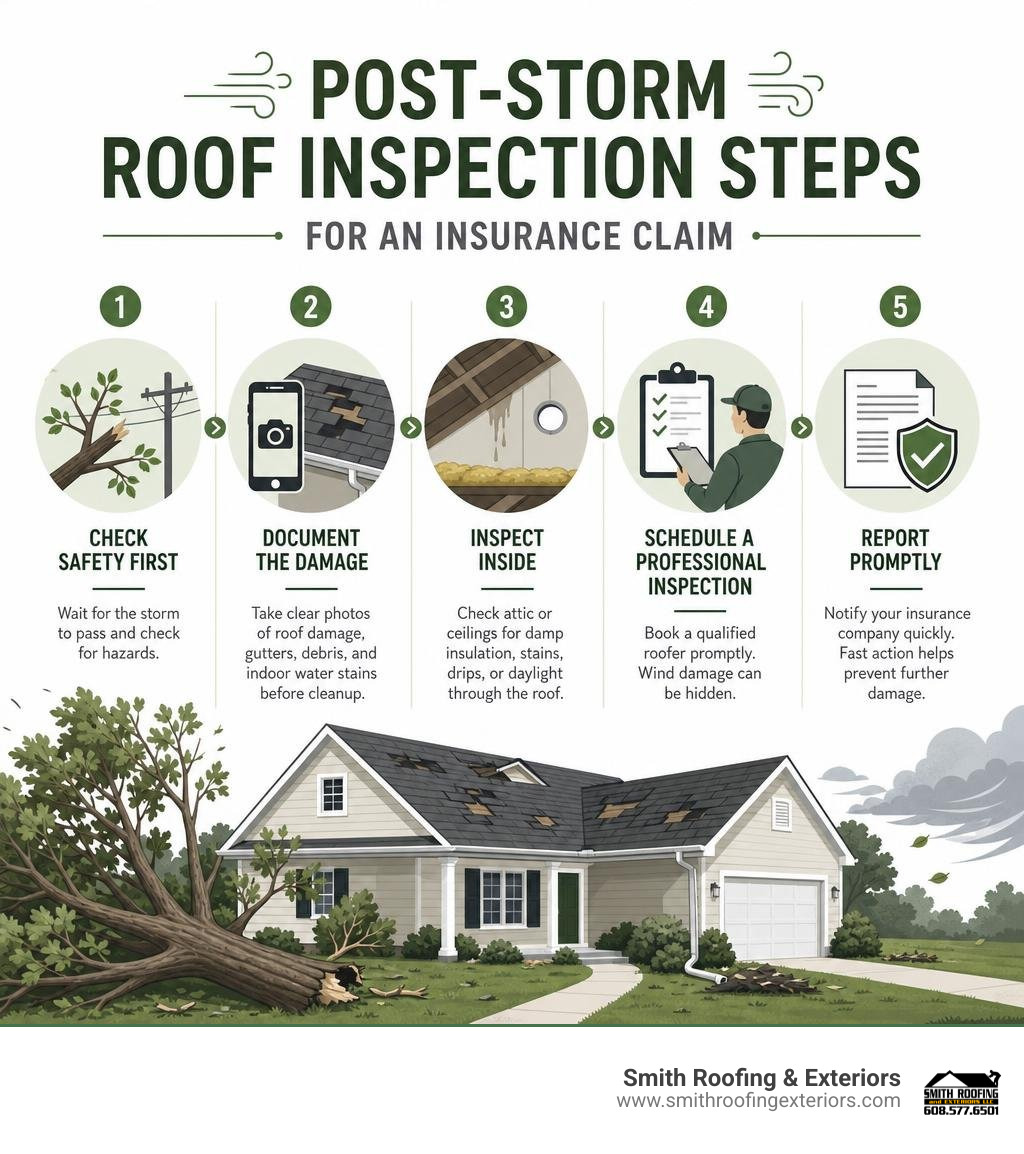
A wind damage roof inspection starts with safety, clear photos, and a prompt call to a qualified local roofer and your insurance carrier. You can inspect from the ground and inside the attic, but avoid climbing onto a wet, steep, or possibly damaged roof.
- Wait until the storm has passed and check for hazards such as downed power lines, fallen trees, and loose debris.
- Photograph missing shingles, lifted edges, damaged gutters, fallen branches, and any indoor water stains before cleanup.
- Check the attic or top-floor ceilings for damp insulation, dark streaks, drips, or daylight through the roof deck.
- Schedule a professional inspection as soon as practical. Wind can break shingle seals or crease materials without blowing shingles completely off.
- Report confirmed damage promptly. Many policies have notice requirements, and fast action can help prevent water damage and mold, which may begin within 24 to 48 hours after moisture enters the home.
High winds can harm a roof well below hurricane strength. The damage often starts at exposed edges, ridges, flashing, and around vents, where wind pressure can lift materials and create a path for rain. A free contractor evaluation can give you documented findings to use when deciding whether to file a claim.
I’m Matt Smith, owner of Smith Roofing & Exteriors. I help Wisconsin property owners understand wind damage roof inspection findings and make informed maintenance, repair, and insurance decisions before small storm issues become major problems.
Wind damage roof inspection terms to remember:
Step 1: Perform a Safe Post-Storm Wind Damage Roof Inspection
When severe weather sweeps through Southeastern Wisconsin—whether across Fort Atkinson, Jefferson, Lake Mills, or Burlington—the immediate aftermath can leave homeowners feeling overwhelmed. Before jumping straight into repairs or calling your insurance agent, your absolute top priority must be safety.
Never walk on a steep, wet, or structurally compromised roof after a high-wind event. High-wind storms frequently loosen shingles, weaken decking, and scatter dangerous power lines or tree limbs across properties. Fortunately, you can collect critical initial evidence without ever putting a ladder against your eaves. To better understand how wind impacts your property, check out Blow Me Away: A Homeowner’s Guide to Wind Damage.
Spotting Exterior Damage From Ground Level
You can conduct a thorough preliminary assessment right from the safety of your lawn. Grab a pair of binoculars and walk the entire perimeter of your home. Stand in far corners of your yard where you have a wide-angle view of every roof slope, ridge, and valley.
Look carefully for the following visible exterior signs:
- Missing Shingles and Exposed Decking: Look for dark rectangular gaps across shingle courses where tabs or entire shingle sheets have torn away.
- Lifted Shingles and Curled Edges: Even if shingles haven’t blown off completely, check if edge rows look flared, raised, or distorted against the sky.
- Granule Loss in Gutters and Downspout Outlets: Heavy wind friction scours protective granules off asphalt shingles. Look for thick, dark sediment piling up inside gutter troughs or spilling onto downspout splash blocks.
- Dented or Detached Gutters: Inspect gutter aprons, fascia, and downspout straps to verify wind forces haven’t pulled drainage assemblies away from the roofline.
- Collateral Metal Damage: Look at soft metal components like metal vent caps, ridge vents, window wraps, and siding. If storm debris or wind impacted your metal fixtures, your roof shingles took a heavy beating as well.
Detecting Interior Leaks and Attic Wind Damage Roof Inspection Signs
While exterior damage gets immediate attention, interior water entry is often where the most expensive damage occurs. According to EPA guidelines, mold can establish itself within just 24 to 48 hours following internal moisture intrusion. That makes prompt interior inspections critical after severe weather events.
Grab a bright flashlight and head up to your attic space (or top-floor ceiling area). Look for subtle indicators that suggest your outer roof barrier has failed:
- Daylight Pinpricks: Turn off your flashlight for a moment and look up at the roof decking. If you see tiny dots of sunlight shining through, wind forces have dislodged shingles or underlayment.
- Water Stains and Ceiling Discoloration: Examine attic rafters, truss bottom chords, and top-floor drywall ceilings for yellow, brown, or dark circular ring stains.
- Damp Attic Insulation: Reach out and touch fiberglass or blown-in insulation directly beneath roof valleys, chimney flashings, or plumbing vents to feel for trapped moisture.
- Musty Odors and Damp Rafters: A wet timber structure emits a distinct damp smell long before water actually drips onto your living room floor.
If you discover active leaks inside your living space, read our emergency guide on Emergency Roof Repair After a Storm: What to Do to mitigate interior loss immediately.
Step 2: Understand How Wind Forces Break Your Roof
To successfully navigate an insurance claim, it helps to understand the physics of how storm winds damage residential roofing systems. Most homeowners assume roofs suffer damage when wind simply slaps directly into the side of a house. In reality, wind damage is primarily caused by air pressure differentials created when wind moves over a structure.
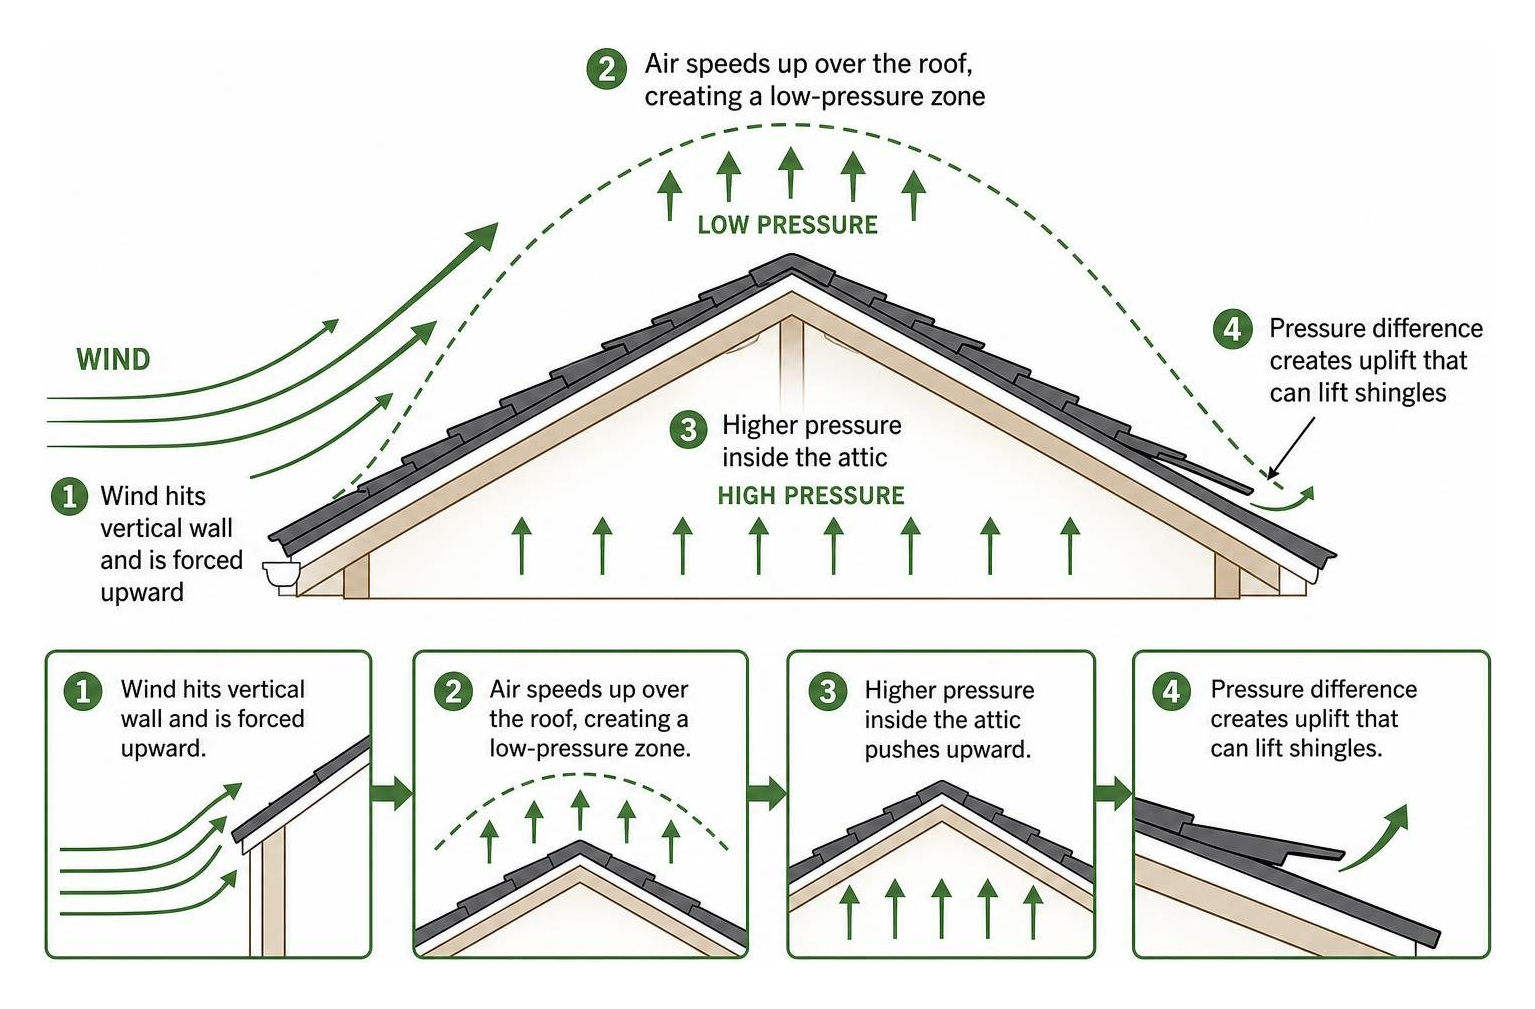
When high wind meets your home’s vertical exterior wall, it is forced upward over the roof edge. As air accelerates over the eaves and ridge line, it creates a severe low-pressure zone directly above the roof surface. Meanwhile, higher atmospheric pressure remains inside the attic or under the shingle layer. This pressure difference creates a powerful upward suction force known as wind uplift.
National weather data shows that real-world roof damage frequently starts at sustained wind speeds as low as 45 to 50 mph—well below official National Weather Service “severe weather” thresholds. In fact, F0 tornadoes (with wind speeds between 65 and 85 mph) represent 53.5% of all tornadic events, proving that moderate to strong wind events are far more common than catastrophic hurricanes or F5 storms.
Identifying Creased Shingles vs Normal Wear
One of the most heavily contested issues during an insurance adjuster’s evaluation is distinguishing actual storm-related wind damage from routine asphalt shingle aging.
When high-wind uplift repeatedly lifts an asphalt shingle, it snaps the factory seal strip that glues adjacent shingle courses together. As the shingle flap bends back and forth in continuous wind gusts, the internal fiberglass mat matrix fractures along a straight horizontal line near the fastener line. This creates a permanent structural defect called a creased shingle.
- Creased Shingles (Wind Damage): Feature sharp, horizontal creasing lines across the top third of the shingle tab. Granules dislodge in a straight dark band directly over the cracked fiberglass core. Shingle tabs lift easily when lightly manipulated because the thermal adhesive seal has failed completely.
- Normal Roof Wear (Aging): Features random, spiderweb-like surface cracking across the entire shingle body caused by long-term UV exposure, thermal expansion, and asphalt drying. Shingles remain securely bonded at their adhesive line despite surface cracking.
When wind breaks adhesive seals across consecutive shingle runs, it triggers a catastrophic failure known as the zipper effect. Once a single leading-edge shingle loses its bond, the wind easily catches the newly exposed underside of the next shingle, peeling back whole sections across an entire roof slope like a unzipping jacket. Read the official industry technical paper on Roof Repair After Strong Winds to see detailed structural guidelines.
Vulnerable Roof Elements: Ridges, Flashing, and Edges
Wind uplift does not apply equal pressure across your entire roof. It concentrates heavily along structural transitions and high-turbulence perimeter areas:
- Eaves and Rake Edges: Roof perimeters experience the highest localized wind uplift. If drip edges or starter shingles are improperly fastened, edge uplift initiates the peeling sequence.
- Ridge Caps: Ridge cap shingles sit directly on the high point of the roof peak where low pressure suction is strongest, making them prone to snapping off or splitting.
- Step and Wall Flashings: High winds drive rain horizontally beneath metal step flashings along sidewalls, dormers, and chimney intersections, causing hidden water leaks even when shingles appear intact.
- Roof Penetrations: Rubber boots surrounding plumbing vent pipes and metal attic power vents can loosen, crack, or twist under intense gusting.
Step 3: Document Storm Damage for Your Insurance Claim
Thorough documentation is the single most critical factor determining whether your insurance claim gets fully approved or partially denied. Insurance adjusters require hard physical and circumstantial evidence showing that property loss resulted directly from a specific, sudden wind event rather than long-term neglect.
Follow this systematic documentation routine immediately following a major wind storm:
- Obtain Official Weather Data: Access official storm reports from Weather.gov or local meteorological logs verifying severe wind gusts in your exact zip code (such as Lake Geneva, Elkhorn, or Edgerton) on the date of the storm.
- Take Timestamped Overview Photos: Photograph all four sides of your home from a distance to establish overall property condition and context.
- Capture Detailed Close-Up Damage Photos: Take clear, well-lit photos of every individual damaged shingle, creased tab, torn ridge cap, or dented downspout. Place a ruler, coin, or small tool next to creases and cracks to establish clear visual scale.
- Document Interior Loss: Photograph wet attic insulation, ceiling water rings, wall paint bubbling, and damaged personal property before starting cleanup.
- Keep Mitigation Receipts: If you must hire emergency professionals to install tarps or boards over open roof holes to prevent active water leaks, keep every single receipt. Emergency mitigation expenses are generally reimbursable under standard homeowners insurance policies.
For a detailed walkthrough on filing your claim step-by-step, review our guide on How to File Roof Insurance Claims in 7 Easy Steps.
Filing Your Claim and Navigating ACV vs RCV Coverage
Most homeowners policies enforce strict notice deadlines—typically requiring storm damage to be reported within 30 to 60 days following the event. Delaying your claim filing gives insurance companies grounds to deny coverage, arguing that interior water issues resulted from post-storm neglect.
When your insurance company reviews your claim, your settlement payout structure will depend heavily on whether your policy is written as Actual Cash Value (ACV) or Replacement Cost Value (RCV):
- Actual Cash Value (ACV): The insurer calculates the total cost to replace your roof, subtracts your policy deductible, and then subtracts an additional amount for age-based depreciation. If your 15-year-old roof suffers storm damage, an ACV payout only covers its depreciated current worth, leaving you to pay the remaining thousands out-of-pocket.
- Replacement Cost Value (RCV): The insurer pays the full current market cost to replace or repair the damaged roof with materials of like kind and quality, minus your policy deductible. Under RCV policies, the insurance company releases an initial check based on ACV, and then releases the remaining “recoverable depreciation” check once repairs are completely finished by your contractor.
To protect your financial interests, check out The Ultimate Guide to Roof Repair Insurance and Claims.
Step 4: Schedule a Professional Wind Damage Roof Inspection and Restoration
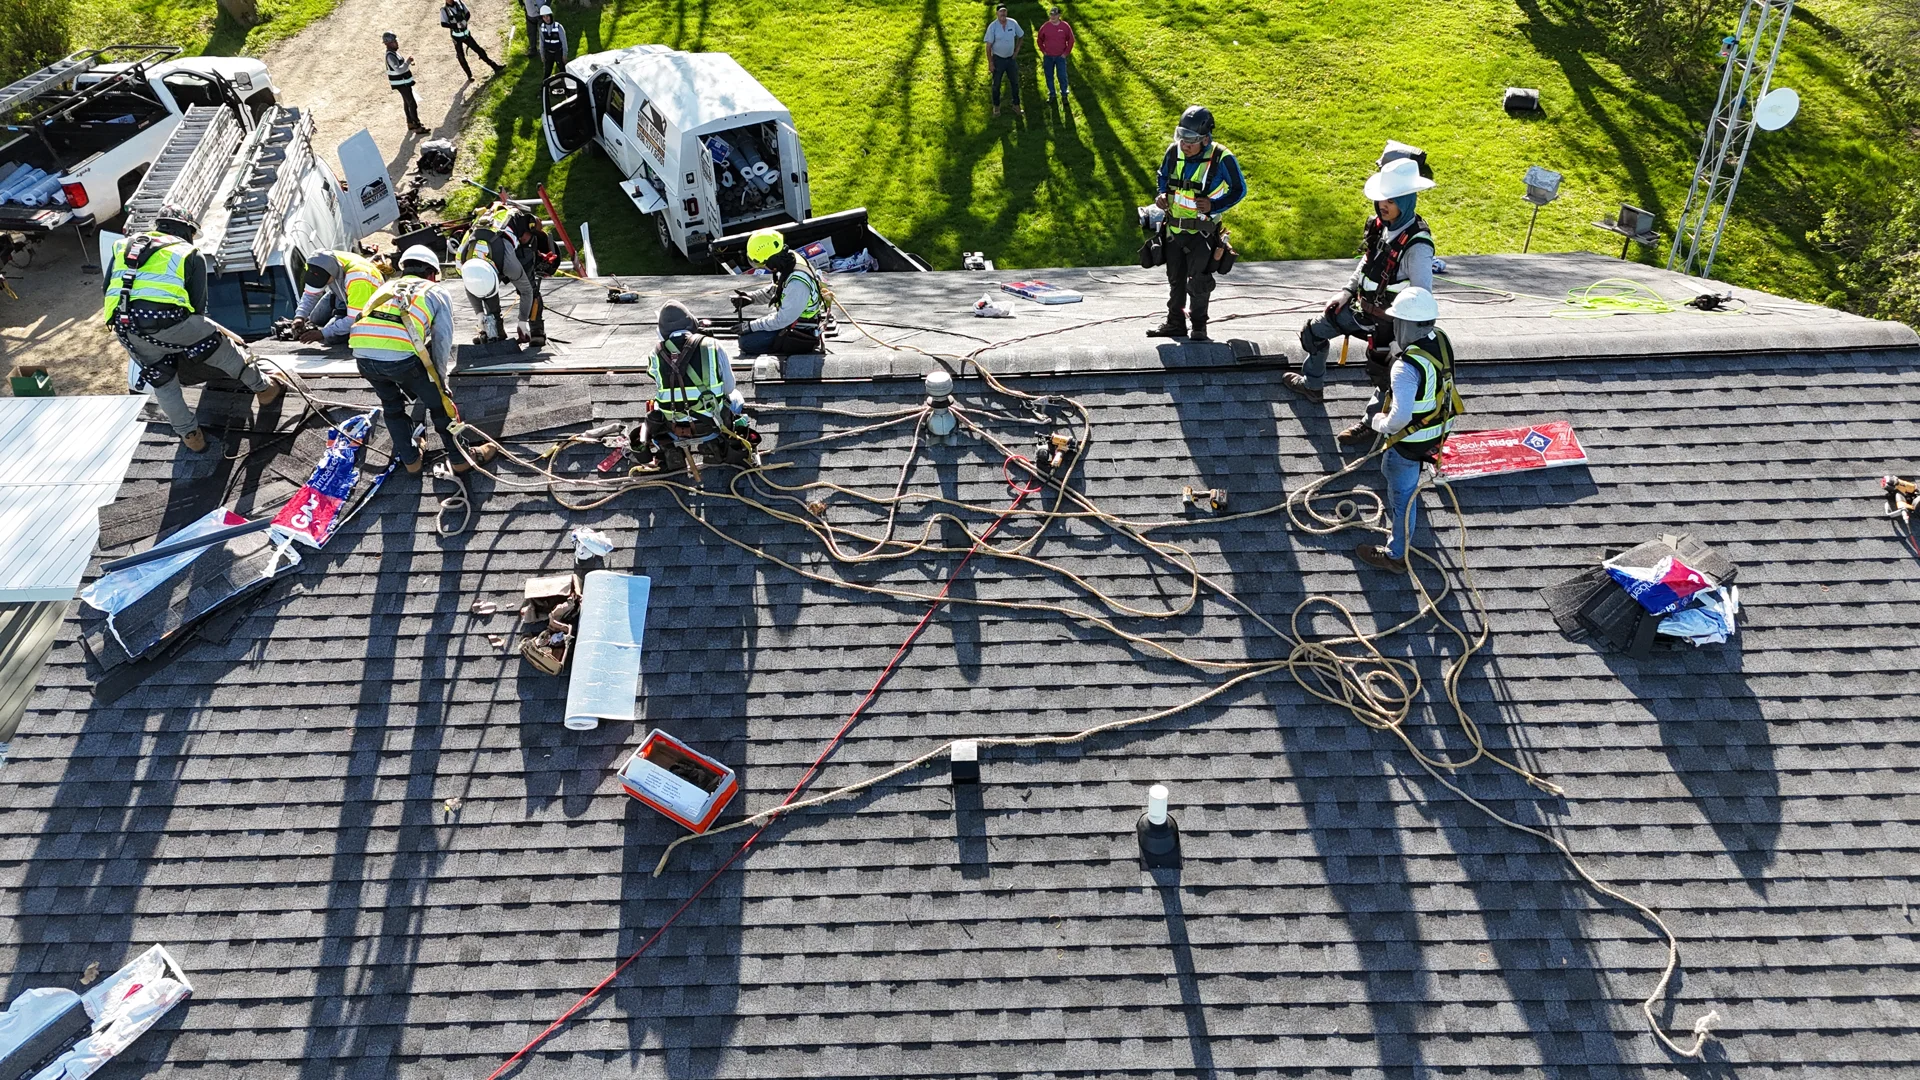
While DIY ground checks and attic reviews provide great starting evidence, insurance carriers rarely approve full roof replacements based on ground photos alone. Securing an accurate claim settlement requires a formal, hands-on physical assessment performed by an experienced, licensed roofing contractor.
Professional Wind Damage Roof Inspection vs DIY Check
A trained storm damage inspector looks at structural elements that homeowners simply cannot see from the ground or attic hatch. Industry best practices rely on forensic standards (such as HAAG Engineering assessment principles) to evaluate roof systems systematically.
During a professional wind damage roof inspection, certified technicians execute a comprehensive 10-point exterior protocol evaluating every component of your building envelope:
- Primary roof field shingles (evaluating seal strip integrity using gentle manual feel checks)
- Ridge cap shingles and mechanical ridge ventilation systems
- Chimney, sidewall, and step flashing seals
- Valley metal channels and underlying leak barriers
- Pipe boots, roof vents, and mechanical penetrations
- Eave starter courses and metal drip edges
- Gutter troughs, downspouts, and fascia board attachment
- Vinyl or aluminum exterior siding and soffit panels
- Metal window cladding, wraps, and screens
- Exterior HVAC condenser unit cooling fins (checking collateral debris impacts)
Roofing professionals also generate detailed estimate reports using industry-standard pricing software called Xactimate. Because insurance adjusters use Xactimate line-item codes to calculate labor and material costs, having your local roofer provide an estimate in the exact same software format ensures your claim scope matches adjuster parameters from day one.
Review our complete checklist on Ultimate Checklist for Roof Inspection to understand what professional inspectors evaluate on your roof.
Deciding Between Roof Repair and Full Replacement
How do contractors and insurance adjusters determine whether a wind-damaged roof can simply be spot-repaired or requires a total roof replacement?
Several crucial technical thresholds guide this decision:
| Evaluation Factor | Spot Repair Candidate | Full Replacement Candidate |
|---|---|---|
| Damage Distribution | Isolated to 1 or 2 small areas on a single roof slope. | Widespread across multiple roof slopes and ridge lines. |
| Shingle Discontinuation | Exact matching shingles are actively manufactured and readily available. | Existing shingles are discontinued, making precise color and size matching impossible. |
| Roof Age | Roof system is under 10–12 years old with flexible asphalt layers. | Roof system is 15–20+ years old with brittle, dried-out asphalt mats. |
| 25% Building Code Rule | Damaged section accounts for under 25% of total roof area. | Local building codes dictate total replacement if over 25% of the roof surface is damaged within a 12-month period. |
| Underlayment & Decking | Roof decking and underlayment remain dry, flat, and structurally sound. | Decking suffers structural rot, sagging, or widespread water saturation. |
If replacement shingles are no longer manufactured, forcing a spot repair with mismatched shingles alters the home’s aesthetic appearance and reduces property value. In these scenarios, contractors can submit shingle samples to forensic laboratories (such as ITEL testing) to document shingle discontinuation, helping convince insurance adjusters to approve full replacement coverage.
For a deeper analysis on choosing the right path for your home, read our guide on Roof Repair vs Replacement: What’s the Right Move.
Step 5: Prevent Future Wind Damage Through Maintenance
While you can’t control severe weather patterns in Southeastern Wisconsin, proactive property maintenance can drastically reduce your roof’s vulnerability to future high-wind events:
- Trim Tree Branches: Keep large tree limbs trimmed back at least 10 feet away from your roofline. Overhanging limbs act as battering rams during high-wind storms and drop heavy debris during squalls.
- Upgrade to High-Wind Class H Shingles: When replacing your roof, select modern architectural shingles carrying ASTM D3161 Class F or ASTM D7158 Class H wind resistance ratings. Class H shingles are laboratory-tested to withstand blown wind speeds up to 110 mph.
- Require a 6-Nail Fastening Pattern: Standard shingle installations utilize 4 nails per shingle tab. In high-wind geographic regions, insist that your roofing contractor utilizes a 6-nail high-wind installation pattern alongside proper nail-line placement to maximize uplift resistance.
- Maintain Clean Gutters: Ensure gutters and downspouts remain free of leaves, pine needles, and ice dams so water flows away smoothly during heavy wind-driven rainstorms.
- Schedule Annual Inspections: Have local roofing professionals conduct routine annual maintenance checkups every spring or fall to catch loose flashings, broken seal strips, or missing caulking before major storms strike.
Frequently Asked Questions About Roof Insurance Claims
How soon after a wind storm should I schedule a roof inspection?
You should schedule a professional wind damage roof inspection within 48 to 72 hours following a major weather event, and certainly within two weeks. Mold and wood rot can initiate within 24 to 48 hours of interior water penetration. Furthermore, standard homeowners insurance policies impose strict reporting deadlines (often between 30 and 60 days). Scheduling an inspection quickly ensures physical evidence remains fresh and uncompromised by subsequent weather.
Will homeowners insurance cover cosmetic wind damage?
Standard homeowners policies generally cover functional wind damage—meaning damage that impairs the roof’s primary purpose of keeping water out of the structure (such as broken seals, torn tabs, creased fiberglass mats, or missing shingles). Purely cosmetic issues that do not affect structural performance or water protection may be excluded under certain specialized policy exclusions. However, because creased shingles and unsealed tabs lead directly to water leaks over time, roofing experts almost always classify creased shingles as functional structural damage.
How do I know if my wind-damaged roof needs repair or total replacement?
Your roof likely needs total replacement if wind damage is scattered across multiple roof slopes, if the existing shingles are discontinued and cannot be matched, if the roof is approaching 20 years of age, or if local building codes enforce the 25% replacement rule. Conversely, if damage is limited to a small, isolated area on a single slope of a relatively new roof with matching shingles readily available, a localized spot repair is usually sufficient.
Conclusion
Navigating a wind damage roof inspection and the subsequent insurance claim process doesn’t have to be overwhelming. By prioritizing safety, conducting ground-level checks, gathering timestamped evidence, and working alongside a trustworthy local roofing professional, you can protect your home and secure the insurance coverage you deserve.
At Smith Roofing & Exteriors, we bring years of local industry expertise, transparent pricing, and 24/7 emergency response to property owners across Southeastern Wisconsin—including Fort Atkinson, Delavan, Walworth, Lake Mills, Jefferson, and Burlington. If high winds or severe storms have impacted your home, don’t wait for minor leaks to turn into costly structural damage.
Contact our local team today to schedule your free, comprehensive storm evaluation. Get professional storm damage roof restoration in Fort Atkinson and secure your home against future weather events.