Emergency Action: Containing Water and Tracing the Leak
When water starts dripping from above, quick action limits interior damage and protects your family. Before jumping into permanent repairs, your immediate focus must be water containment and safety. If you want a deep dive on handling sudden interior water issues, check out our guide on repairing ceiling water damage.
Start by clearing the area beneath the leak. Move rugs, furniture, electronics, and personal keepsakes to another room or cover them with heavy plastic sheets. Place a wide bucket or plastic tub directly under the drip. Lay down towels around the bucket to catch rogue splatters.
If water is dripping anywhere near a ceiling fan, light fixture, or wall switch, do not touch the fixture. Water conducts electricity and creates a serious shock or fire hazard. Go straight to your electrical panel and shut off power to that room’s circuit before proceeding.
Immediate Steps to Prevent Ceiling Collapse
A sagging bulge in your drywall means water is pooling on top of the ceiling paper. Drywall becomes soft and extremely heavy when saturated; eventually, the fasteners fail and a large section can crash down, causing mess and potential injury.
To prevent a sudden collapse, perform a controlled pressure relief:

- Set a large bucket directly beneath the center of the bulge.
- Take a long screwdriver or sharp drill bit.
- Gently push a small hole right into the center (the lowest point) of the water bubble.
- Step back as trapped water drains cleanly into your bucket.
Sometimes latex ceiling paint acts like a rubber balloon, stretching under the weight of trapped water without letting it break through. Piercing this bubble relieves the strain immediately, converting a potential structural failure into a manageable drip.
Diagnosing Plumbing vs Roof Issues Before Fixing a Leak in the Ceiling
Before you can tackle fixing a leak in the ceiling, you must determine where the water is coming from. A roof repair won’t fix a leaking bathroom pipe, and replacing a faucet won’t stop a rain storm from coming through compromised shingles.
Here is how to tell the difference:
- Plumbing Leaks: If water drips continuously regardless of the weather outside, a pressurized supply pipe (copper or PEX) may be cracked. If the drip happens intermittently—such as right after someone takes a shower, flushes a toilet, or runs the dishwasher—it typically stems from a drain line or fixture seal. Read more about repairing ceiling leaks from upstairs bathrooms to pinpoint these issues.
- Roof Leaks: If the leak coincides directly with rainfall, melting snow, or thawing ice dams, the issue is on your exterior shell. Condensation from poorly vented attic space or overflowing HVAC drip pans can also mimic roof leaks during temperature swings.
How to Safely Trace Water Stains to the Roof Entry Point
Water rarely takes a straight path down. It enters a roof penetration, runs horizontally along top plates, down sloping rafters, or along electrical conduits before pooling at a low spot on your drywall.
To trace the source accurately, learn more about how to trace ceiling water stains to the roof source:
- Examine Stain Geometry: A circular stain often indicates a leak coming from directly above. A fan- or cone-shaped stain usually means water is flowing horizontally from a point higher up, spreading outward as it travels.
- Inspect the Attic: Carefully enter your attic with a bright flashlight. Measure the distance from an exterior wall to the stain below, then find that same spot in the ceiling joists. Look upward along the roof rafters for water tracks, dark wood staining, or damp insulation.
- Conduct a Hose Test: On a dry day, have a helper stand inside the attic with a flashlight while you use a garden hose on the roof. Start low near the eaves and run water over small sections for 5 minutes each, slowly moving upward toward the ridge until your helper sees water entering.
Step-by-Step Process for Fixing a Leak in the Ceiling
Once you have located the precise entry point on your roof, you must secure the exterior shell before tackling interior drywall work. Discovering the root cause makes fixing a roof leak far more manageable.
Primary Causes of Roof-Based Ceiling Leaks
Roof leaks rarely happen in the middle of a blank field of undamaged shingles. Instead, they occur at flashing transitions, roof penetrations, and valleys.
| Leak Source | Percentage of Roof Leaks | Common Vulnerability |
|---|---|---|
| Flashing Failures | ~40% | Rusted, missing, or improperly sealed metal around chimneys, sidewalls, and step transitions. |
| Valley Defects | ~15% | Heavy water volume wearing out sealant or lifting shingle seams where two roof slopes meet. |
| Ice Dams | ~10% | Melted snow re-freezing at cold eaves, backing water up under shingles during winter. |
| Missing / Damaged Shingles | ~10% | High winds tearing off shingles or hail cracking underlying asphalt matting. |
| Nail Pops | ~10% | Thermal expansion pushing roof nails up through shingles, creating direct water paths. |
| Ridge Cap Failure | ~5% | Aging ridge shingles cracking open at the peak of the roof. |
Patching Roof Vulnerabilities and Sealing Shingles
If weather conditions prevent an immediate permanent roof overhaul, you can apply temporary stopgap measures. Detailed steps on how to seal your shingles to stop a leak can keep your home dry while you plan a complete repair.
For active leaks during heavy downpours, use high-grade asphalt seals designed for wet applications, such as applying wet patch roof sealant in a downpour. These heavy-bodied mastics adhere to wet shingle surfaces, buying you critical time until the storm passes.
For standard repairs:
- Replace Damaged Shingles: Use a pry bar to gently lift the overlapping shingles above the damaged shingle. Pull out the exposed roof nails, slide out the broken shingle, insert a new one, and nail it securely into place.
- Reseal Flashing: Lift compromised step flashing or vent boots, clean out dried sealant, apply fresh polyurethane roof sealant, and secure loose edges with corrosion-resistant roofing nails capped with sealant.
Restoring Water-Damaged Ceiling Drywall
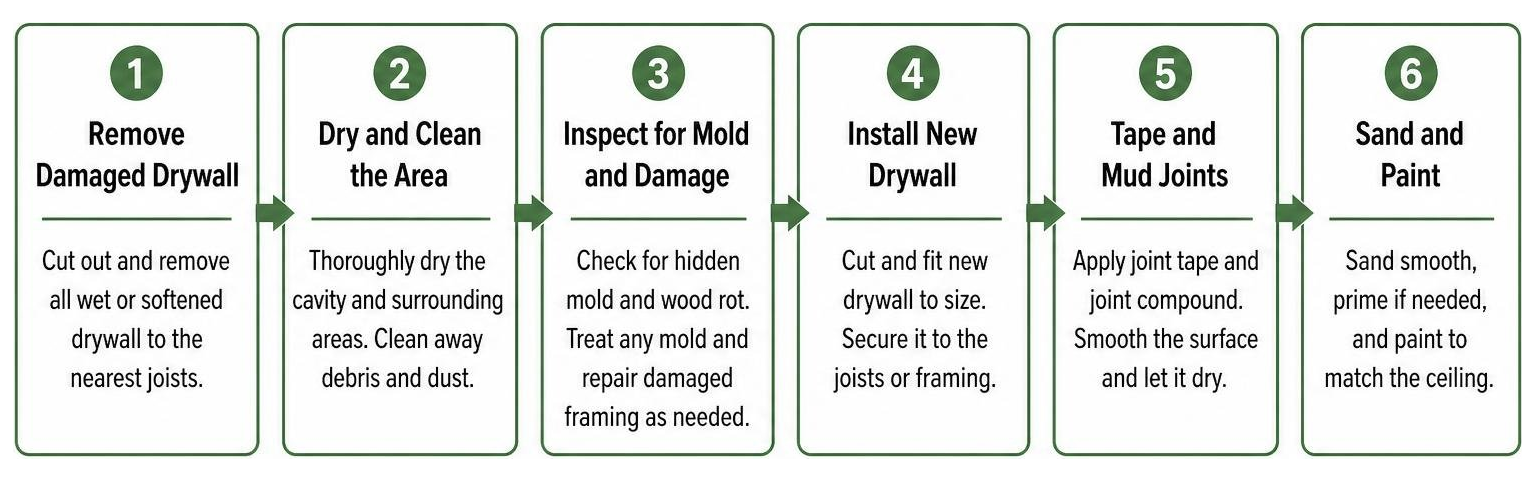
With the water source completely repaired, you can safely pivot toward interior ceiling restoration. For comprehensive drywall techniques, read through detailed insights on fixing broken ceiling water damage and troubleshooting a leaking ceiling.
Inspecting for Hidden Mold and Wood Rot
Never cover up wet building materials. Sealing trapped moisture behind new drywall creates an ideal environment for harmful mold spores and structural decay.
Before patching:
- Test Timber Moisture: Use a pin-type moisture meter on attic joists and subfloors. Moisture levels must fall below 15% before you seal the cavity.
- Perform the Screwdriver Pick Test: Press a flathead screwdriver firmly into structural framing. If the blade sinks more than 1/8 inch into soft, spongy wood, rot has set in, and structural members must be sistered or replaced.
- Treat for Mold: Spray all exposed framing with a non-bleach, concrobium-based mold inhibitor. Mold can establish colonies within 24 to 48 hours in moist environments, so fast action is vital.
Cutting, Patching, and Mudding Ceiling Drywall
Small water stains can simply be sealed, but drywall that is sagging, crumbling, or soft to the touch must be replaced.
- Cut out the Damage: Use a jab saw to cut a clean, rectangular hole around the water damage. Extend your cuts back to the centers of nearby structural ceiling joists. Square cutouts are far easier to patch cleanly than round or jagged shapes.
- Install Back-Blocking Cleats: Screw 1×3 or 2×4 wooden cleats along the back edges of the opening where joist support is lacking. This “back-blocking” provides a solid lip to support the new patch and prevents future seam cracking.
- Fit and Secure the Patch: Cut a new panel of drywall (typically 5/8-inch thickness for ceiling fire ratings) about 1/8 inch smaller than your opening. Secure it to the joists and cleats using dimpled drywall screws spaced every 6 to 8 inches.
- Tape and Mud: Bed fiberglass mesh or paper tape over the seams using joint compound. Apply two to three thin coats of joint compound, feathering each layer 2 to 4 inches wider than the previous coat using a 10- or 12-inch taping knife. Lightly sand smooth once thoroughly dry.
Priming and Painting Water Stains
If you skip using a specialized primer, water-soluble tannins and mineral deposits from old ceiling leaks will bleed right through standard latex wall paint—no matter how many coats you apply!
Apply two coats of an oil-based (like KILZ Original) or shellac-based (like Zinsser B-I-N) stain-blocking primer over the patched or stained section. Once the primer dries completely, apply a matching ceiling paint over the entire ceiling plane to ensure a seamless color blend.
Professional Assistance, Costs, and Insurance Coverage
Understanding when to attempt a DIY fix versus hiring a professional contractor keeps your home safe and saves money in the long run. Small leaks can quickly evolve into structural threats if ignored; read more about why you should never ignore a residential roof leak.

Average Costs and Financial Considerations for Fixing a Leak in the Ceiling
Costs vary depending on whether the source is plumbing or roofing, and how extensive the interior damage is:
- DIY Ceiling Patching: Materials (drywall, cleats, tape, joint compound, stain-blocking primer) typically cost between $50 and $200.
- Professional Roof Leak Repair: Simple shingle or flashing fixes usually range from $300 to $1,500.
- Professional Plumbing & Drywall Restoration: Fixing upstairs plumbing combined with professional drywall replacement and ceiling texturing generally runs between $500 and $2,500.
- Average US Professional Ceiling Repair: Most basic cosmetic and structural ceiling repairs fall between $300 and $1,200.
Navigating Homeowners Insurance for Ceiling Water Damage
Homeowners insurance policies usually cover water damage if it is sudden and accidental—such as a storm blowing off shingles or a pipe bursting without warning. However, policies almost universally exclude damage resulting from neglected maintenance, such as an aging roof that should have been replaced years ago.
Because many minor roof leak repairs cost less than standard policy deductibles ($1,000 to $2,500), homeowners often pay for simple repairs out-of-pocket. For severe storm damage, consult our detailed guide on roof repair insurance and claims.
Preventing Future Ceiling Water Leaks
An ounce of prevention goes a long way toward keeping your ceilings dry. Protecting your investment requires routine seasonal checks on your roof and home exterior.

Essential Roof and Gutter Maintenance Checklist
Incorporate these tasks into your home maintenance routine, or check out our full list of proper roof maintenance tips:
- Clean Gutters Bi-Annually: Clear leaves and debris every spring and fall. Ensure gutters maintain a slope of at least 1/4 inch vertical drop per 10 feet of horizontal run so water drains freely.
- Inspect Flashing and Boot Seals: Check step flashing around chimneys and rubber boot seals around plumbing vents annually. Flashing failures cause 40% of all roof leaks!
- Trim Overhanging Trees: Cut back branches hovering within 6 feet of your roofline to prevent shingle abrasion and keep debris out of gutters.
- Check Ventilation and Attic Insulation: Ensure attic exhaust fans and ridge vents function properly to prevent ice dams during Southeastern Wisconsin winters.
Frequently Asked Questions About Ceiling Water Leaks
How quickly does mold grow after a ceiling leak?
Mold growth can begin within 24 to 48 hours in moist environments. To prevent spores from multiplying, set up commercial fans and dehumidifiers immediately to bring timber and drywall moisture below 15%.
Can you paint directly over a dried ceiling water stain?
No. Water-soluble minerals and tannins will dissolve into standard interior latex paint, causing the brown stain to bleed right back through. You must apply an oil-based or shellac-based stain-blocking primer before applying latex ceiling paint.
How long can a roof leak go unnoticed before structural decay occurs?
Active roof leaks can rot wood decking and joists within 60 to 120 days of sustained moisture exposure. Slow, intermittent leaks may go unnoticed inside walls for months, quietly compromising timber structural integrity over time.
Keep Your Home Protected with Expert Help
Fixing a leak in the ceiling requires a systematic approach: containing the initial drip, accurately diagnosing whether plumbing or roofing is at fault, making durable exterior repairs, and restoring water-damaged drywall safely. Addressing small moisture issues right away protects your home’s structural integrity, interior finishes, and indoor air quality.
If you suspect your ceiling leak is coming from roof damage, flashing failure, or seasonal ice dams, don’t climb onto a slick roof alone. Our local team at Smith Roofing & Exteriors brings years of hands-on experience, transparent pricing, and 24/7 emergency response to homeowners throughout Fort Atkinson, Jefferson, Lake Mills, Burlington, and surrounding Southeastern Wisconsin communities.
When you need reliable, lasting solutions for your home, turn to our expert roof repair services in Fort Atkinson. Contact us today to schedule a thorough roof inspection and keep your family warm and dry all year long!