Why Choosing the Right Heavy Duty Roof Sealant Can Save You Thousands
A heavy duty roof sealant is a waterproofing compound — available as a liquid coating, tape, or caulk — used to seal leaks, seams, and penetrations on roofs exposed to harsh weather.
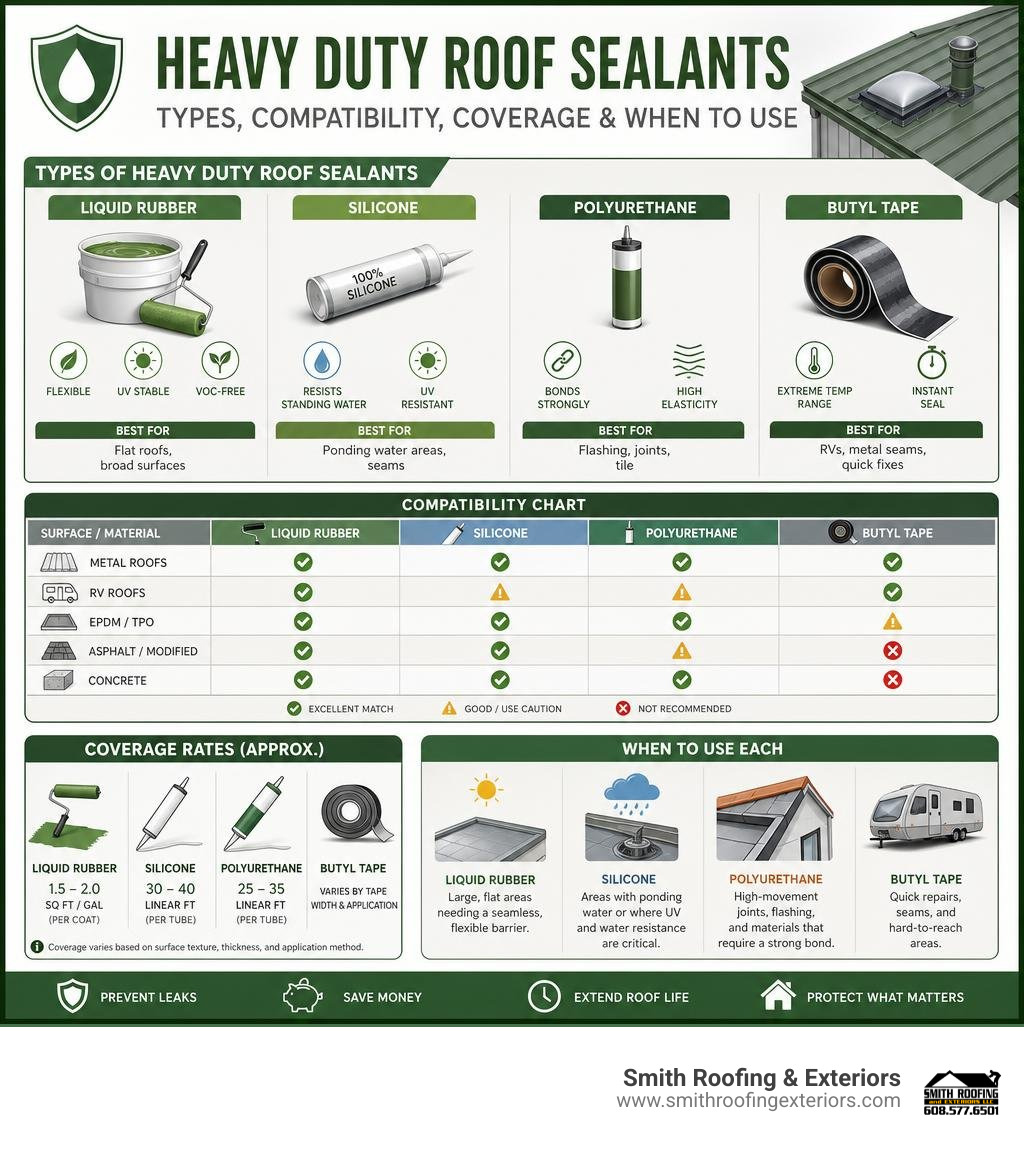
The most common types and their best uses:
| Type | Best For | Key Strength |
|---|---|---|
| Liquid Rubber | Flat roofs, broad surfaces | Flexible, VOC-free, UV stable |
| Silicone | Ponding water areas, seams | Resists standing water, UV |
| Polyurethane | Flashing, joints, tile | High elasticity, bonds strongly |
| Butyl Tape | RVs, metal seams, quick fixes | Instant seal, extreme temp range |
A small drip on your ceiling rarely starts where you think it does. Water travels along rafters and decking before it ever shows up as a stain — which means by the time you notice it, the damage has already spread. In Wisconsin’s climate, where freeze-thaw cycles put constant stress on roofing materials, catching and sealing that weak point early is the difference between a $30 tube of sealant and a full roof replacement.
The problem is that not every sealant works on every roof. Using the wrong product — say, a standard acrylic coating on a ponding water section, or silicone tape over an existing silicone sealant — can make things worse. This guide breaks down exactly which sealants work where, how to apply them correctly, and what to avoid.
I’m Matt Smith, owner of Smith Roofing & Exteriors, and over the years I’ve seen how the right heavy duty roof sealant — properly applied — can add years to a roof’s life and save homeowners serious money. Let’s walk through everything you need to know to make the right call for your roof.
Choosing the Right Heavy Duty Roof Sealant for Your Project
Choosing the right heavy duty roof sealant is not a one-size-fits-all decision. The chemical bases of these products vary wildly, affecting how they stretch (their elastomeric properties), how they hold up to the sun, and how they bond to different materials. If you pick a sealant that lacks the flexibility to handle your roof’s natural movement, it will crack and pull away within a single season.
When evaluating sealants, you must consider the “dynamic joint movement” of your roof. Roofs are living structures; they expand in the blazing heat of July and contract in the freezing depths of January. A high-quality elastomeric sealant is designed to stretch and return to its original shape without losing its bond. Let’s look at the four primary categories of heavy-duty sealants you will encounter.
Liquid Rubber: The Flexible Heavy Duty Roof Sealant
Liquid rubber is a highly versatile, bitumen-based or polymer-modified coating that has taken the DIY and professional market by storm. To put its popularity into perspective, over 2,000,000 gallons of Liquid Rubber Waterproof Sealant have been sold worldwide.
What makes liquid rubber so popular for flat and low-slope roofs is its seamless application and incredible safety profile. It is completely UV stable, VOC-free, and non-toxic, meaning you do not have to wear a respirator or worry about harsh chemical fumes entering your home or RV during application.
When you apply liquid rubber, it goes on as a thick liquid and cures into a continuous, highly elastic membrane. This eliminates the seams where traditional roofing materials typically fail. It is also incredibly user-friendly: it goes on brown when wet and dries to a deep black, giving you a clear visual indicator of when it is fully cured. If you want to dive deeper into how this material can protect your home, check out The Ultimate Guide to Flex Sealing Your Leaky Roof.
Silicone: The Best Heavy Duty Roof Sealant for Ponding Water
If your roof has low spots where water pools for days after a rainstorm, silicone is your absolute best defense. Unlike water-based acrylics or some polyurethane sealants that break down when submerged, silicone is naturally hydrophobic and completely impervious to standing water.
High-performance silicones, such as those detailed in this TECHNICAL DATA SHEET, are formulated as high-solids, paste-grade materials. This means they do not shrink as they cure, allowing you to build up a thick, protective layer over high-stress areas like seams, fasteners, and penetrations.
Furthermore, silicone provides unmatched UV resistance. It reflects solar radiation, which prevents the material from drying out, chalking, or cracking under the sun. This thermal flexibility ensures that even during extreme temperature swings, your seams and flashings remain tightly sealed.
Polyurethane: Ideal for Joints and Flashing
Polyurethane is the heavy hitter of the sealant world when it comes to raw adhesive strength and joint movement. It is the go-to choice for sealing flashing around chimneys, skylights, and roof valleys where structural shifting is most pronounced.
A prime example of this technology is PL ® Roof and Flashing Polyurethane. This commercial-grade polyurethane sealant will harden within 24 hours, is functional within 3 days, and will fully cure in 7 days. Once cured, it provides a highly elastic seal with a joint movement capability of ±35%. This means it can stretch and compress dramatically without tearing or losing its grip on metal, wood, or masonry.
Polyurethane is also incredibly durable and paintable, making it ideal for visible areas of your roof. If you are dealing with loose shingles or exposed roofing nails, polyurethane is the perfect adhesive to secure them back down. For a step-by-step look at how to handle these specific repairs, read our guide on how to Seal Your Shingles and Stop the Leak.
Butyl Tape: The Quick-Fix Solution for RVs and Metal Seams
When you need an instant, mess-free waterproof barrier, heavy-duty butyl tape is unmatched. Unlike liquid sealants that require hours or days to cure, butyl tape creates an immediate, mechanical watertight seal the moment you apply pressure.
Premium butyl tapes, like EternaBond® RoofSeal™ – H.B. Fuller, utilize advanced MicroSealant technology. This is a 100% solids formulation of synthetic resins, thermoplastics, and non-curing rubber with a built-in primer. It features an incredible tensile strength of 1200 PSI and remains flexible at temperatures as low as -57°C (-70°F). This extreme low-temperature flexibility makes it virtually impossible for thermal shock to crack the seam and cause a leak.
Butyl tape is highly favored for sealing RV roof seams, metal roof overlaps, and window flanges. However, be warned: the adhesive is incredibly aggressive. Once it touches a surface, it bonds instantly, meaning you have to position it perfectly on your first try.
Surface Compatibility and Coverage Rates

Before you buy a single gallon or tube of sealant, you must verify that it is chemically compatible with your roof’s substrate. Applying the wrong sealant can lead to adhesion failure, chemical degradation of the roofing membrane, or unsightly discoloration. For a complete understanding of your roofing system, check out The Complete Guide to Metal Roofing.
Single-Ply Membranes and Metal Roofs
Single-ply membranes like EPDM (synthetic rubber), TPO (thermoplastic), and PVC are highly common on flat residential roofs, commercial buildings, and RVs. Each of these materials reacts differently to sealants:
- EPDM: Requires highly flexible sealants. Liquid rubber and premium butyl tapes bond exceptionally well to EPDM, but they often require a specialized EPDM primer first to ensure maximum long-term adhesion.
- TPO & PVC: These thermoplastic membranes can be slick and difficult to bond to. You must use sealants specifically rated for TPO/PVC, and a dedicated primer is almost always necessary to prevent the sealant from peeling off like tape.
- Metal (including Galvalume): Metal roofs expand and contract aggressively. Silicones, polyurethanes, and butyl tapes are excellent for metal seams and fasteners because they can handle this thermal movement. If you are considering upgrading your roof entirely, you might want to explore Why Your Next Roof Should Be a Galvalume Standing Seam Masterpiece. If you just need a quick fix for an existing metal roof, we have a detailed guide on Holy Sheet How to Patch a Hole in a Metal Roof.
Asphalt and Concrete Substrates
Asphalt-based roofs (such as modified bitumen, built-up roofs, and traditional shingles) and concrete decks present their own unique challenges:
- Asphalt Bleed-Through: If you apply a light-colored silicone or acrylic sealant directly over asphalt or modified bitumen, the oils in the asphalt will leach into the new coating, causing yellow or brown staining. To prevent this, you must apply a pre-catalyzed, water-based epoxy/acrylic primer to lock in the asphalt oils before applying your topcoat.
- Concrete Porosity: Concrete is highly porous and holds moisture. Before applying any heavy-duty liquid sealant, concrete must be thoroughly cleaned, etched to open up its pores, and completely dry to prevent trapped moisture from bubbling the cured coating.
For those working with asphalt shingles or modified bitumen, our step-by-step guide on How to Repair Asphalt Roof in 7 Easy to Follow Steps offers practical advice to ensure your repair lasts.
Coverage Area Calculations
To avoid running out of material mid-project or over-buying, you need to understand how coverage rates translate to real-world application. Coverage is determined by the desired “mil thickness” (one mil is 1/1000 of an inch) of the cured sealant:
- Flat/Ponding Surfaces: Liquid coatings require a much thicker build to withstand standing water. For a flat roof, you typically need to apply 1 gallon per 15 square feet (spread across 4 to 5 heavy coats) to achieve a robust 60–80 mil dry film thickness.
- Vertical Surfaces: Vertical applications (like parapet walls or RV siding) require less thickness because water drains off quickly. Here, coverage is usually 1 gallon per 30 square feet (achieved in 2 to 3 coats) for a 30 mil dry film thickness.
- Linear Joint Coverage: For tube-applied caulks like Designed for Dynamic Joint MovementROOF PLUS, a standard 10 fl. oz. cartridge will yield approximately 31 linear feet of a 1/4-inch bead. If you increase the bead size to 3/8-inch, the coverage drops to about 13.8 linear feet.
How to Prepare and Apply Roof Sealants
Ask any professional roofer, and they will tell you the same thing: 90% of all roof sealant failures are caused by poor surface preparation. If you apply a premium, $150-a-gallon heavy duty roof sealant over dirt, dust, or old flaking caulk, it will bond to the debris rather than the roof, causing it to peel away in a matter of weeks. If you want to learn the easiest path to a successful repair, start with The Easiest Way to Fix Roof Leak.
Step-by-Step Surface Preparation
To ensure a permanent bond, follow this rigorous preparation protocol:
- Debris Removal: Sweep away all loose dirt, leaves, and moss. Use a pressure washer if necessary, but allow the roof to dry completely (usually 24 to 48 hours) before proceeding.
- Wire Brushing & Scraping: Use a razor blade, putty knife, or wire brush to remove every trace of old, failing caulk, loose paint, rust, and asphalt tar.
- Solvent Cleaning: Wipe down the repair area with a non-residue solvent like acetone or lacquer thinner. This removes invisible oils, grease, and salt that compromise adhesion.
- Priming: If you are working with EPDM, TPO, or highly porous concrete, apply the manufacturer-recommended primer. Allow the primer to dry for the specified time (usually 30 minutes to an hour) and apply your sealant on the exact same day.
Application Techniques for Liquid, Tape, and Caulk
Depending on the format of your chosen sealant, your application technique will vary:
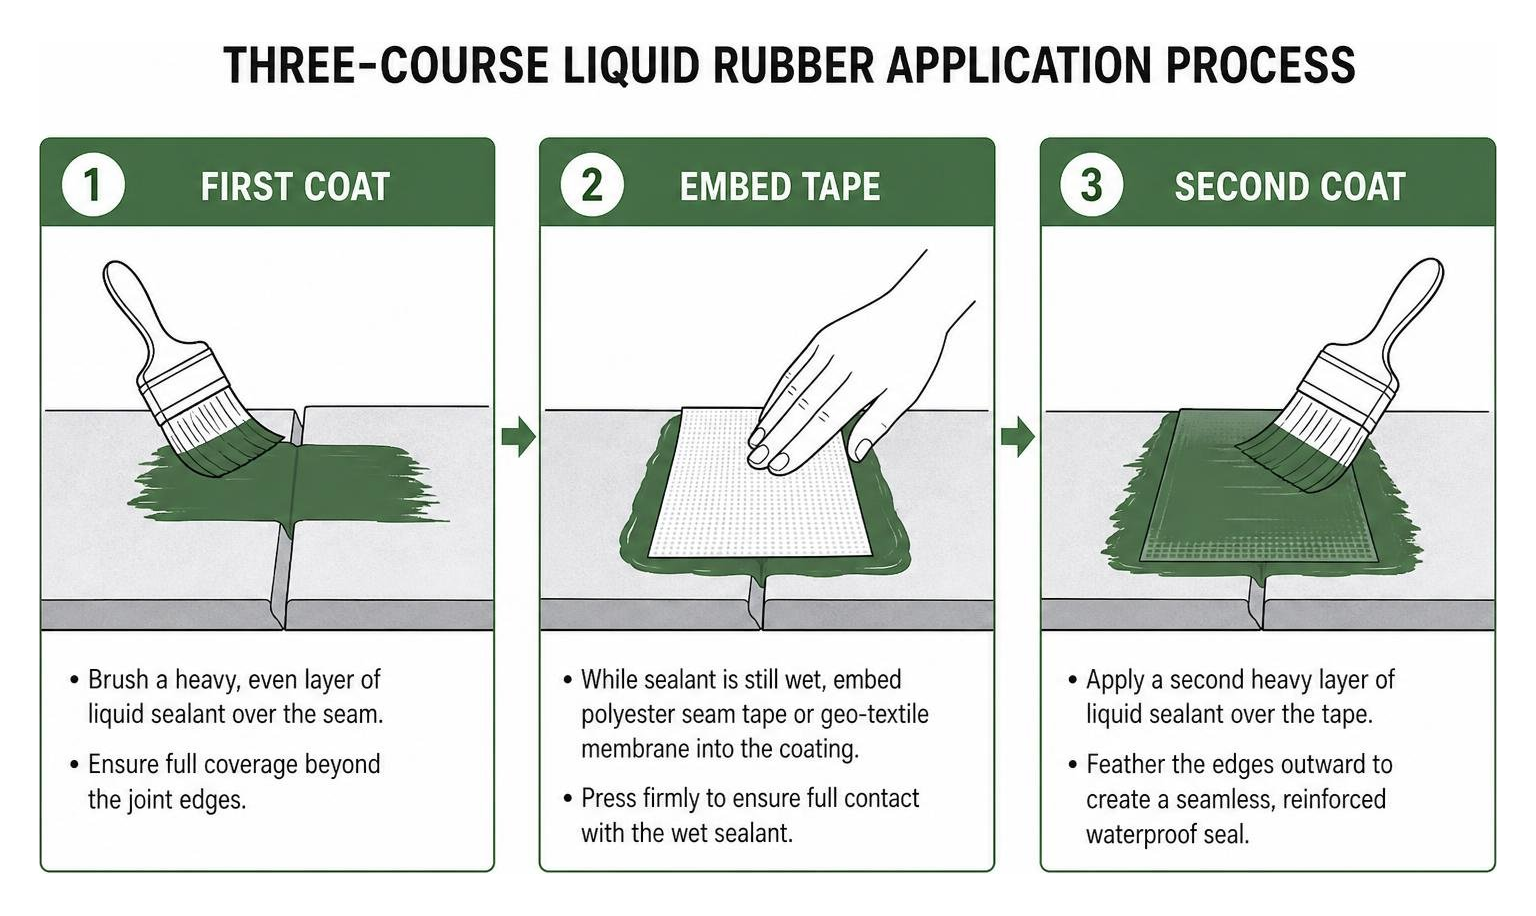
- Liquid Coatings (The Three-Course Method): When sealing seams, joints, or penetrations with liquid rubber, you must reinforce the area. First, brush a heavy layer of liquid sealant over the seam. While it is still wet, embed a polyester seam tape or geo-textile membrane directly into the coating. Finally, apply a second heavy layer of liquid sealant over the tape, feathering the edges outward. This creates an incredibly strong, reinforced bridge.
- Butyl Tape: Measure and cut the tape to size. Peel back a few inches of the release liner, align the tape carefully, and press it down. Continue peeling the liner while smoothing the tape. Once in place, use a heavy steel roller to apply firm, even pressure across the entire surface. This mechanical pressure activates the MicroSealant chemical bond.
- Caulk & Joint Sealants: When caulking joints with a polyurethane or hybrid polymer, you must maintain the correct joint depth-to-width ratio. Ideally, the sealant depth should be half the width of the joint (minimum 1/4 inch, maximum 1/2 inch). If the joint is deeper than 1/2 inch, you must insert a closed-cell backer rod first. When gunning the sealant, always push the nozzle forward ahead of the bead to force the material deep into the joint, and tool it flat within 5 minutes.
Lifespan, Weather Limitations, and Avoiding Sealant Failure
A high-quality heavy duty roof sealant should last anywhere from 10 to 20 years, but its actual lifespan is heavily influenced by environmental factors and installation quality. In Southeastern Wisconsin, our roofs endure brutal winter freeze-thaw cycles, heavy snow loads, and humid summer heat. This constant thermal movement can quickly expose any flaws in your repair. If you are dealing with an active leak and feeling overwhelmed, take a breath and read Don’t Let the Drip Drive You Crazy with Fast Roof Repair.
Why Roof Sealants Fail
Understanding why sealants fail is the best way to prevent it from happening to your roof:
- Three-Sided Adhesion: When sealing an expansion joint, the sealant must only bond to the two opposing sides of the joint. If it bonds to the bottom of the joint as well (three-sided adhesion), it cannot stretch properly when the joint moves, causing the sealant to tear down the middle. Always use a backer rod or a polyethylene bond-breaker strip to prevent this.
- Over-Thinning: Trying to stretch a gallon of liquid coating further than recommended results in a cured film that is too thin. This thin membrane will quickly crack under UV exposure and thermal expansion.
- Applying Over Wet Substrates: Trapping moisture under a non-breathable sealant like silicone will cause the moisture to turn to vapor when the sun heats the roof. This vapor pressure creates large blisters that eventually pop and ruin the seal.
Weather and Temperature Limitations
Traditional solvent-based and water-based sealants are highly sensitive to the weather during application. Water-based acrylic elastomeric coatings should never be applied if rain is forecast within 24 hours, or if temperatures will drop below 41°F (5°C) before they cure.
However, modern hybrid polymers have changed the game. Advanced sealants like EVOSEAL MS combine the best properties of silicone and polyurethane. They can be applied in temperatures as low as 30°F (-1.1°C) and will adhere directly to damp or completely wet surfaces. This makes them invaluable for emergency repairs when you cannot wait for a dry, sunny day.
Frequently Asked Questions About Roof Sealants
Can heavy duty roof sealants be applied in wet or cold weather?
Yes, but only if you choose the right chemical formulation. Traditional sealants require a completely dry surface and temperatures above 40°F to bond and cure. However, if you are facing a severe winter storm or an active leak in standing water, you can use an ultra-premium rubberized wet patch sealant.
Products like Henry 209 Extreme Wet Patch Roof Leak Repair: Ultimate Leak Protection in All Conditions are specifically engineered to penetrate standing water and establish 100% wet surface adhesion. It can be applied in freezing temperatures down to -20°F (-28.9°C) and remains easily spreadable even in extreme cold, allowing you to stop a damaging leak instantly.
Are heavy duty roof sealants safe for indoor use?
Generally, no, unless they are specifically labeled as VOC-free and non-toxic (like some liquid rubber formulations). Many professional-grade roof sealants are solvent-based and release high levels of Volatile Organic Compounds (VOCs) as they cure.
If you are applying a solvent-based sealant to a commercial or residential roof, you must close all nearby HVAC air intakes until the solvents have completely dissipated. This prevents harmful fumes from being drawn into the building’s ventilation system and causing respiratory irritation to the occupants inside.
How do roof sealants compare in cost to a full roof replacement?
There is no comparison: a targeted roof repair using a heavy-duty sealant is a fraction of the cost of a full replacement. While a professional roof replacement can cost anywhere from $8,000 to over $20,000 depending on the size and material, a high-quality sealant repair kit typically costs between $50 and $300.
By performing preventative maintenance and sealing minor leaks early, you can easily extend the lifespan of an existing flat or metal roof by 5 to 10 years. If you are working with a tight budget and want to maximize your savings, check out our guide on How to Repair Flat Roof on a Budget.
Conclusion
A heavy duty roof sealant is one of the most cost-effective and powerful tools in your home maintenance arsenal. Whether you are patching a seam on your camper before a road trip or reinforcing the flashing around your home’s chimney, choosing the correct chemical base and preparing the surface meticulously will ensure your repair stands up to the elements for years to come.
While many small patches are well within the reach of a handy DIYer, larger flat roofs and complex metal roofing systems require a professional touch to guarantee a lifetime of leak-free performance. If you want to explore the absolute best products for low-slope structures, read our expert analysis on The Best Roof Sealant for Flat Roofs and Where to Find Them.
At Smith Roofing & Exteriors, we have spent years protecting homes and commercial properties throughout Southeastern Wisconsin, including Fort Atkinson, Lake Mills, Jefferson, Burlington, Delavan, Elkhorn, Lake Geneva, Walworth, and Edgerton. If you suspect your roof has a leak, or if you want a professional, worry-free application of commercial-grade sealants, our local team is here to help with transparent pricing and 24/7 emergency services. Contact us today to schedule your roof inspection!